How-To: Managing Application Secrets in AWS Secrets Manager
Introduction
This guide provides step-by-step instructions for common tasks related to managing your application's secrets using AWS Secrets Manager and the integrated Kubernetes setup. It assumes you have a basic understanding of AWS, Kubernetes concepts (Pods, Deployments, Services, Secrets, ConfigMaps), Git, and Helm templating.
Jump to your task:
- How to View Your Application's Secrets in AWS
- How to Update an Existing Secret's Value
- How to Reference a Shared Secret (Created by another team/process)
- How to Change an Application's Secret Type (e.g., env to json)
- How to Add an Additional Secret to an Existing Application
- How to Set Up Secrets for a New Application
Prerequisites
- Access to the AWS Management Console via AWS Identity Center (SSO) using your team-specific role (e.g.,
Ncia). This role grants permissions based on Permission Sets configured by the platform team. - Access your application's Git deploy repository (containing its Helm chart).
- Access to the Cluster-Manager Repository (permissions to create branches and Merge Requests).
- Basic familiarity with editing YAML and JSON files and using Git.
- Understanding that the underlying IAM Roles and Kubernetes Service Accounts linkage (IRSA) is configured by the Platform team based on the Cluster-Manager repository definitions. Your primary interactions are with AWS Secrets Manager (via Console), your app's Helm chart (
SecretProviderClass,Deployment,values.yaml), thecluster-managerrepository (for permissions), and potentiallykubectlfor verification.
How to View Your Application's Secrets in AWS
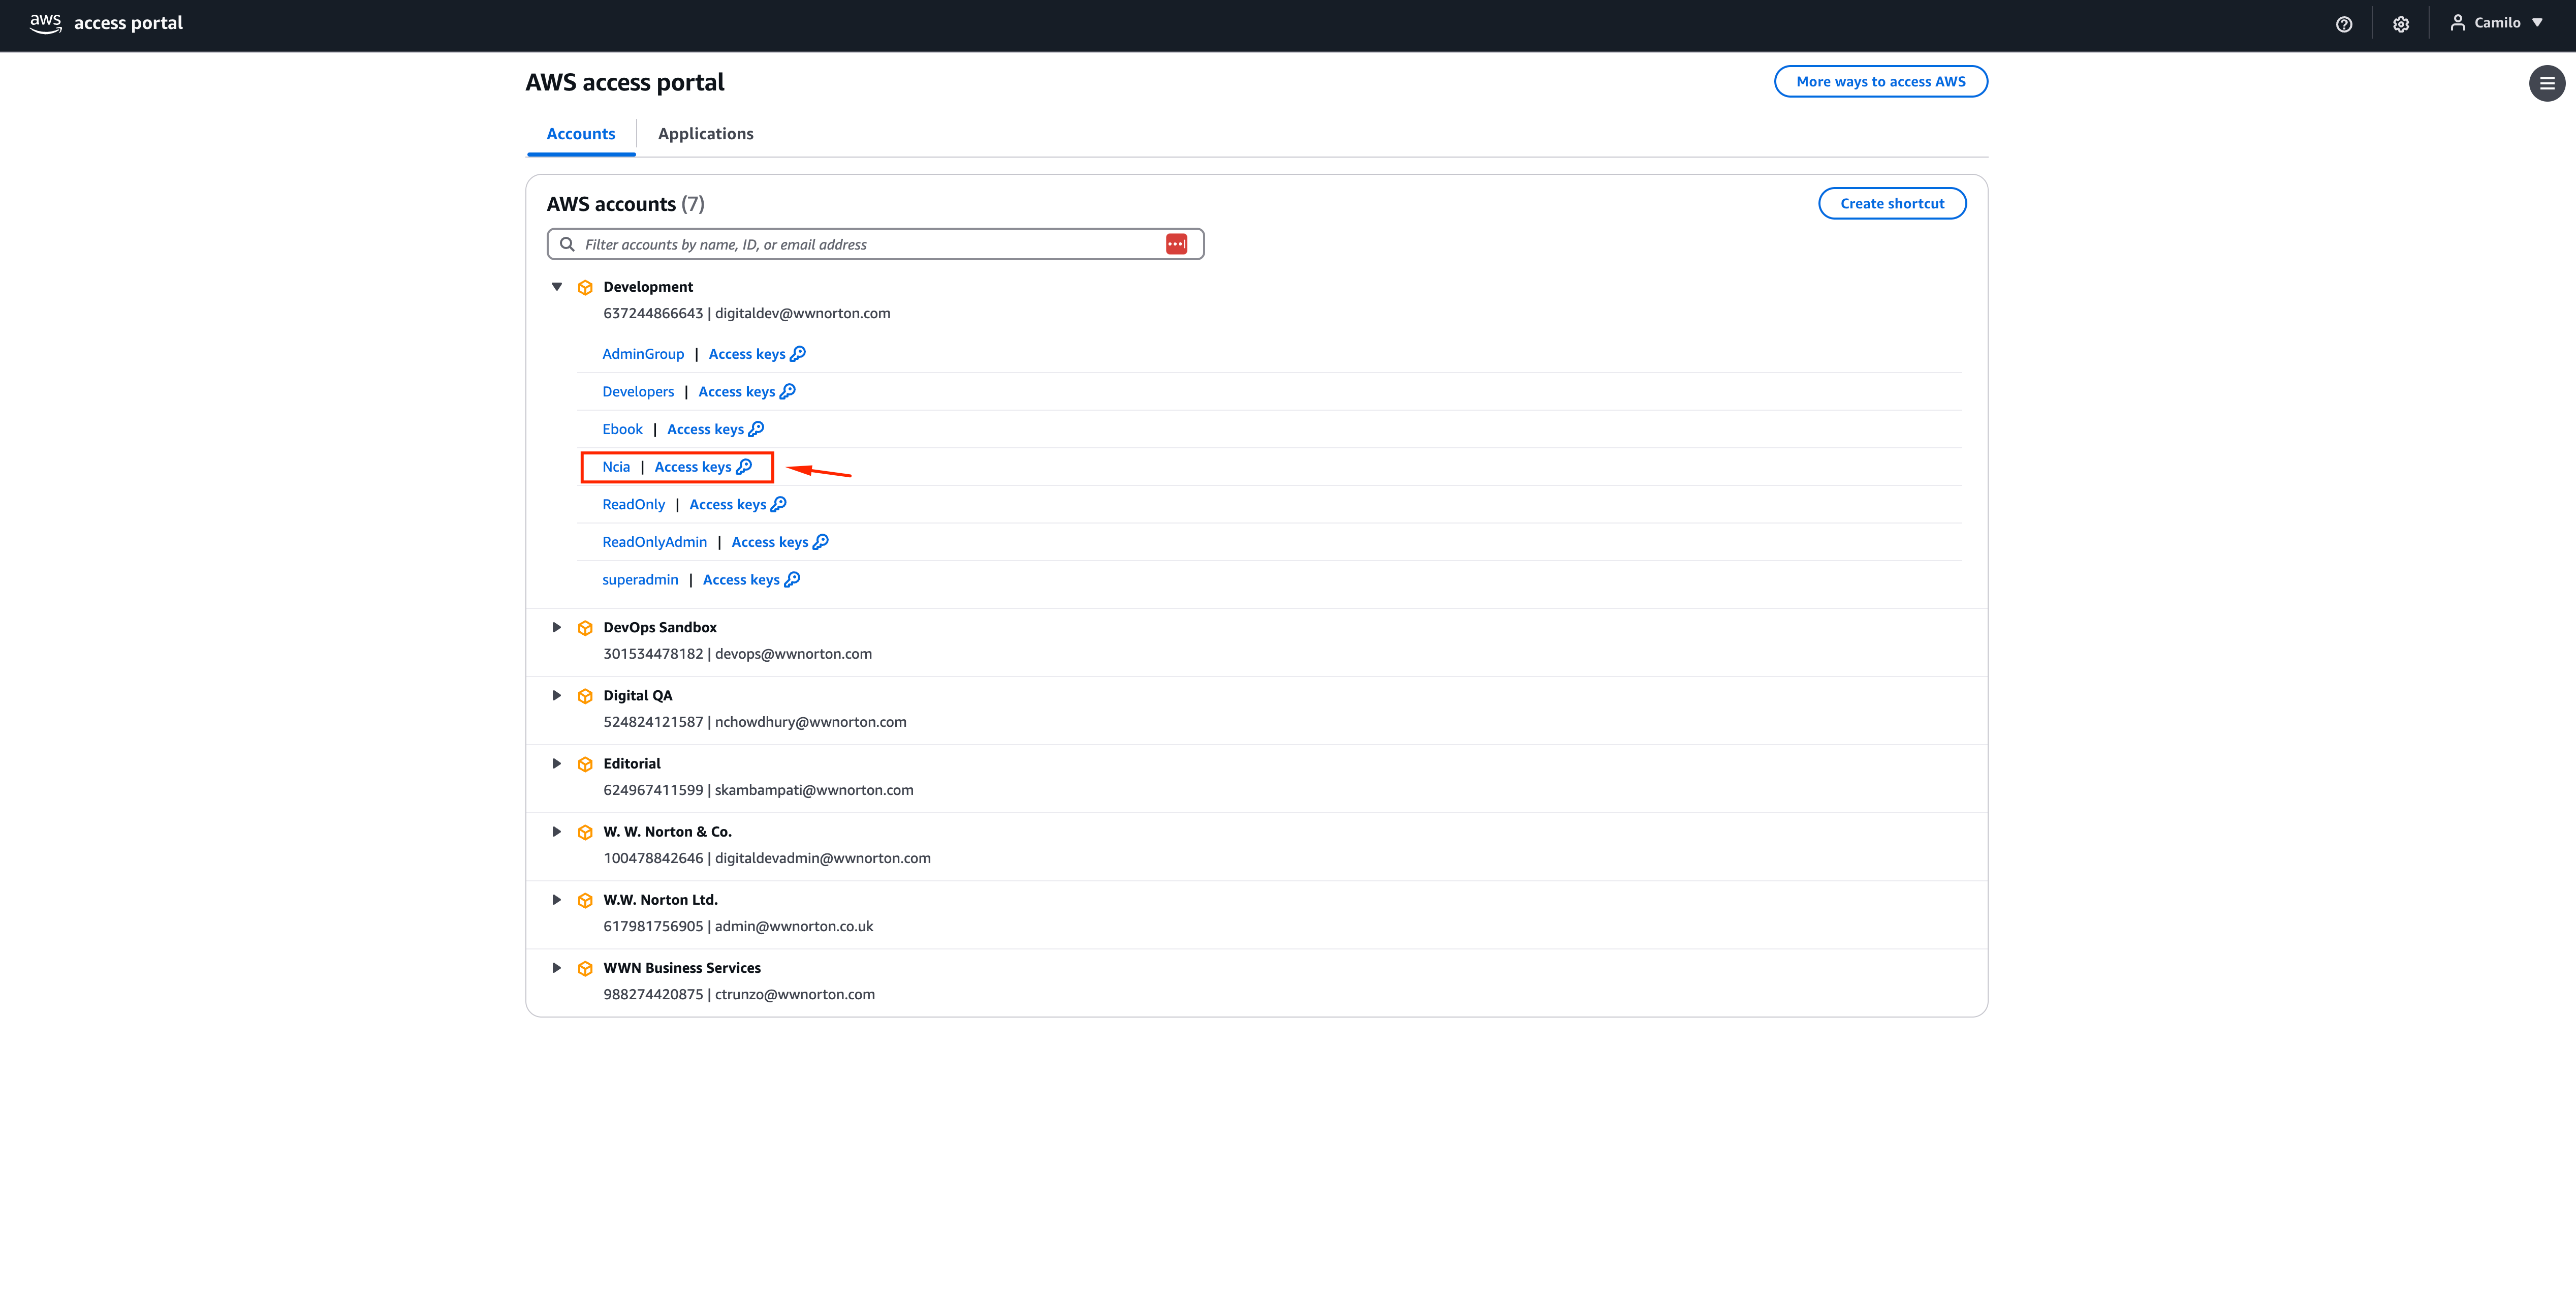
Step 1: Log in to AWS
Access the AWS Console using your SSO credentials. Select the appropriate AWS account (e.g., Development, Production) and your assigned team role (e.g., Ncia).
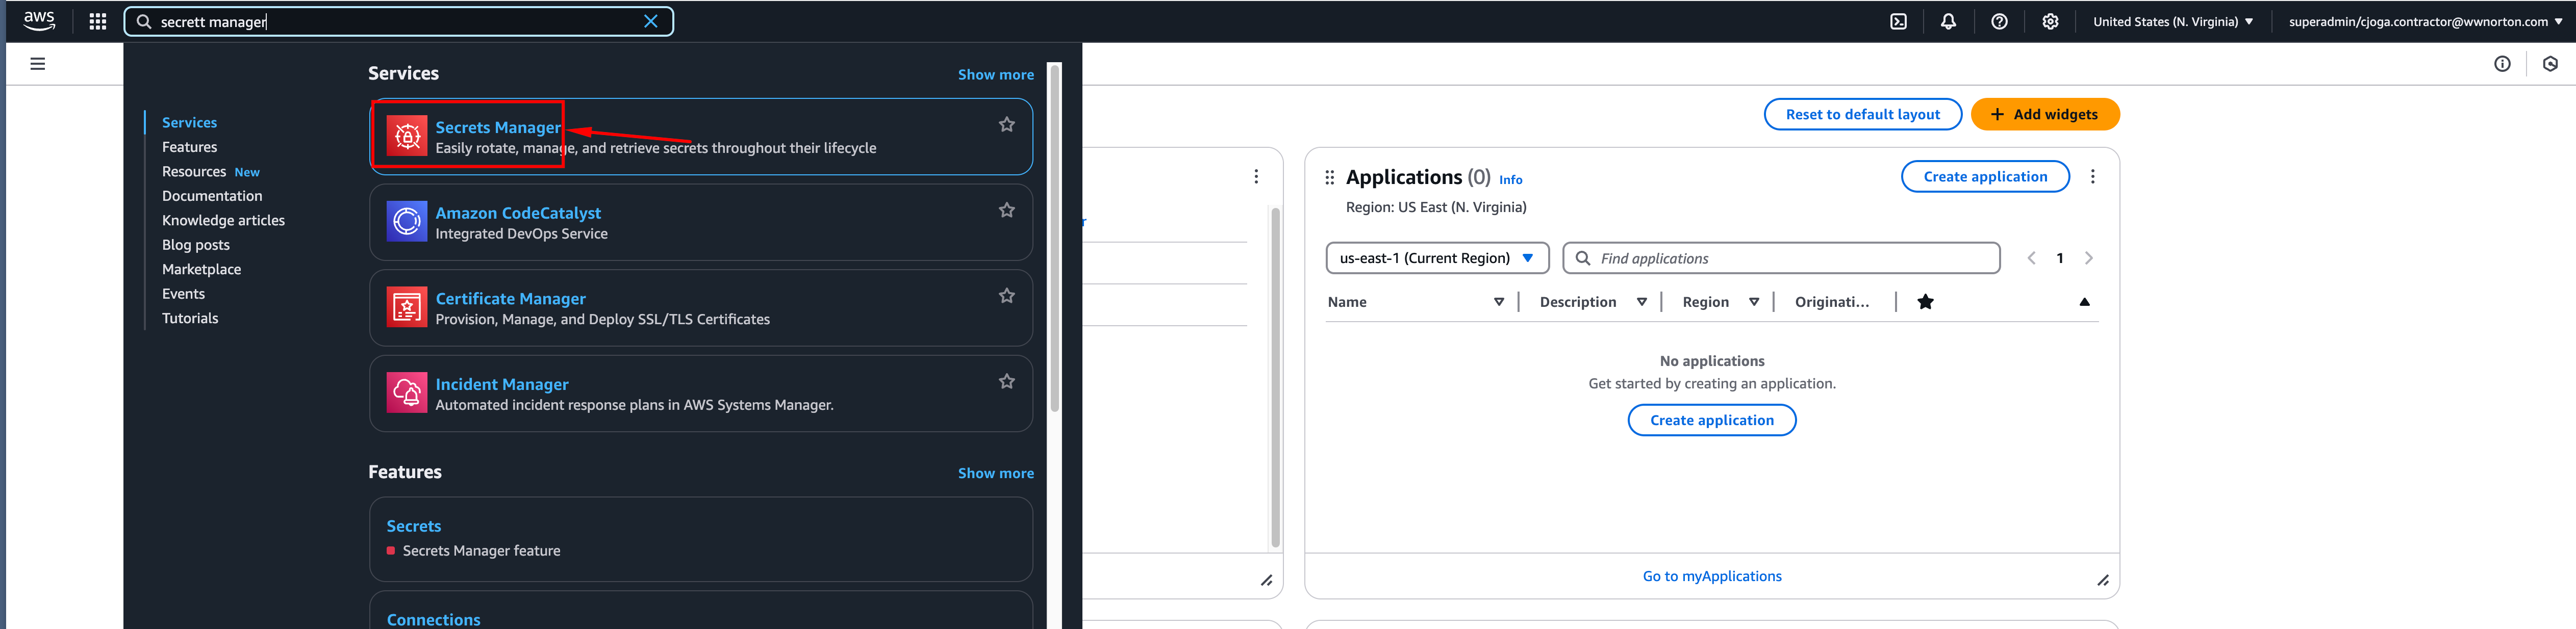
Step 2: Navigate to Secrets Manager
Go to the Secrets Manager service.
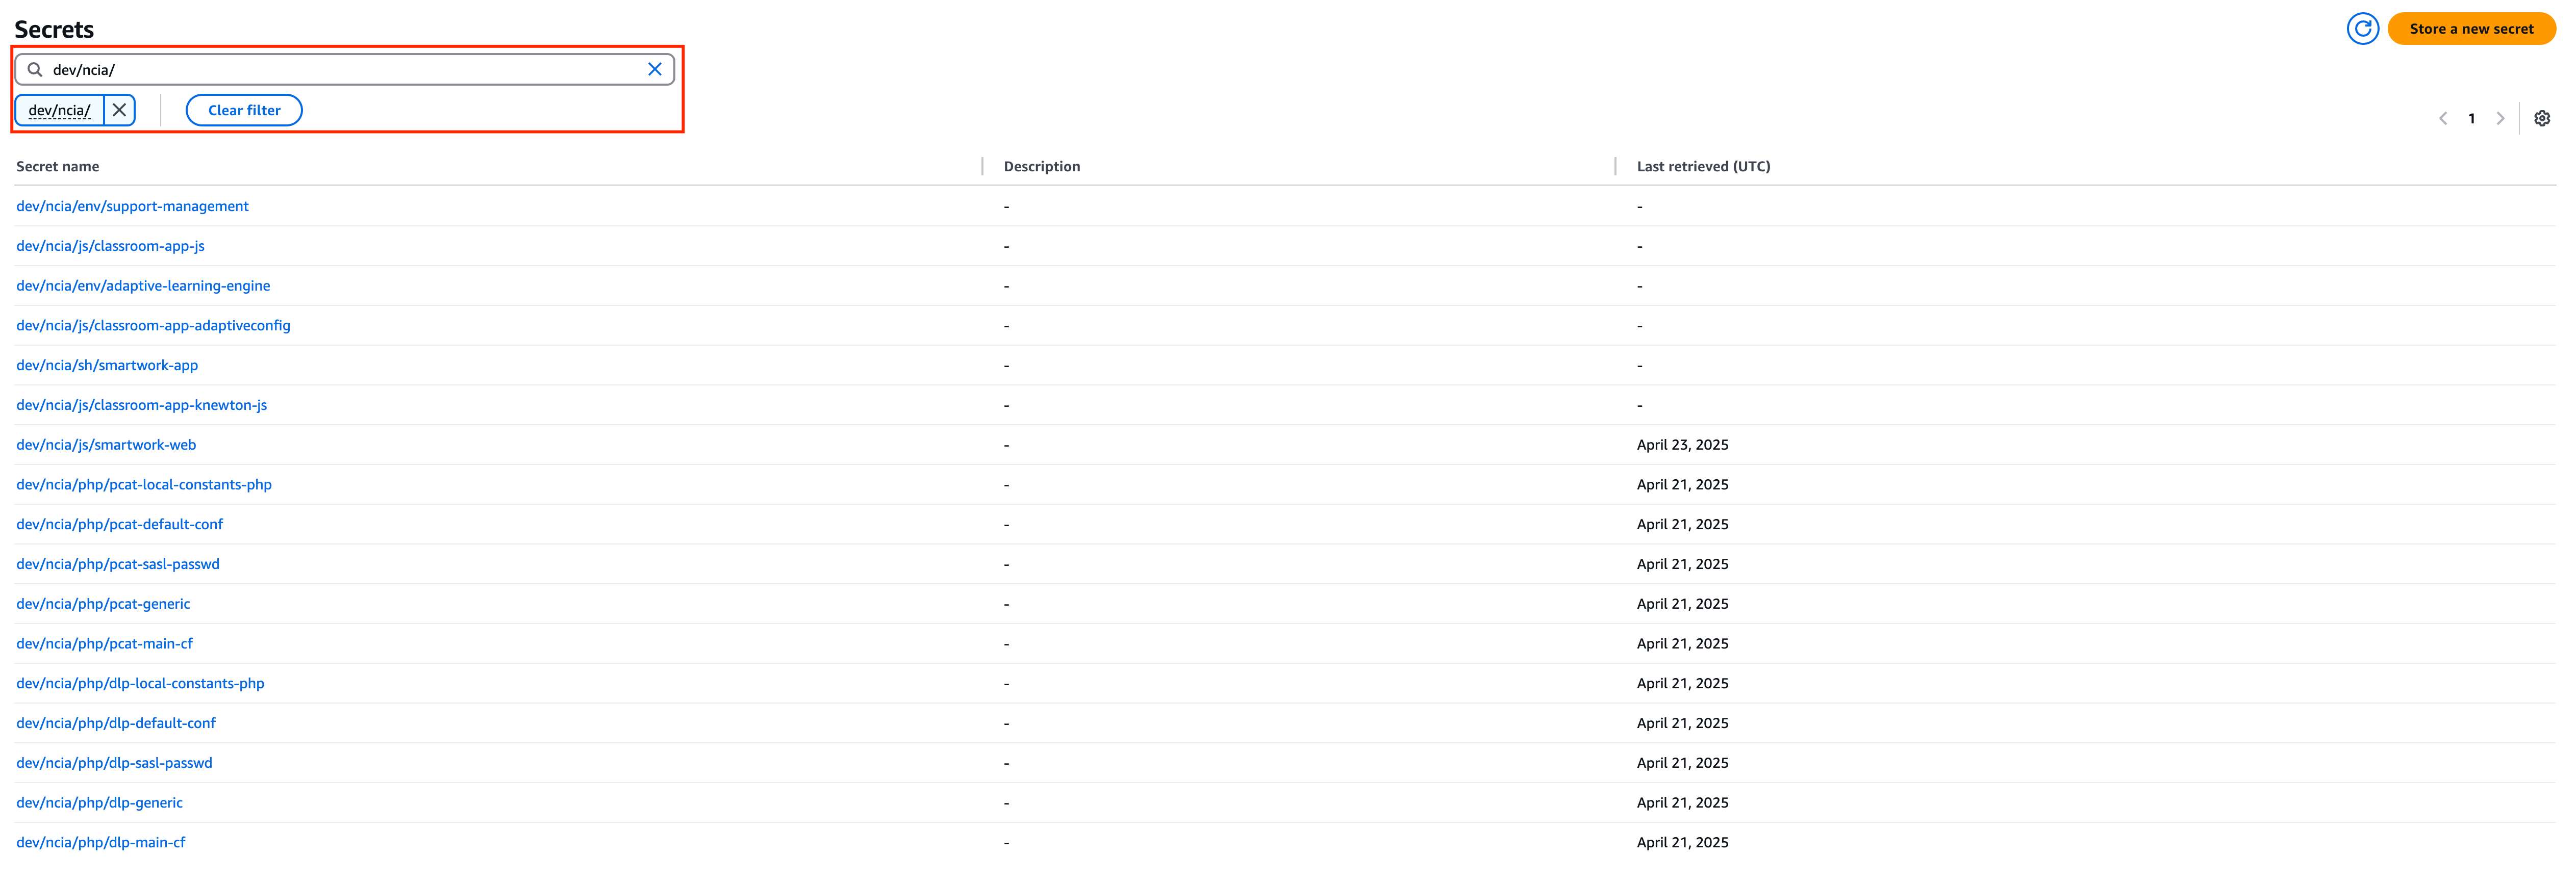
Step 3: Filter Secrets
Use the search bar to find secrets matching your application's path prefix. Use the naming convention: <environment>/<namespace>/....
- Example: dev/ncia/ or production/ebook/json/.
Step 4: Select Secret
Click on the specific secret name you want to inspect from the filtered list.
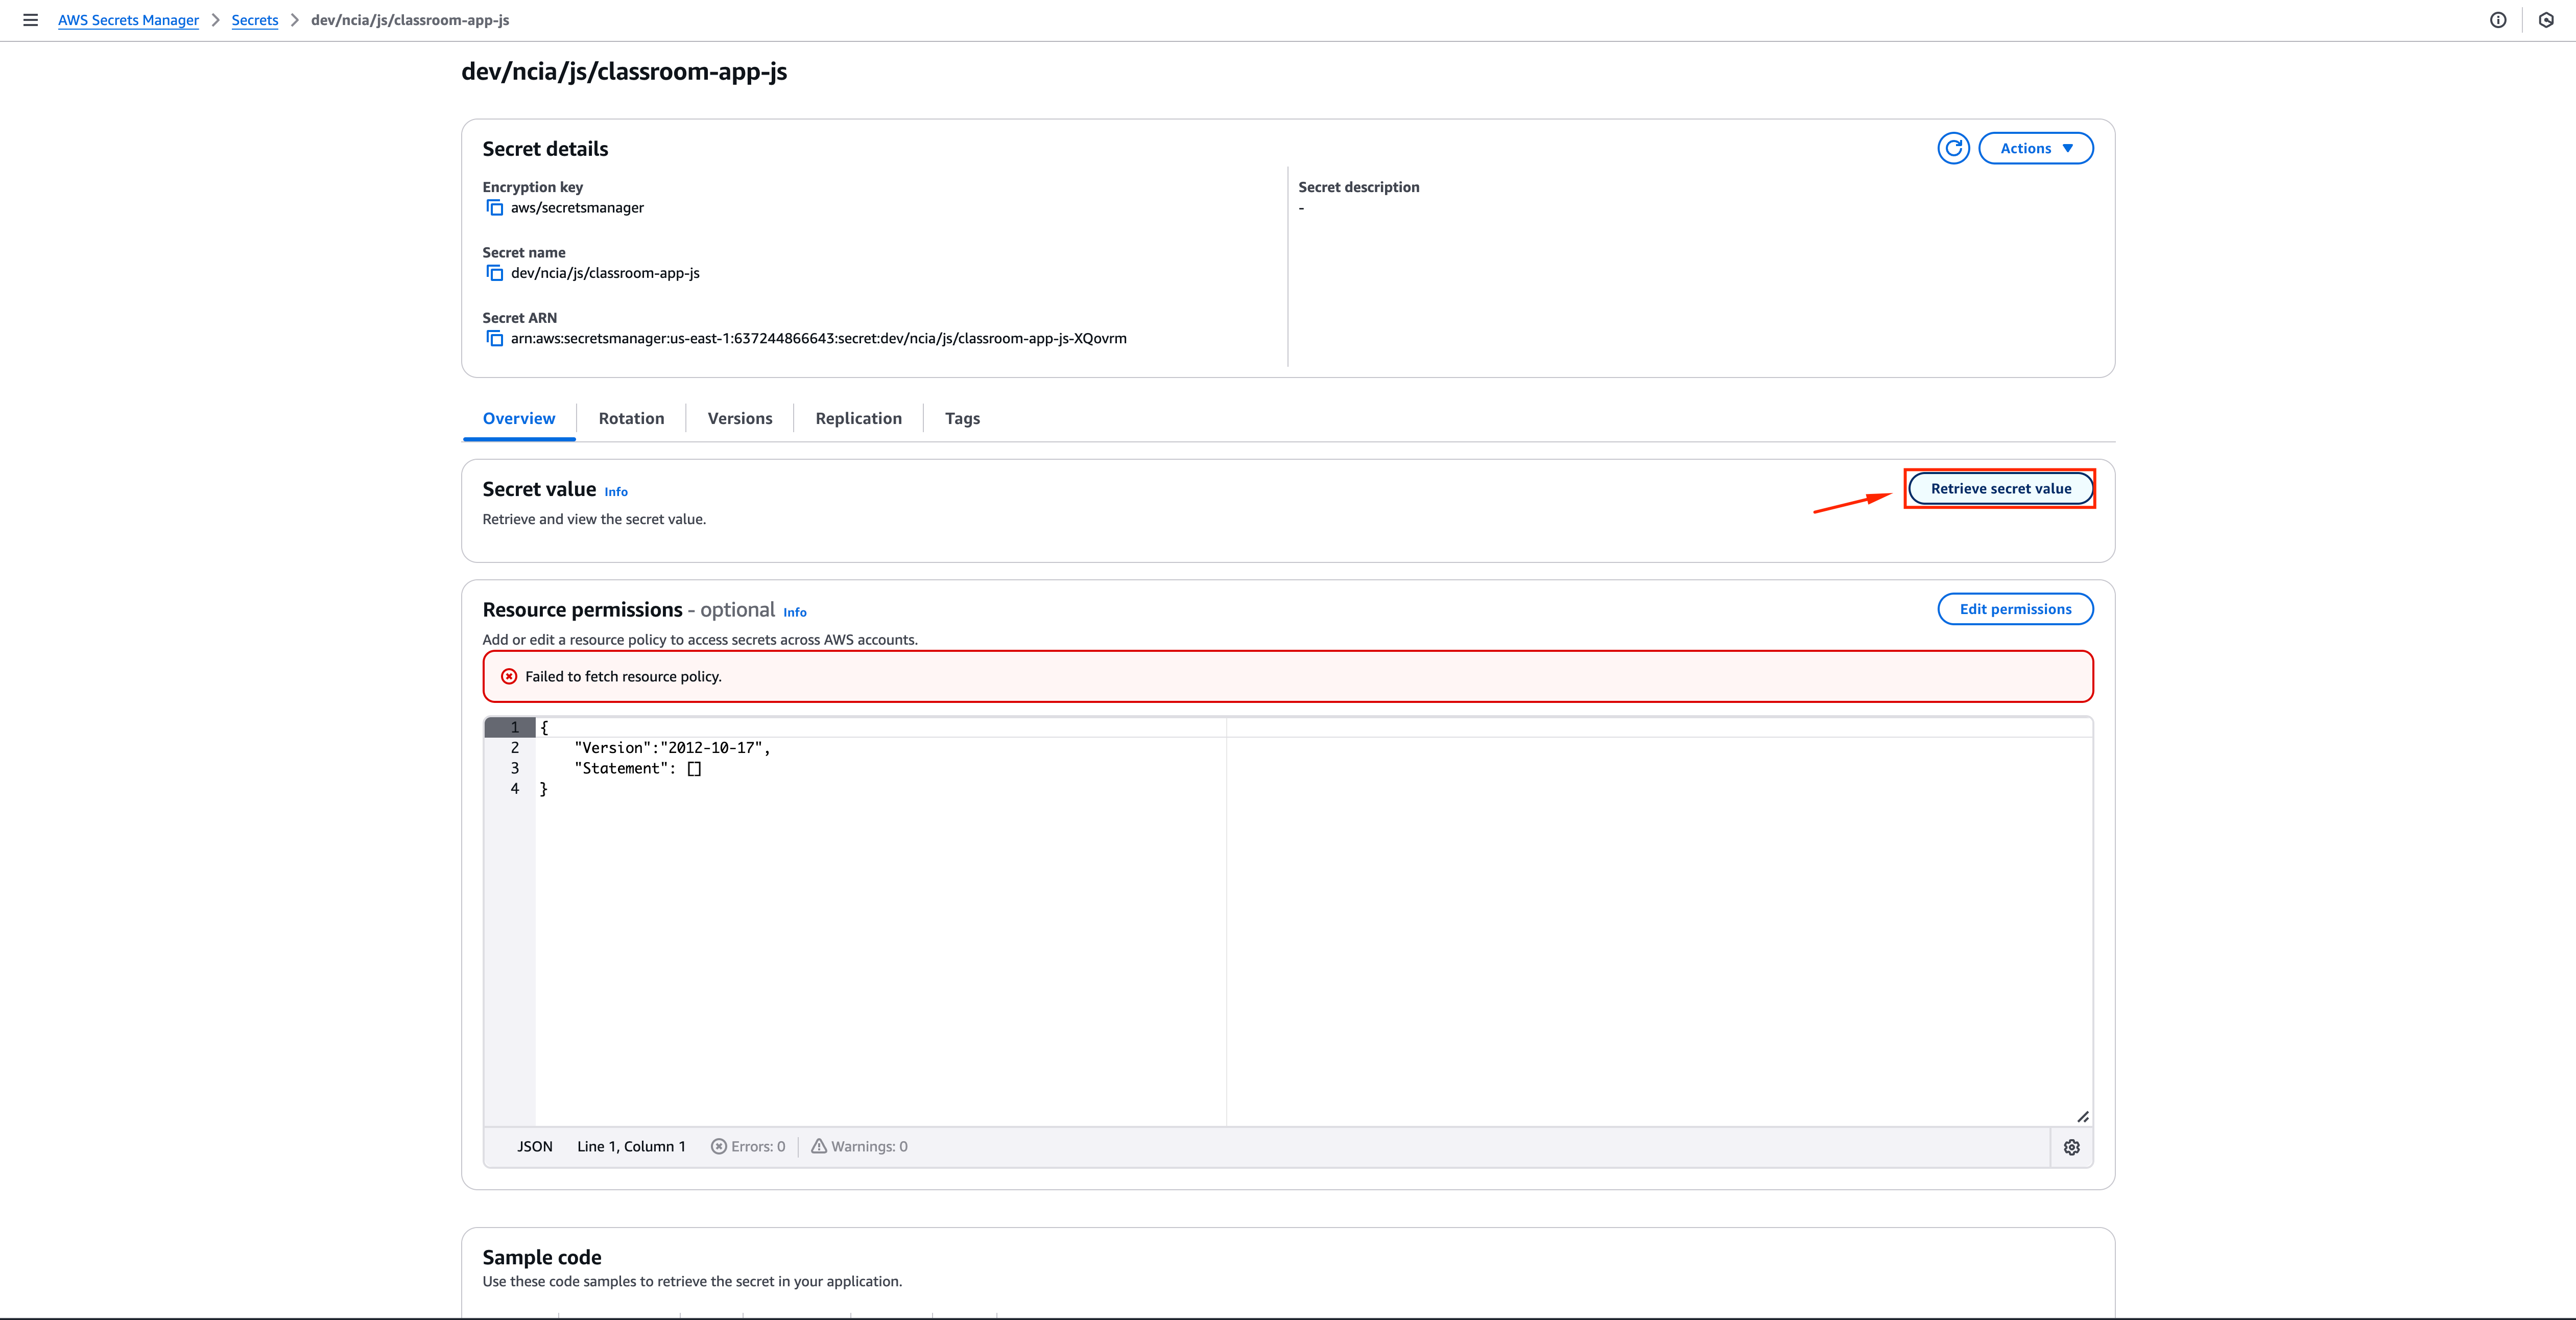
Step 5: Retrieve Value
Scroll down to the "Secret value" section and click the "Retrieve secret value" button. You will only be able to see the value if your assigned SSO role's Permission Set allows the secretsmanager:GetSecretValue action on that specific secret ARN.
How to Update an Existing Secret's Value
Note: Successfully updating a secret value in AWS Secrets Manager will typically trigger an automatic rolling restart of your application pods within a few minutes if the Stakater Reloader is configured via secretObjects and the deployment annotation.
- Locate Secret: Follow steps 1-4 in "How to View Your Application's Secrets".
- Retrieve Value: Click "Retrieve secret value".
- Edit: Click the "Edit" button.
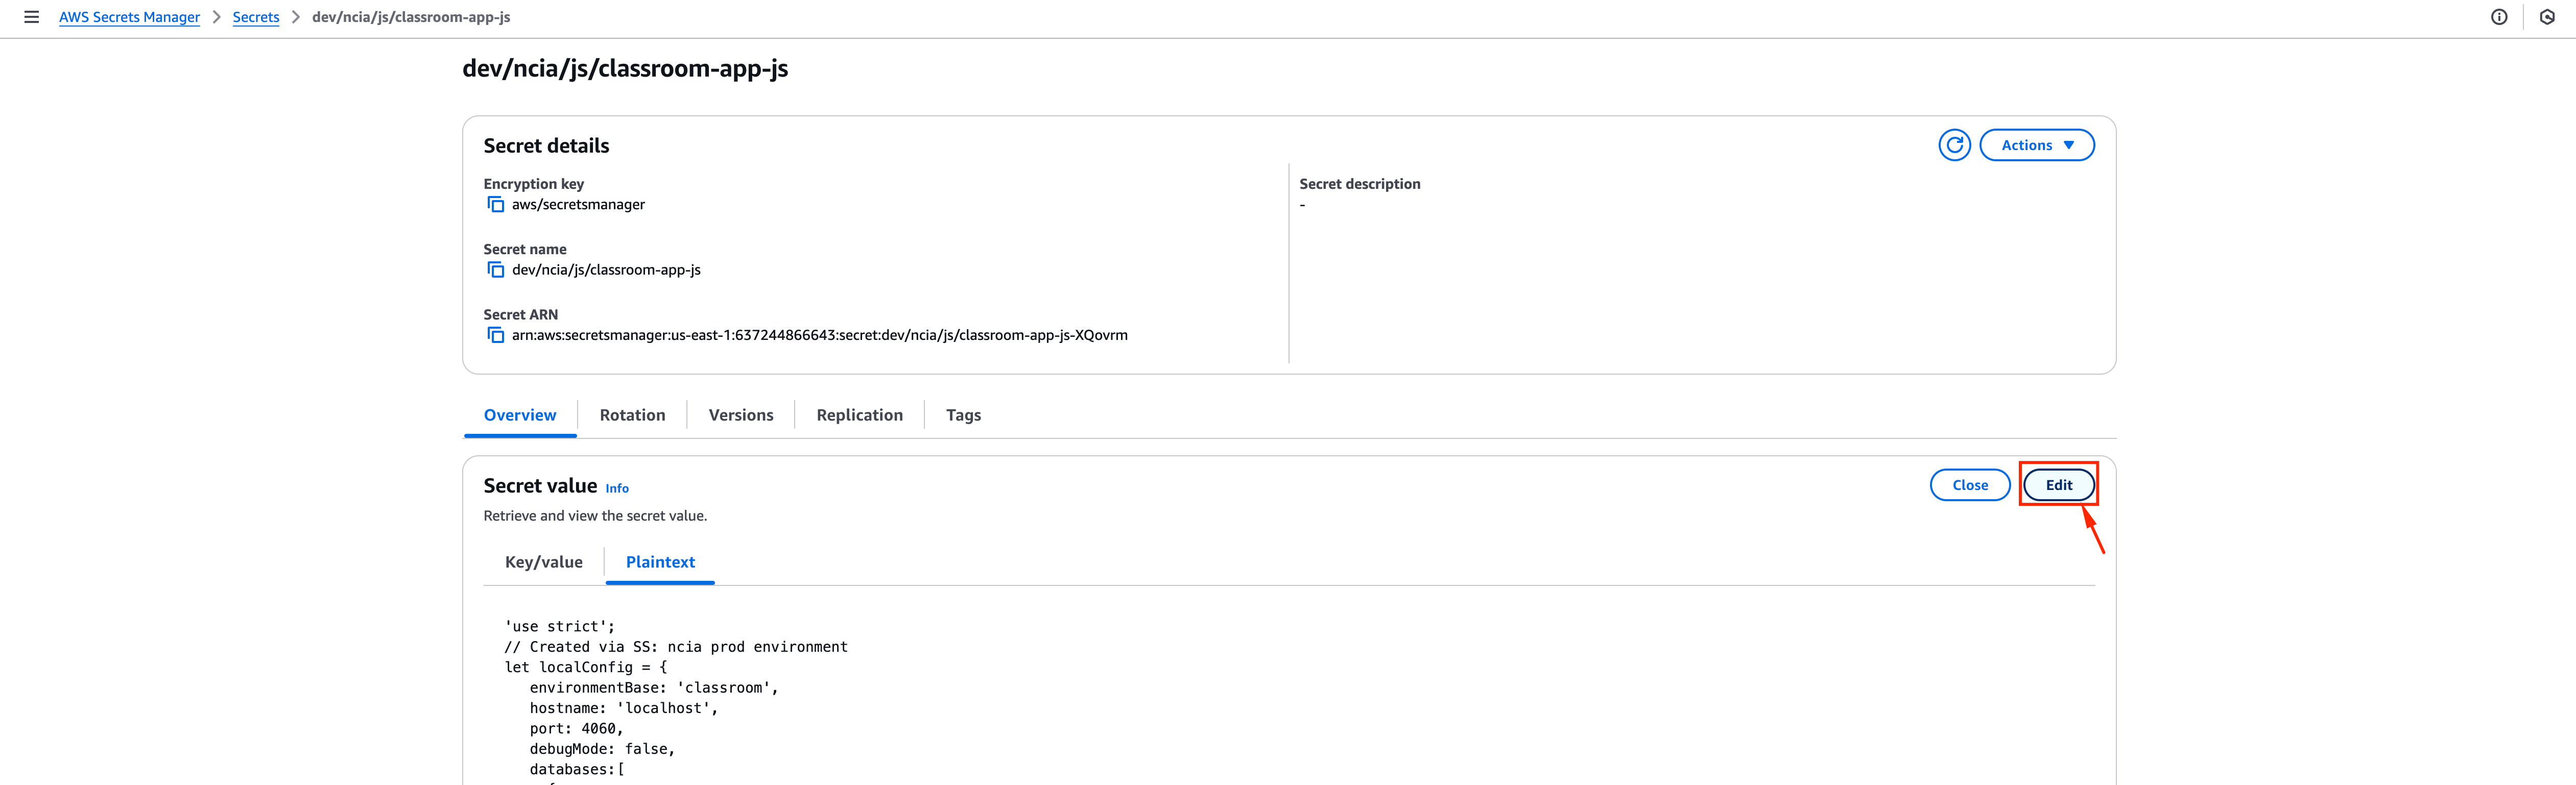
- Modify: Change the secret content in the "Plaintext" tab or update key/value pairs as needed. Ensure the format remains valid (e.g., valid JSON if it's a JSON secret).
- Save: Click "Save".
- Monitor (Optional): You can watch your pods (
kubectl get pods -n <namespace> -w) to see the rolling restart initiated by Stakater, usually within 1-3 minutes.
How to Reference a Shared Secret (Created by another team/process)
Use this when your application needs to access a secret that isn't specific to your app but is shared.
- Get Path: Obtain the full, exact AWS Secrets Manager path (
objectName) of the existing shared secret (e.g.,dev/shared-secrets/cert/our-ca-bundle). - Request Permissions: Submit an MR to
cluster-manager(similar to Step 2 in "New Application") adding the shared secret's details to theadditional_secretslist for your application in the relevantconfig.<env>.jsonfiles. Wait for this MR to be merged. - Declare in Application Chart:
- Edit your application's
./chart/templates/secretproviderclass.yaml. - Under
spec.parameters.objects, add a new list item pointing to the shared secret:
- Edit your application's
      # Example: Referencing a shared CA bundle
      - objectName: "dev/shared-secrets/cert/our-ca-bundle" # Exact path to shared secret
        objectType: "secretsmanager"
        objectAlias: "ca-bundle.pem" # Choose a suitable local filename alias
-
(Optional) Sync to K8s Secret: Add corresponding entry under
spec.secretObjects[0].data. -
Consume Secret: Update application code/config to read from
/mnt/creds/ca-bundle.pemor the synced K8s key. -
Deploy: Commit
secretproviderclass.yamlchanges, push, and deploy (only after permissions MR is merged).
How to Change an Application's Secret Type (e.g., env to json)
This involves changing the <type> part of the secret name in AWS and ensuring the content matches the new type. It also requires updating the reference in your SecretProviderClass.
- Create/Update Secret in AWS:
- Log in to AWS Secrets Manager.
- Create a new secret with the desired type in the name (e.g.,
dev/ncia/json/dlpif changing fromdev/ncia/env/dlp). - Copy the value from the old secret and reformat it to match the new type (e.g., convert key=value lines to a valid JSON object). Store this formatted value in the new secret.
- Request Permissions: You must submit an MR to
cluster-managerto update thetypefield for your application inconfig.<env>.jsonor add the new path toadditional_secrets. Wait for this MR. - Update Declaration in Chart: Edit
secretproviderclass.yamlto pointobjectNameto the new path. AdjustobjectAliasandsecretObjects.dataif needed. - Update Consumption: Modify application code for the new format/path.
- Deploy: Commit chart changes, push, and deploy (only after any necessary permissions MR is merged).
- (Recommended) Cleanup: Delete the old secret from AWS Secrets Manager. Use the AWS Console to delete it after verifying the new setup works.
How to Add an Additional Secret to an Existing Application
Use this recipe when your application is already using the CSI driver setup, and you just need it to access one more secret from AWS Secrets Manager.
Step 1: Ensure Secret Exists in AWS
-
Log in to AWS Secrets Manager.
-
Verify or Create the additional secret using the "Store a new secret" process, following the strict naming convention:
<environment>/<namespace>/<type>/<specific_secret_name>. -
Note the full path (objectName) of the secret.
Step 2: Request Permissions (If Necessary)
-
Check if the existing permissions granted via
cluster-manageralready cover this new secret path. Permissions are often granted broadly using wildcards like<env>/<namespace>/<type>/<app_name>/*. -
If the new secret follows the existing naming pattern covered by the wildcard, no
cluster-managerMR is needed. -
If the new secret has a different path (e.g., different type, different name structure, or is a shared secret in another namespace) that isn't covered by existing permissions, you must submit an MR to
cluster-managersimilar to Step 1 in the "New Application" section, adding the new secret path to theadditional_secretslist for your application in the relevantconfig.<env>.jsonfiles. Wait for this MR to be merged before deploying chart changes.
Step 3: Update secretproviderclass.yaml
- Edit your application's
./chart/templates/secretproviderclass.yaml. - Add a new list item
-underspec.parameters.objects:
      # Example: Adding a new API key
      - objectName: "{{ .Values.app.env }}/{{ .Values.app.namespace }}/json/{{ include "chart.name" . }}-new-service-key"
        objectType: "secretsmanager"
        objectAlias: "new-service-key.json" # Choose a clear local filename
- If using
secretObjectsfor K8s sync and Stakater, add a corresponding entry underspec.secretObjects[0].data:
        # Example mapping for the new key
        - key: new-service-key.json
          objectName: new-service-key.json # Matches objectAlias above
Step 4: Update Application Code/Config (If Necessary)
-
Modify your application to read the new secret from its file path:
/mnt/creds/<new-local-filename-alias>or consume it from the synced Kubernetes secret key (if usingsecretObjects).
Step 5: Deploy
Commit the secretproviderclass.yaml changes (and any necessary code changes), push, and trigger a deployment. Ensure any required cluster-manager MR (from Step 2) was merged first.
How to Set Up Secrets for a New Application
Note: Platform team will help migrate existing applications as needed for the first phase migration to AWS Secrets Manager in April-May 2025. This section will be more relevant for future applications that will be created, but for existing applications it will likely not be required reading.
Follow these steps when configuring a brand-new application or migrating an existing one fully to use AWS Secrets Manager via the CSI driver for the first time.
Step 1: Create Secrets in AWS Secrets Manager
- Before configuring Kubernetes or permissions, the actual secret data must exist in AWS Secrets Manager. The Platform team will not create or maintain these application-specific secrets in the future
- Log in to the AWS Console via SSO, navigate to Secrets Manager.
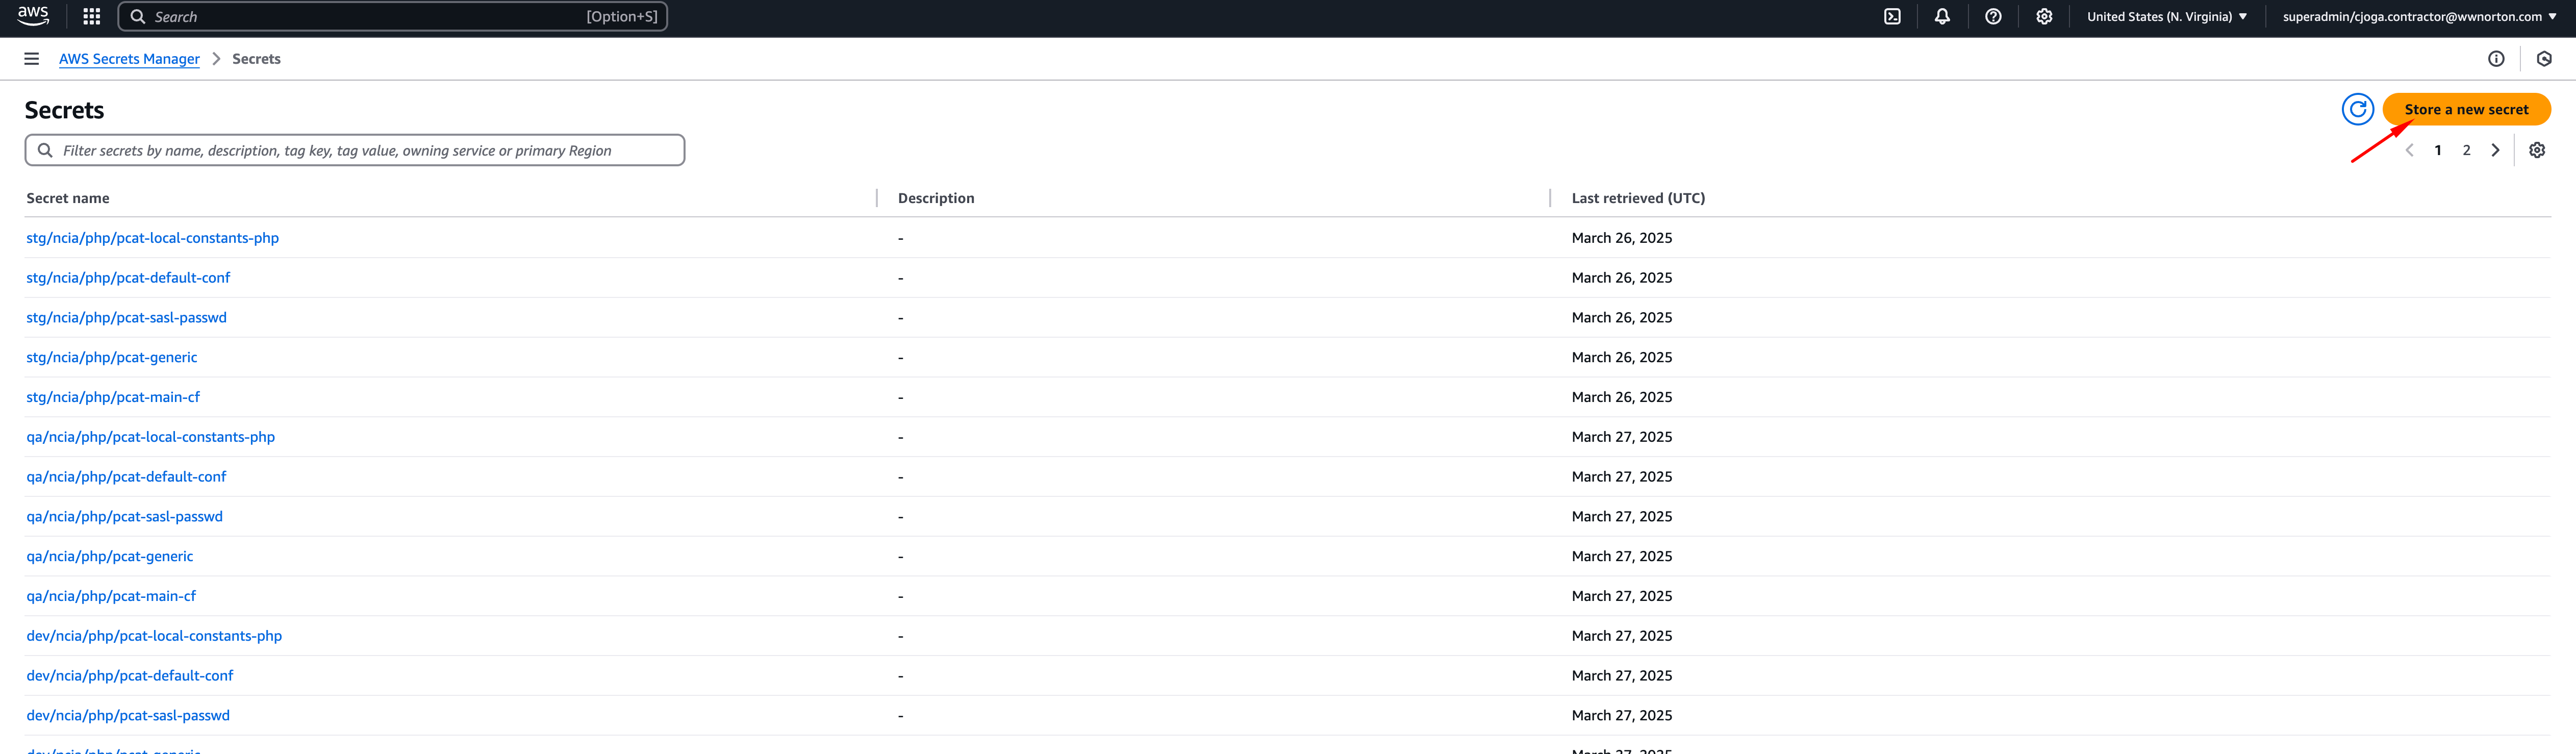
For each secret your application needs (e.g., main config file content, specific API keys, database credentials), create it using the "Store a new secret" button
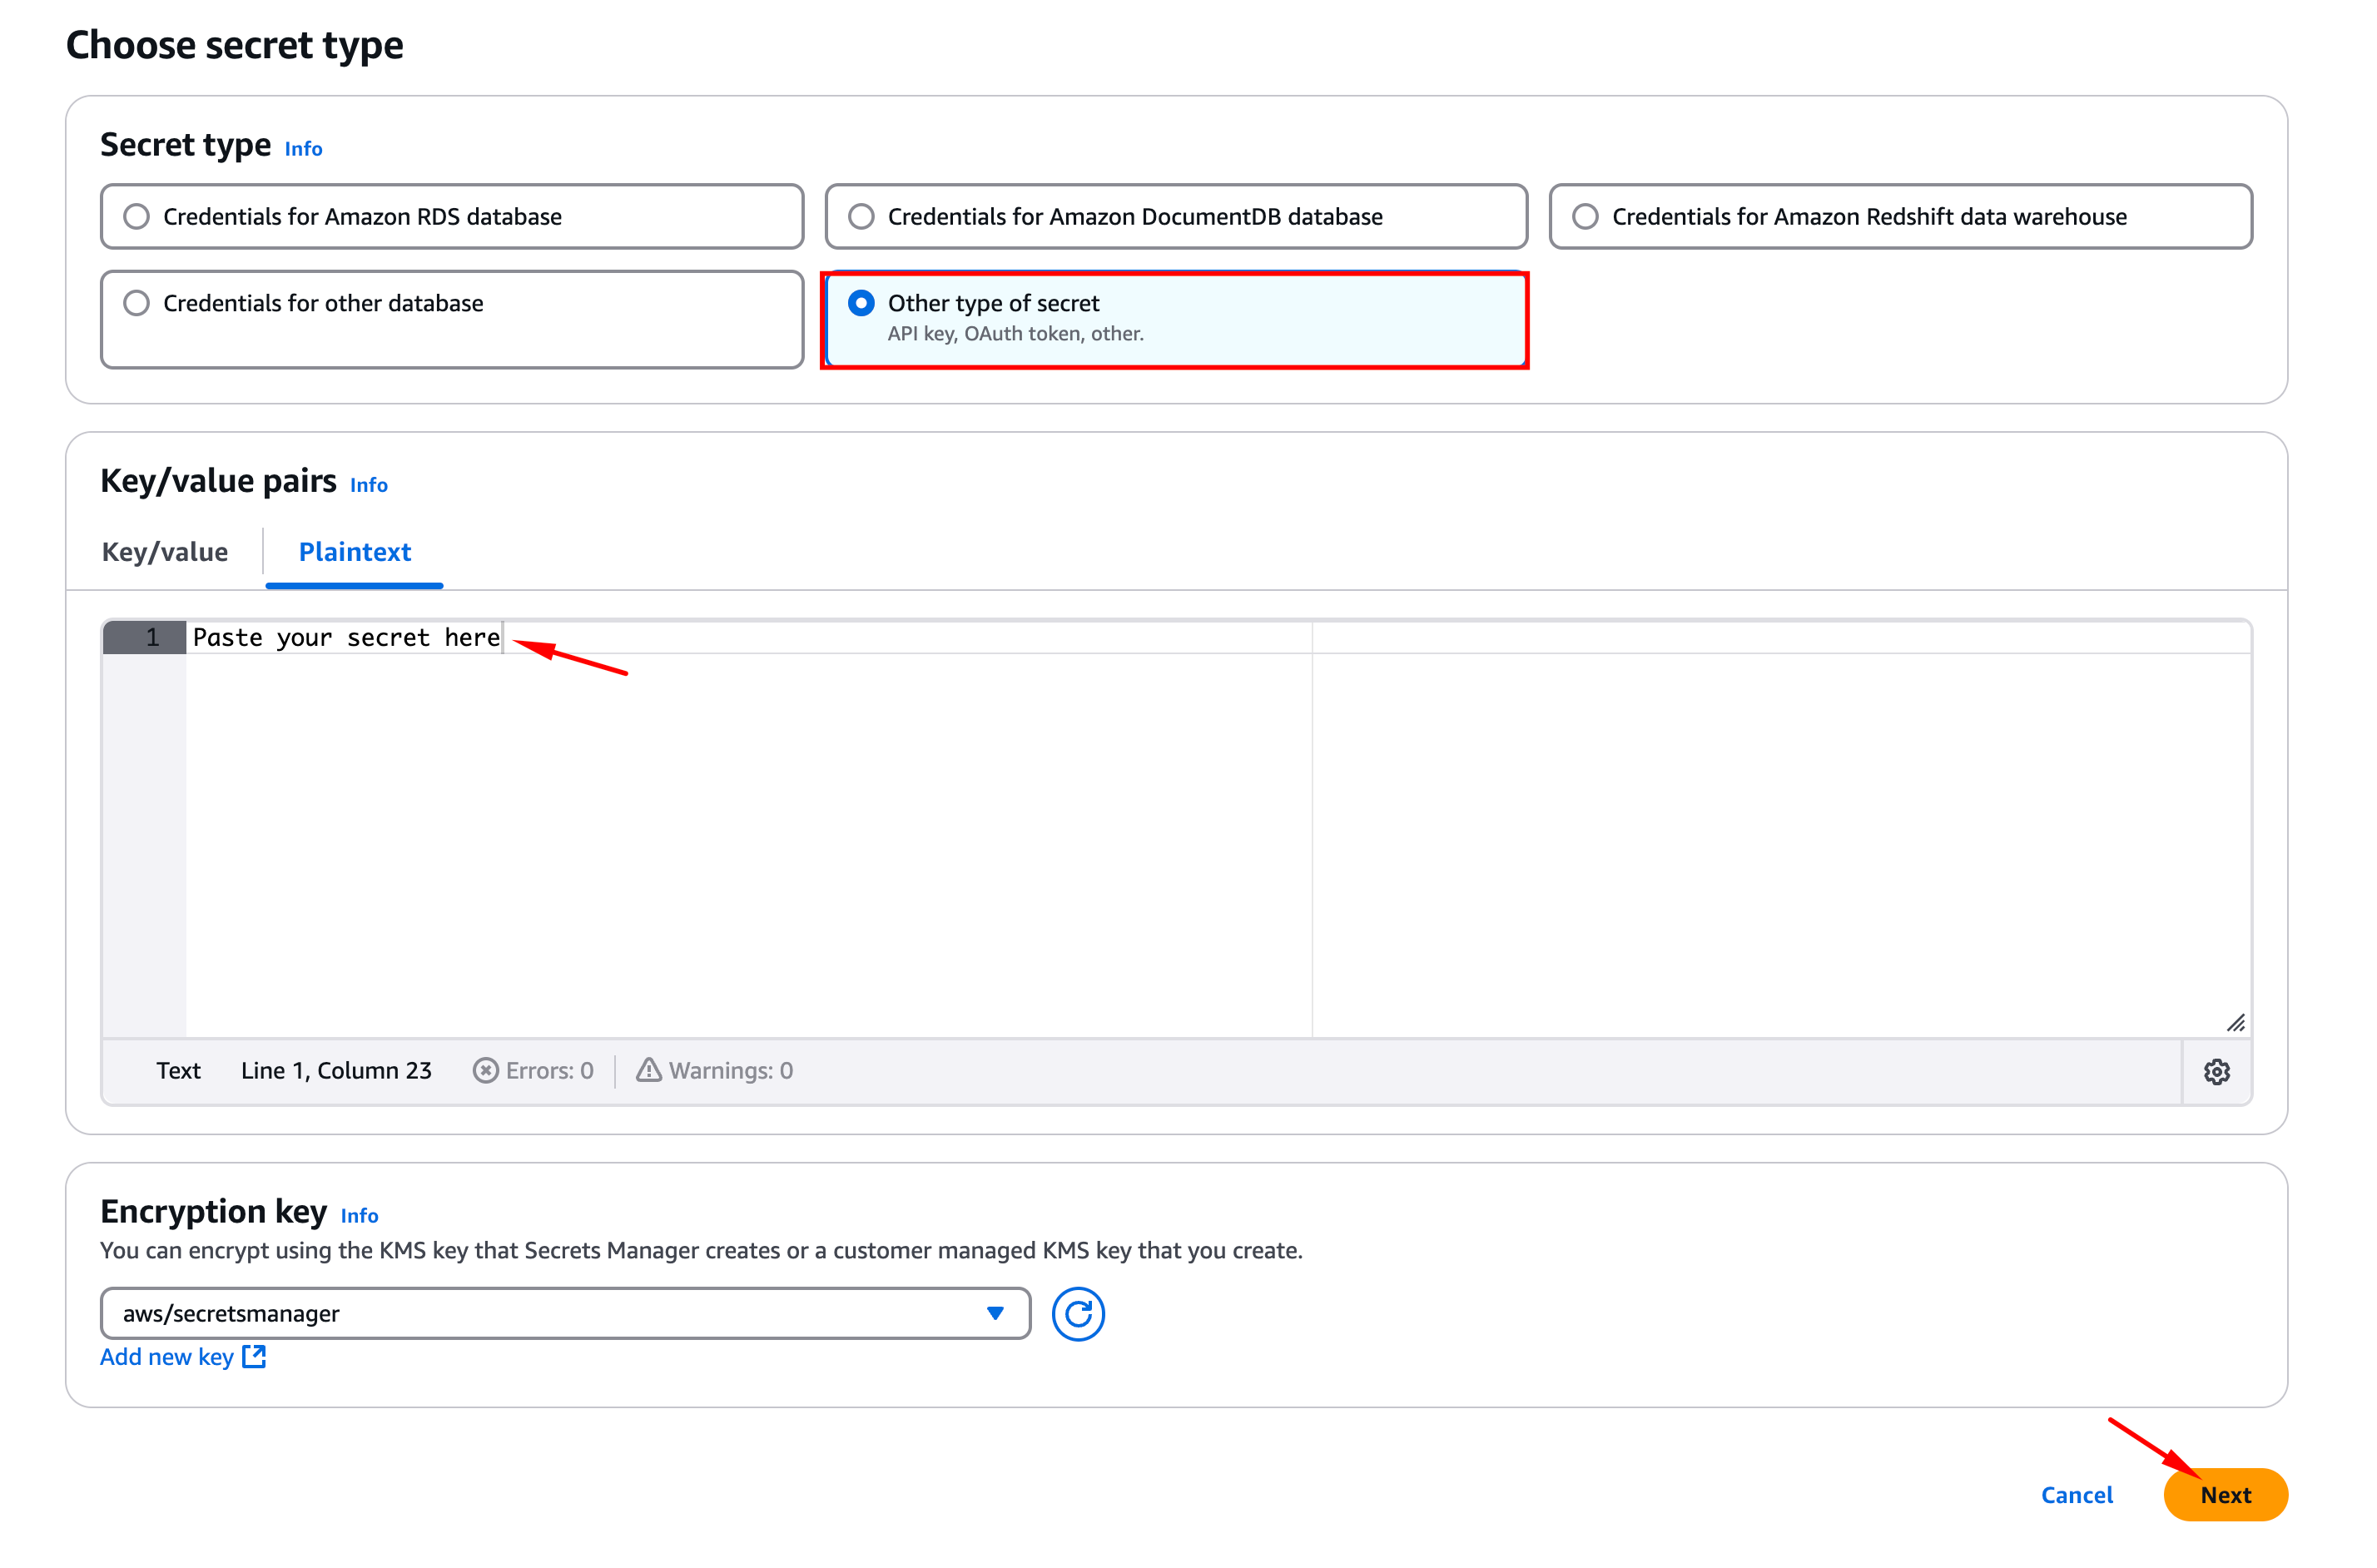
- Choose "Other type of secret".
- Enter the secret value (use the "Plaintext" tab for file contents like PHP, JSON, ENV files; use Key/value pairs if appropriate).
- Click "Next".
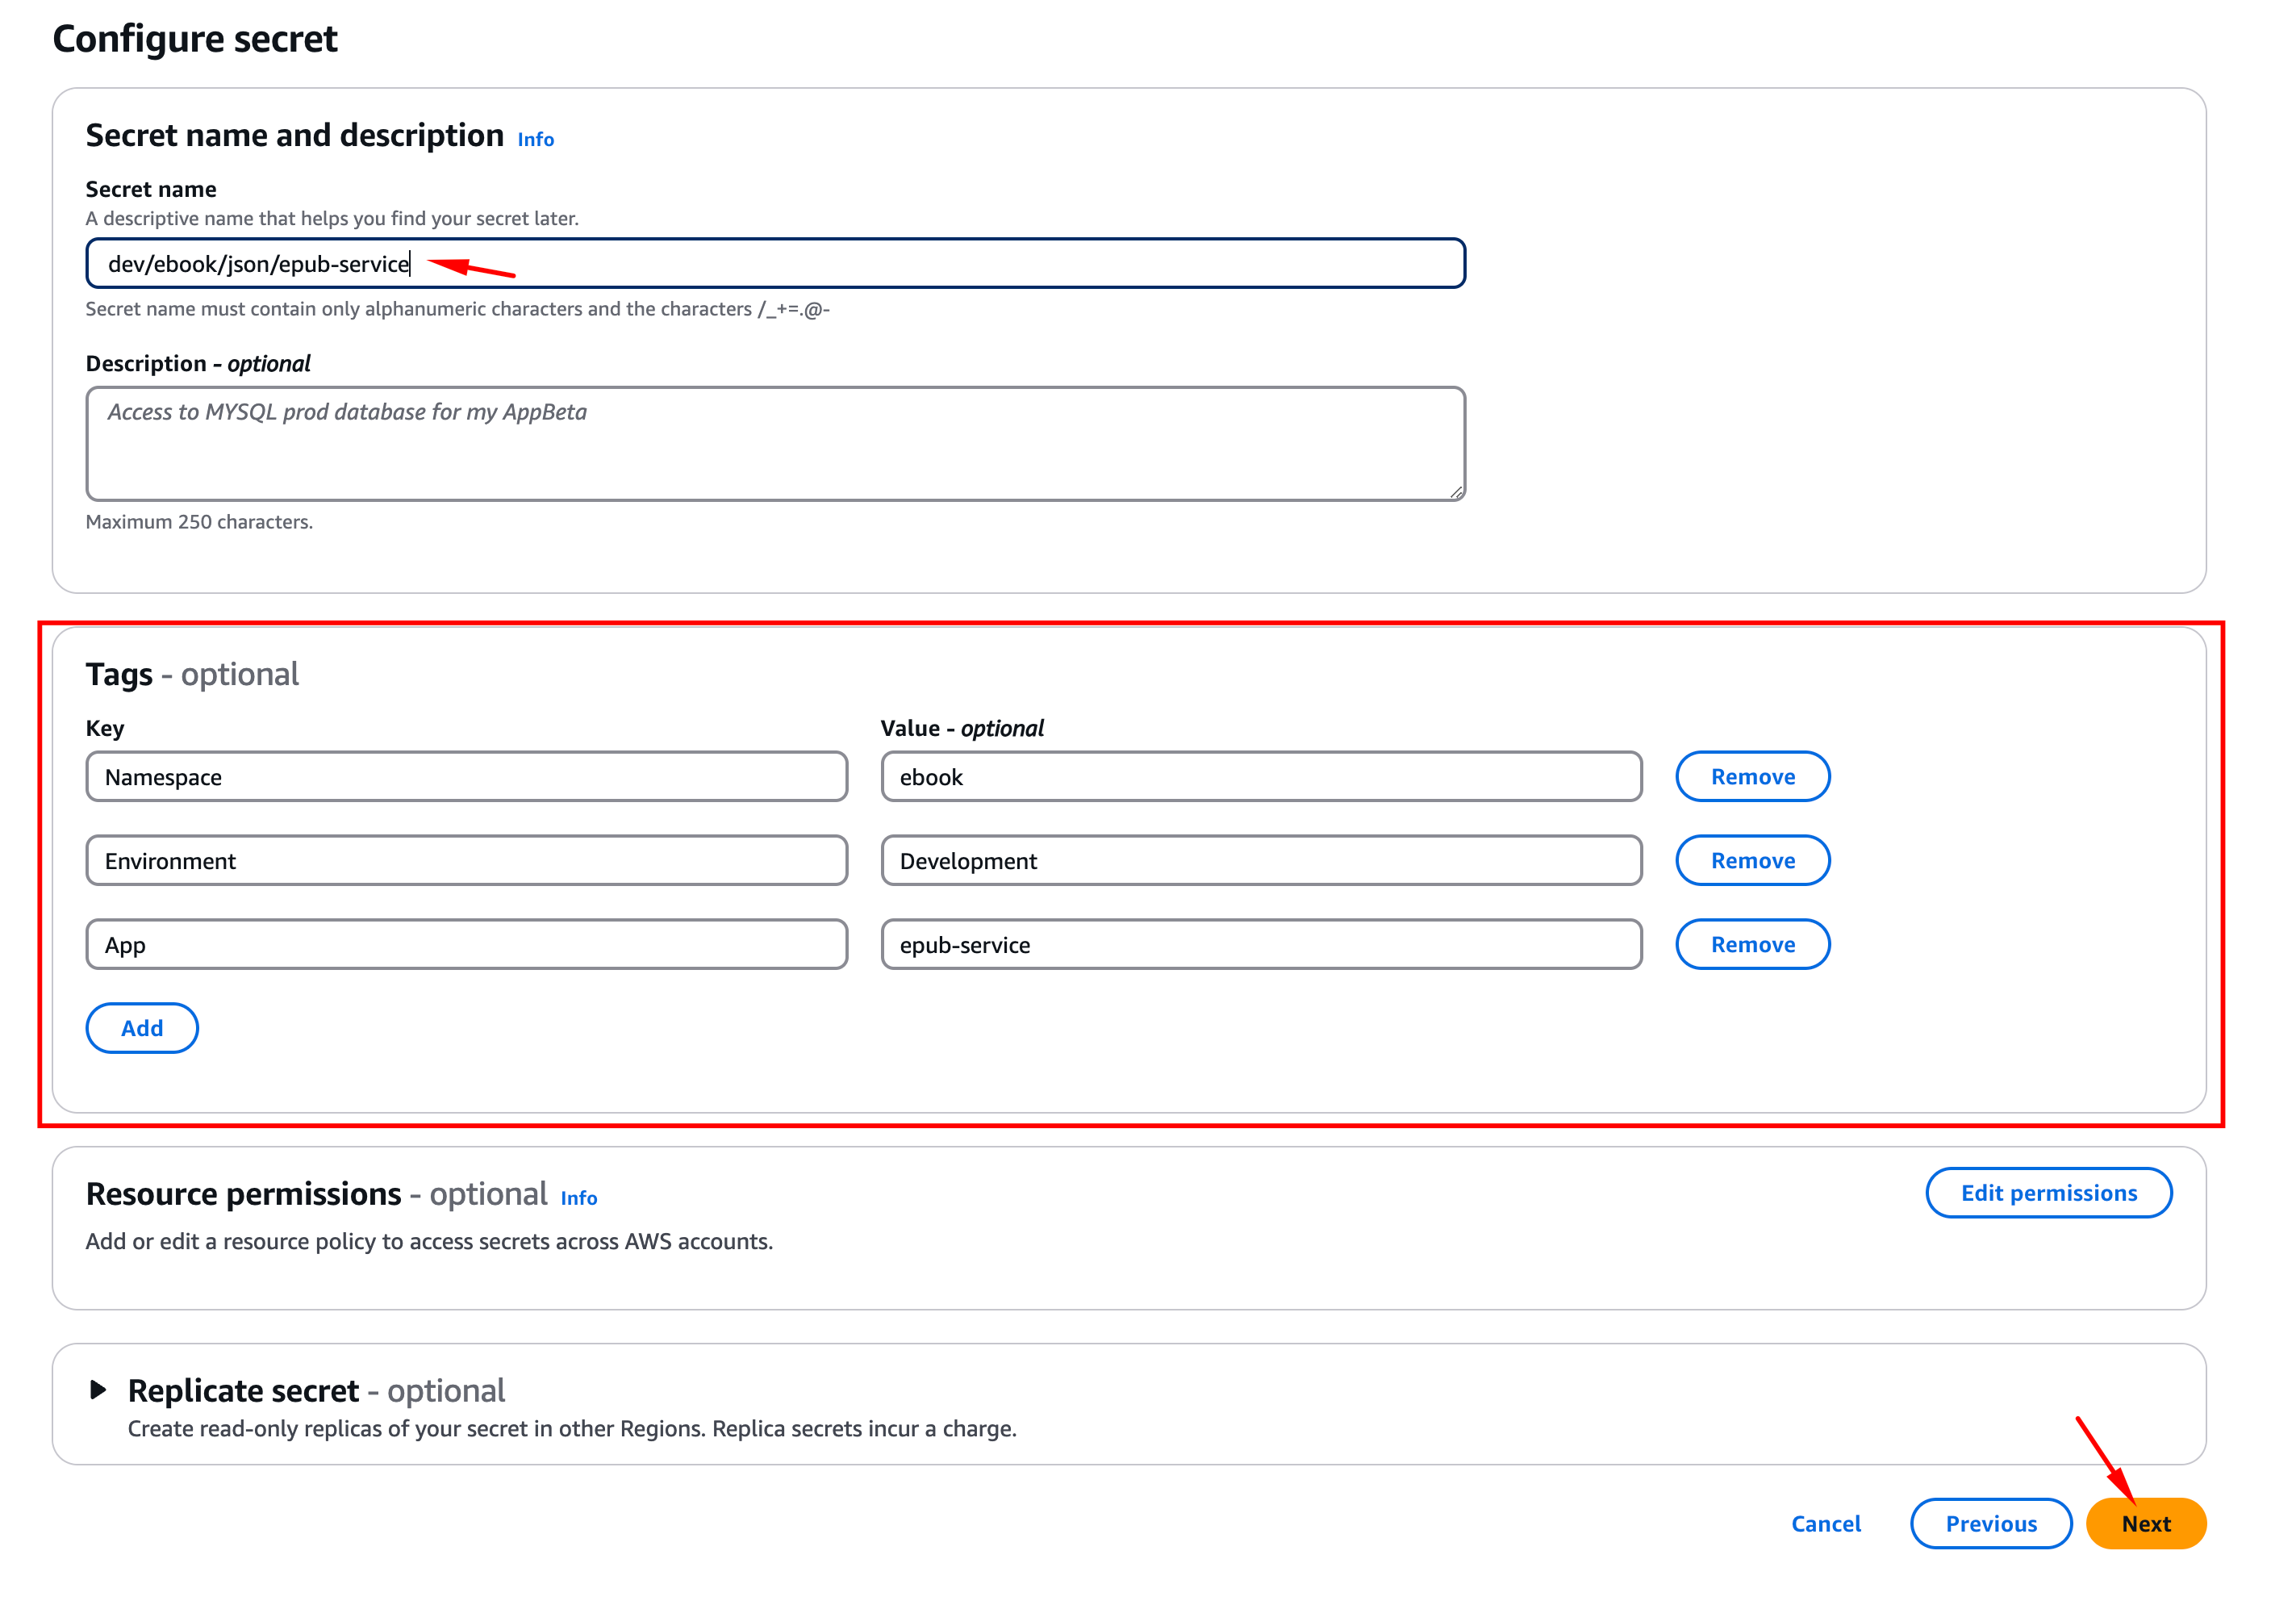
Enter the Secret name using the strict standard convention: <environment>/<namespace>/<type>/<app_name>. This naming is critical as IAM permissions granted via Cluster-Manager rely on it!
Example Main Config: dev/ncia/php/my-new-app
Example Certificate: dev/ncia/json/cert-name-pub
Add relevant Tags (e.g., App: my-new-app, Environment: Development, Namespace: NCIA), then click "Next".
-
Skip Rotation settings unless you have a specific, understood requirement and implementation (often needs a Lambda). Click "Next".
-
Review and click "Store". Repeat for all necessary secrets.
Step 2: Request Permissions via Cluster-Manager Repository
Your application's Kubernetes Service Account needs permission (via an AWS IAM Role) to access the secrets you created in Step 1. This link is configured centrally in the cluster-managerrepository, which we will configure here.
- Repository: Navigate to the Cluster-Manager Repository repository.
- Create Branch: Create a new feature branch from the
mainbranch (e.g.,feature/add-myapp-secret-perms). - Modify Config Files: Locate the configuration files for each environment where your application will run. The path follows this pattern:
/modules/k8s/{lower|prod}/secret_config/config.<environment_to_modify>.json- Example for
dev:/modules/k8s/lower/secret_config/config.dev.json - Example for
production:/modules/k8s/prod/secret_config/config.production.json
- Add Application Entry: Edit the JSON file(s) to include your application under the correct namespace. Add an object to the namespace's array specifying your application's base name (without
-appsuffix) and its primary secret type.- Example: Adding
dlp-app(which uses a primaryphpsecret) to thencianamespace inconfig.dev.json:
- Example: Adding
{
  "ncia": [
    { // Existing app entry
      "name": "existing-app",
      "type": "json"
    },
    { // Your new app entry
      "name": "dlp", // App name without suffix
      "type": "php"  // Primary secret type used in AWS name
    }
  ],
  "other-namespace": [
    // ... other apps ...
  ]
}
- If the namespace doesn't exist yet in the file, add it:
{
  "existing-namespace": [ /* ... */ ],
  "ncia": [ // New namespace entry
    {
      "name": "dlp",
      "type": "php"
    }
  ]
}
- (Optional) Additional Secrets: If your application needs to access secrets other than its primary one (e.g., a shared certificate or a secret belonging to another app), add the
additional_secretsarray to your app's entry. Specify the full path details of the extra secret(s) as they exist in AWS Secrets Manager:
{
  "ncia": [
    {
      "name": "my-new-app",
      "type": "php",
      "additional_secrets": [
        { "namespace": "shared-secrets", "type": "cert", "name": "our-ca-bundle" },
        { "namespace": "external-services", "type": "json", "name": "some-api-key" }
      ]
    }
  ]
}
Note: You only need to define shared secrets here if your app needs access. The shared secret itself doesn't need its own top-level entry unless it's also a primary secret for some (potentially different) application.
-
Commit Changes: Commit the modifications to your feature branch with a clear message (e.g., "feat: Add secret permissions for my-new-app in ncia namespace").
-
Create Merge Request: Create an MR from your feature branch targeting the
mainbranch of thecluster-managerrepository. -
Request Review: Assign the MR to the Platform Team for review and approval.
-
Outcome: Once merged and applied by the platform team's pipeline, this will automatically create/update the necessary IAM Role, attach policies granting access to the specified secret paths (
<env>/<namespace>/<type>/<app_name>*and anyadditional_secrets), and configure the Kubernetes Service Account (<app_name>-sa) to use this IAM Role via IRSA. Do not proceed with deploying your application (Step 6) until this MR is merged and applied.
Step 3: Define Environment Values in values.yaml
Your Helm chart templates (SecretProviderClass, Deployment, etc.) rely on variables to adapt to different environments. Ensure these are defined correctly in each environment's values file within your application repository.
- Standard Location:
/flux/<environment>/values.yaml(e.g.,./flux/dev/values.yaml,./flux/qa/values.yaml, etc.)- Required Values Example: (./flux/dev/values.yaml):
# Global application settings used across templates
app:
  # Environment name (dev, qa, stg, production) - used in secret paths
  env: dev
  # Kubernetes namespace the app runs in - used in secret paths & resource metadata
  namespace: ncia # Or your application's specific namespace

# other sections like 'deployment', 'service', etc.
# deployment:
#   name: my-new-app
-
Verify/create these files for
dev,qa,stg, andproductionenvironments, ensuringapp.envandapp.namespaceare correct for each.
Step 4: Create secretproviderclass.yaml
- In your application's Helm chart directory, create a new file:
./chart/templates/secretproviderclass.yaml. - Paste and adapt the following template and its values
# ./chart/templates/secretproviderclass.yaml
apiVersion: secrets-store.csi.x-k8s.io/v1
kind: SecretProviderClass
metadata:
  # Convention: <helm-release-name>-secrets
  # Uses the standard Helm chart fullname helper
  name: {{ include "chart.fullname" . }}-secrets
  # Namespace MUST match where your app deployment runs
  namespace: {{ .Values.app.namespace | quote }} # Populated from values.yaml
  labels:
    {{- include "chart.labels" . | nindent 4 }}
spec:
  # Specifies the AWS Secrets Store CSI provider
  provider: aws
  parameters:
    # AWS Region where secrets are stored (consistent across environments)
    region: us-east-1
    # Defines which secrets to fetch from AWS Secrets Manager
    objects: |
      # --- List each AWS Secret Manager secret your application needs ---
      # Use YAML list format within this multi-line string.
      # objectName: Full path in AWS Secrets Manager. Use values for env/namespace.
      # objectType: Always "secretsmanager" for this provider.
      # objectAlias: Local filename the secret will have inside the pod mount path.

      # Example 1: Main PHP config file for 'my-new-app'
      - objectName: "{{ .Values.app.env }}/{{ .Values.app.namespace }}/php/<secret-name>               objectType: "secretsmanager"
        objectAlias: "config.php"

      # Example 2: Specific JSON API key file
      - objectName: "{{ .Values.app.env }}/{{ .Values.app.namespace }}<secret-key-name>
              objectType: "secretsmanager"
        objectA"api-key.json".json"

      # Example 3: Referencing a shared credential file (if applicable & permissions granted via Step 2)
      # - objectName: "{{ .Values.app.e{{ .Values.app.namespace }}secrets/cert/our-ca-bundle"
      #   objectType: "secretsmanager"
      #   objectAlias: "ca-bundle.pem") Sync secrets to a Kubernetes Secret object
  # This enables automatic reloading via Stakater Reloader and allows
  # consumption via K8s mechanisms (e.g., env vars from secretKeyRef).
  secretObjects:
    # Defines a Kubernetes Secret resource to be created/managed by the CSI driver
    - data:
        # --- Map each secret from 'objects' above to a key in the K8s Secret ---
        # key: The key name within the created Kubernetes Secret object.
        # objectName: Must exactly match the objectAlias from the 'objects' list above.

        # Example for config.php
        - key: config.php
          objectName: config.php

        # Example for api-key.json
        - key: api-key.json
          objectName: api-key.json

        # Example for shared creds file (if included above)
        # - key: ca-bundle.pem
        #   objectName: ca-bundle
      # Name of the Kubernetes Secret object to create/update
      # Convention: <helm-release-name>-creds
      secretName: {{ include "chart.fullname" . }}-creds
v vars
      type:nt 4 }}
- Key Configuration Requirements:
-
Verify
metadata.nameuses the standard Helm fullname helper ({{ include "chart.fullname" . }}). -
Ensure
metadata.namespaceuses{{ .Values.app.namespace | quote }}. -
In
spec.parameters.objects: Carefully list all required AWS secrets that you requested permissions for in Step 2. Use{{ .Values.app.env }},{{ .Values.app.namespace }}, and potentially{{ include "chart.name" . }}or{{ include "chart.fullname" . }}to construct theobjectNamepaths dynamically and correctly. Define a meaningfulobjectAliasfor each (this becomes the filename). -
In
spec.secretObjects: If using Stakater/K8s Secret sync, ensuresecretNamefollows convention ({{ include "chart.fullname" . }}-creds). Map eachobjectAliasfrom theobjectslist to akeyunderdata.
-
Step 5: Update deployment.yaml
- Edit your application's
./chart/templates/deployment.yaml. Several pieces need to be added or modified. - a) Add
serviceAccountName: The pod needs to run as the specific Service Account created by the process in Step 2.
# ... inside spec.template.spec ...
spec:
  # Add this line, using the standard Helm fullname helper + '-sa' suffix
  # This MUST match the service account name generated by the cluster-manager process
  serviceAccountName: {{ include "chart.fullname" . }}-sa
  containers:
  # ... rest of spec ...
- b) Define CSI
volume: Tell the Deployment about the volume managed by the CSI driver.
# ... inside spec.template.spec ...
      volumes:
        # Add this volume definition
        - name: env-creds # Choose a consistent volume name
          csi:
            # Specifies the Secrets Store CSI driver
            driver: secrets-store.csi.k8s.io
            readOnly: true
            # Links this volume to the SecretProviderClass created in Step 4
            # Name must match metadata.name of the SecretProviderClass
            volumeAttributes:
              secretProviderClass: {{ include "chart.fullname" . }}-secrets
        # --- Remove any old volume definitions that mounted these secrets directly ---
        # ... other volumes ...
- c) Add CSI
volumeMounts: Mount the CSI volume into your application container(s).
# ... inside spec.template.spec.containers[0] ...
            volumeMounts:
              # Add this mount for the secrets volume
              - name: env-creds # Must match the volume name defined above
                # Mount path where secret files (named by objectAlias) will appear
                mountPath: "/mnt/creds"
                readOnly: true
              # --- Remove any old volumeMounts that used the old secret volume ---
              # ... other volume mounts ...
Your application code must now be configured to read secrets from /mnt/creds/<objectAlias>.
- d) Add Stakater
annotation(if usingsecretObjects): Enable automatic restarts when the synced K8s secret changes.
# ./chart/templates/deployment.yaml
apiVersion: apps/v1
kind: Deployment
metadata:
  name: {{ include "chart.fullname" . }}
  labels:
    {{- include "chart.labels" . | nindent 4 }}
  annotations:
    # Add this annotation if you defined 'secretObjects' in SecretProviderClass
    # Value MUST match secretObjects.secretName
    secret.reloader.stakater.com/reload: {{ include "chart.fullname" . }}-creds
    # ... other annotations ...
spec:
  # ... rest of deployment spec ...
-
e) (If Migrating) Remove Old Secret Consumption: Ensure removal of old mechanisms (e.g.,
envFrom,valueFrom, direct volume mounts of old secrets/configmaps).
Step 6: Deploy & Verify
DO THIS STEP ONLY After Cluster-Manager MR is Merged in STEP 2!
- Confirm Permissions: Ensure the Merge Request submitted in Step 2 has been approved, merged, and applied by the platform team's automation. Deploying before permissions are active will cause pods to fail.
- Commit Chart Changes: Commit all Helm chart changes (
values.yamlfiles,secretproviderclass.yaml,deployment.yaml) to Git. - Push & Deploy: Push the changes and this will trigger an upgrade of the helm release installed in the cluster.
- Monitor & Verify: Monitor the deployment rollout (
kubectl get pods -n <namespace> -w). Verify pods start correctly (Runningstatus) and can access secrets from/mnt/creds/. Check application logs. Usekubectl exec <pod-name> -n <namespace> -- ls -l /mnt/creds/to confirm files are mounted.
Troubleshooting Quick Checks
- Pod Errors (CrashLoopBackOff, Init Errors):
- Check pod logs (
kubectl logs <pod-name> -n <namespace>) for errors mentioning "secrets", "permission denied", "mount", "csi". - Verify
serviceAccountNameindeployment.yamlis correct ({{ include "chart.fullname" . }}-sa). - Check status/events of the
SecretProviderClass(kubectl describe secretproviderclass <class-name> -n <namespace>). Look for errors. - Check logs of the
secrets-store-csi-driver-*pods in thekube-systemnamespace for potential driver-level issues.
- Check pod logs (
- Secret Value Not Updating in Pod (after AWS update):
- Confirm the secret was saved correctly in AWS Secrets Manager.
- Are
secretObjectsconfigured inSecretProviderClass? If not, Stakater won't work; updates require a manual pod restart/redeploy. - If
secretObjectsis configured, ensure thesecret.reloader.stakater.com/reloadannotation exists on yourDeploymentmetadata and its value exactly matches thesecretObjects.secretName. - Check the logs for the Stakater Reloader pod(s) (usually in a
stakateror similar namespace) for errors related to your secret or deployment.
- Permission Denied Errors (in Pod or CSI Driver Logs):
- Likely an IAM policy issue. The IAM Role assumed by your pod's Service Account doesn't have
secretsmanager:GetSecretValuepermission for the specific secret ARN (objectName) listed in theSecretProviderClass. - Verify the
objectNamepath (environment, namespace, type, name) is exactly correct in yourSecretProviderClass. - Confirm the
cluster-managerMR granting permissions for this path was merged and applied. Check theconfig.<env>.jsonfile in themainbranch ofcluster-managerto ensure your app/secret path is listed correctly. - Contact the Platform team to verify the applied IAM policies for your application's Service Account if issues persist.
- Likely an IAM policy issue. The IAM Role assumed by your pod's Service Account doesn't have
- File Not Found in Pod (
/mnt/creds/...):- Double-check the
objectAliasinSecretProviderClassmatches the filename your application is trying to read. - Verify the CSI
volumeMountis correctly configured indeployment.yamlat/mnt/creds. - Check the
SecretProviderClassstatus/events for errors indicating the secret couldn't be fetched from AWS (often due to permission errors). - Use
kubectl exec <pod-name> -n <namespace> -- ls -l /mnt/creds/to see what files are actually mounted.
- Double-check the
Support Request
For further assistance, issues not covered by this guide, suspected platform-level problems (like IAM permissions or Cluster-Manager configuration/MRs), or clarification on edge cases, please reach out to Platform Team on MS Teams. Provide details about your application name, the environment (dev/qa/stg/prod), the specific problem, and any relevant error messages or logs.