How-To: Managing RDS Databases with Terraform
Introduction
This guide provides step-by-step instructions for creating and modifying AWS RDS databases using Terraform in the Infrastructure repository. It covers everything from initial setup to submitting changes.
The self-service RDS workflow is designed for scenarios where you need to:
- Create a new PostgreSQL or MySQL database for your application
- Modify an existing database's configuration (size, storage, tags, etc.)
- Enable high availability with Multi-AZ deployments
- Upgrade database engine versions
What This Workflow Does: You edit a Terraform variables file (terraform.tfvars) in a merge request. The CI/CD pipeline validates your changes with OPA policies, the Platform team reviews and approves, and Terraform applies the changes to AWS automatically upon merge.
Prerequisites
Required
- GitLab Access: Developer (or higher) permissions on the Infrastructure repository so you can create a branch and open a merge request. This is the only hard requirement — everything else in the workflow is done through GitLab. If you don't have access, contact the Platform team via the
@platformtag in any public Digital Product Group Teams channel. The@platformgroup tag only works in public Digital Product Group channels — private channels won't resolve it. - AWS Access (for secret creation): SSO access to the target AWS account via AWS Identity Center. Unlike S3, RDS requires you to create the database password secret in Secrets Manager before the pipeline runs, so Console access is a hard requirement for the Step 2 secret. See Managing Application Secrets for Console access details.
Recommended
You can complete the rest of the workflow from the GitLab UI, but the tooling below makes the experience smoother.
- Local clone + Git: If you prefer editing in an IDE over the GitLab web UI, clone the repo locally. Not required.
- macOS
- Windows
- Linux
Git ships with macOS (via Xcode Command Line Tools). For a newer version, install Homebrew first — it doesn't come pre-installed:
/bin/bash -c "$(curl -fsSL https://raw.githubusercontent.com/Homebrew/install/HEAD/install.sh)"
brew install git
Install Git for Windows which includes Git Bash — a Unix-like terminal for running Git commands.
# Debian/Ubuntu
sudo apt install git

# RHEL/CentOS
sudo yum install git
- VS Code + HashiCorp Terraform extension: Nice-to-have for syntax highlighting, auto-formatting, and inline validation. Install the HashiCorp Terraform extension (official — search
HashiCorp.terraform). Requires VS Code v1.86+ and Terraform v0.12+. On Windows it also supports Remote - WSL. - Basic Understanding: Familiarity with Git workflows (branches, merge requests) and the difference between Norton's AWS accounts — Development (hosts dev, QA, staging) and Production.
Setting Up Editor IntelliSense for Terraform
The HashiCorp Terraform extension gives you full IntelliSense — inline provider docs, attribute autocompletion, and instant validation of resource shapes — but only after a one-time terraform init so the AWS provider schema lands on disk where the language server can read it. This is documented officially under Refresh IntelliSense in the extension repository.
Do not run terraform plan or terraform apply locally. The remote state backend, AWS credentials, and KMS keys are configured inside the CI runners only. Local plan/apply will either fail outright or — worse — appear to succeed against incomplete state and produce a misleading diff. terraform init -backend=false is the only Terraform CLI command you should run locally, and only for editor IntelliSense; let the pipeline do everything else.
One-Time Setup
-
Install the HashiCorp Terraform VS Code extension — marketplace listing. Full feature reference: hashicorp/vscode-terraform on GitHub.
-
Install the Terraform CLI if you don't have it already. Follow the official Terraform installation guide for your platform — package managers (
brew,choco,apt) and direct downloads are all covered there. Confirm with:terraform -version -
Initialize the stack without a backend so providers download but no remote state is touched:
cd accounts/development/rdsterraform init -backend=falseThe
-backend=falseflag is the important part. It tells Terraform to skip the GitLab-hosted state backend entirely — no credentials are needed, no state is locked, and nothing is read or written remotely. Terraform downloads the AWS provider into.terraform/and that is the schema the VS Code extension reads from. -
Reload VS Code (or close and reopen the workspace). Open any
.tffile under the stack and IntelliSense should activate — hover overaws_db_instancefor inline documentation, and typeaws_db_instance.to see attribute autocomplete. If completions don't appear, run Terraform: Refresh IntelliSense from the Command Palette as described in the official docs. -
Repeat for any other stack you actively edit.
init -backend=falseis per-directory. Run it once in eachaccounts/{env}/rds/(ors3/,Route53/, etc.) directory you work in. You only need to re-run it when the AWS provider version changes or when you wipe the.terraform/directory.
How to Create a New RDS Database
Step 1: Clone the Infrastructure Repository
If you haven't already, clone the repository locally:
git clone git@gitlab.com:wwnorton/ops/infrastructure.git
cd infrastructure
Create a new branch for your changes:
git checkout -b feat/add-my-new-database
Step 2: Create the Database Secret in AWS Secrets Manager
Critical Step: The database password must exist in AWS Secrets Manager before the Terraform pipeline runs. If the secret doesn't exist, the pipeline will fail.
-
Log in to the AWS Console and select the target AWS account (Development or Production)
-
Navigate to Secrets Manager → Store a new secret
-
Select Other type of secret as the secret type
-
Add a single key-value pair:
- Key:
password - Value: your database password
- Key:
-
Click Next
-
For the secret name, follow the naming convention:
{env}/{team}/rds/{db-identifier}Examples:
dev/labs/rds/my-new-dbdev/ecommerce/rds/commerce-api-dev-dbproduction/labs/rds/my-app-prod
The
{team}segment must match an existing team namespace. It is not a free-form label — it aligns with the namespace conventions used across IAM paths, Kubernetes namespaces, and other Secrets Manager secrets. Using a novel value here will cause IAM policy evaluations (and downstream tooling that scans by namespace) to miss your secret. If you're unsure which namespace your team uses, check an existing secret for your team in Secrets Manager, look at your Kubernetes namespace, or ask@platform. Common examples:labs,nas,ncia,ebook. -
Click through the remaining steps and Store the secret

Why "Other type of secret"? The "RDS" secret type in Secrets Manager requires the database to already exist. Since we're creating it via Terraform, we use a free-form secret with just a password key. Terraform reads this secret at apply time to set the master password.
For more details on secrets management, see Managing Application Secrets in AWS Secrets Manager.
Step 3: Choose a Preset and Paste the Full Example
Open the Terraform variables file for your target environment:
- Development:
accounts/development/rds/terraform.tfvars - Production:
accounts/production/rds/terraform.tfvars
Review existing instances in the file for reference. We provide three presets covering the most common use cases — pick the tab that matches your workload and paste the full block inside the rds_instances = { ... } map. Each preset includes the correct sizing and the matching networking values, so you should not need to assemble these from multiple tables.
- Small (POC / dev experiment)
- Medium (standard dev/staging)
- Large (prod-critical)
Instance: db.t4g.micro • Storage: 20 GB gp3, max 1000 GB, 3000 IOPS • Multi-AZ: no
Best for: POCs, dev experiments, lightweight services where a restart is tolerable.
my-new-db = {
  identifier              = "my-new-db"
  engine                  = "postgres"
  engine_version          = "17.4"
  instance_class          = "db.t4g.micro"
  allocated_storage       = 20
  max_allocated_storage   = 1000
  storage_type            = "gp3"
  iops                    = 3000
  storage_throughput      = 125
  db_name                 = ""
  username                = "postgres"
  password_secret_name    = "dev/labs/rds/my-new-db"
  port                    = 5432
  publicly_accessible     = false
  multi_az                = false
  storage_encrypted       = true
  backup_retention_period = 7
  skip_final_snapshot     = true
  vpc_id                  = "vpc-0db14c78307b70ca1"
  subnet_ids              = ["subnet-0d2d66ab976ec23e5", "subnet-0306b938e7ba6affe", "subnet-067d280c965af5b51", "subnet-08a8b88e0c9a2b29a", "subnet-0076005bcf0240c13", "subnet-01b34ba5972a1ced1"]
  subnet_group_name       = "dev-group"
  security_group_ids      = ["sg-0daaf121546a3a678"]
  allowed_cidr_blocks     = ["0.0.0.0/0"]
  kms_key_id              = "arn:aws:kms:us-east-1:637244866643:key/7f2cc784-172e-4584-99ea-5d875c3c1184"
  copy_tags_to_snapshot                 = true
  performance_insights_enabled          = true
  performance_insights_retention_period = 7
  manage_master_user_password           = false
  monitoring_interval                   = 0
  enabled_cloudwatch_logs_exports       = ["postgresql"]
  backup_window                         = "06:00-06:30"
  maintenance_window                    = "sun:03:00-sun:03:30"
  auto_minor_version_upgrade            = true
  tags = {
    CreatedBy    = "terraform"
    Environment  = "dev"
    Product      = "myproduct"
    Team         = "myteam"
    BusinessUnit = "engineering"
  }
}
Instance: db.m5.large • Storage: 200 GB gp3, max 1000 GB, 3000 IOPS • Multi-AZ: no
Best for: Standard dev/staging workloads that match production-ish shape but don't need HA.
my-new-db = {
  identifier              = "my-new-db"
  engine                  = "postgres"
  engine_version          = "17.4"
  instance_class          = "db.m5.large"
  allocated_storage       = 200
  max_allocated_storage   = 1000
  storage_type            = "gp3"
  iops                    = 3000
  storage_throughput      = 125
  db_name                 = ""
  username                = "postgres"
  password_secret_name    = "dev/labs/rds/my-new-db"
  port                    = 5432
  publicly_accessible     = false
  multi_az                = false
  storage_encrypted       = true
  backup_retention_period = 7
  skip_final_snapshot     = true
  vpc_id                  = "vpc-0db14c78307b70ca1"
  subnet_ids              = ["subnet-0d2d66ab976ec23e5", "subnet-0306b938e7ba6affe", "subnet-067d280c965af5b51", "subnet-08a8b88e0c9a2b29a", "subnet-0076005bcf0240c13", "subnet-01b34ba5972a1ced1"]
  subnet_group_name       = "dev-group"
  security_group_ids      = ["sg-0daaf121546a3a678"]
  allowed_cidr_blocks     = ["0.0.0.0/0"]
  kms_key_id              = "arn:aws:kms:us-east-1:637244866643:key/7f2cc784-172e-4584-99ea-5d875c3c1184"
  copy_tags_to_snapshot                 = true
  performance_insights_enabled          = true
  performance_insights_retention_period = 7
  manage_master_user_password           = false
  monitoring_interval                   = 60
  monitoring_role_arn                   = "arn:aws:iam::637244866643:role/rds-monitoring-role"
  enabled_cloudwatch_logs_exports       = ["postgresql"]
  backup_window                         = "06:00-06:30"
  maintenance_window                    = "sun:03:00-sun:03:30"
  auto_minor_version_upgrade            = true
  tags = {
    CreatedBy    = "terraform"
    Environment  = "dev"
    Product      = "myproduct"
    Team         = "myteam"
    BusinessUnit = "engineering"
  }
}
Instance: db.m5d.2xlarge • Storage: 400 GB io2, max 1000 GB, 3000 IOPS • Multi-AZ: yes
Best for: Production critical workloads where downtime is unacceptable and IOPS latency matters.
my-new-db = {
  identifier              = "my-new-db"
  engine                  = "postgres"
  engine_version          = "17.4"
  instance_class          = "db.m5d.2xlarge"
  allocated_storage       = 400
  max_allocated_storage   = 1000
  storage_type            = "io2"
  iops                    = 3000
  db_name                 = ""
  username                = "postgres"
  password_secret_name    = "production/myteam/rds/my-new-db"
  port                    = 5432
  publicly_accessible     = false
  multi_az                = true
  storage_encrypted       = true
  backup_retention_period = 14
  skip_final_snapshot     = false
  vpc_id                  = "vpc-0e9a40e45f62a82ab"
  subnet_ids              = ["subnet-032faa91a2e05c533", "subnet-03ad98970e3eb7042", "subnet-045bf91734774284c", "subnet-089bcc7c3ea809ea4", "subnet-0d177523b0c8fa5de", "subnet-0f26ee6a7e2083ad1"]
  subnet_group_name       = "prod-group"
  security_group_ids      = ["sg-0ec8114e41abf4063"]
  allowed_cidr_blocks     = ["0.0.0.0/0"]
  kms_key_id              = "arn:aws:kms:us-east-1:100478842646:key/568d75c8-431c-46f3-9a94-b956050589d9"
  copy_tags_to_snapshot                 = true
  performance_insights_enabled          = true
  performance_insights_retention_period = 7
  manage_master_user_password           = true                         # Use AWS-managed password rotation in prod
  monitoring_interval                   = 60
  monitoring_role_arn                   = "arn:aws:iam::100478842646:role/rds-monitoring-role"
  enabled_cloudwatch_logs_exports       = ["postgresql"]
  backup_window                         = "06:00-06:30"
  maintenance_window                    = "sun:03:00-sun:03:30"
  auto_minor_version_upgrade            = true
  deletion_protection                   = true
  tags = {
    CreatedBy    = "terraform"
    Environment  = "prod"
    Product      = "myproduct"
    Team         = "myteam"
    BusinessUnit = "engineering"
  }
}
Prod networking values above (VPC, subnets, subnet group, security group, KMS key) reflect the current shared prod VPC used by existing databases at the time this guide was last updated. Before submitting your MR, confirm against an existing prod instance in accounts/production/rds/terraform.tfvars — if your team owns a dedicated VPC, SG, or KMS key, substitute those values. Ask @platform if unsure.
Tags Are Required: Every database must include tags with at least the following keys: CreatedBy, Environment, Product, Team, and BusinessUnit. These tags are used for cost allocation, ownership tracking, and incident response.
Step 4: Customize the Fields That Are Yours
After pasting the preset, adjust only the fields that identify your database and team. Everything else should stay at preset values unless you have a specific reason to change it.
| Field | What to Set | Notes |
|---|---|---|
Map key (my-new-db) | A unique logical name | Used internally by Terraform, must be unique in the file |
identifier | Your RDS instance name | Must be unique in the AWS account/region |
engine | "postgres" or "mysql" | Only these two are allowed by OPA policy |
engine_version | See allowlist | Must be in the OPA allowlist |
port | 5432 (postgres) or 3306 (mysql) | OPA enforces the port matches the engine |
password_secret_name | Path to the secret you created in Step 2 | Must match exactly |
tags | Your team's values | Update Product, Team, and BusinessUnit |
Allowed Engine Versions and Instance Classes
The allowed engine versions and instance classes are maintained in the OPA allowlist and change over time as versions are deprecated and new ones are added. Always check the current values before submitting your MR:
- Source of truth:
policies/data/rds/allowlist.json
The file contains separate dev and prod sections with all currently allowed engines, versions, instance classes, ports, VPCs, and subnet groups.
OPA Policy Enforcement: The CI pipeline runs OPA (Open Policy Agent) checks against your changes. If you use an engine, version, or instance class not in the allowlist, the pipeline will fail and post a comment on your MR explaining the specific violation. See Understanding RDS Infrastructure for details on all policy guardrails.
Step 5: Choose Your Deployment Timing
You have two options for when changes take effect after the MR is merged. Pick the one that matches your tolerance for disruption:
| Dimension | Option A: Immediate | Option B: Maintenance Window |
|---|---|---|
| Setting | apply_immediately = true | maintenance_window = "sun:03:00-sun:03:30" apply_immediately = false (default) |
| When changes apply | On the next pipeline run after merge | During the next maintenance window (UTC) after merge |
| Typical wait | Minutes | Up to a week, depending on window cadence |
| Good for | Dev databases; urgent fixes; changes with no downtime (tag updates, storage increase) | Production databases; any change that triggers a restart |
| What wins if both are set | apply_immediately = true overrides the maintenance window for that apply | — |
About the window format: ddd:hh24:mi-ddd:hh24:mi in UTC. Changes in the tfvars "live" on your branch until merge — there is no intermediate state or drift. Terraform applies the full desired state when the pipeline runs.
Step 6: Validate Your Changes via the Pipeline
All validation — formatting, syntax, OPA policy checks, and terraform plan — runs automatically when you open a merge request. If you are using VS Code with the Terraform extension, syntax errors will be highlighted in the editor automatically, which can help catch issues before pushing.
Step 7: Submit Your Changes
-
Commit your changes:
git add accounts/development/rds/terraform.tfvarsgit commit -m "feat: Add my-new-db RDS instance"git push origin feat/add-my-new-database -
Open a Merge Request in GitLab targeting the
mainbranch -
In your MR description, include:
- What database is being created (or modified)
- What environment it targets
- The team and application this database serves
- Any special considerations (e.g., "needs to be applied before Thursday's release")
Step 8: Review and Deployment
- The CI pipeline runs automatically on your MR:
- OPA policy check — validates your configuration against the allowlists
- Terraform plan — shows what will be created or changed
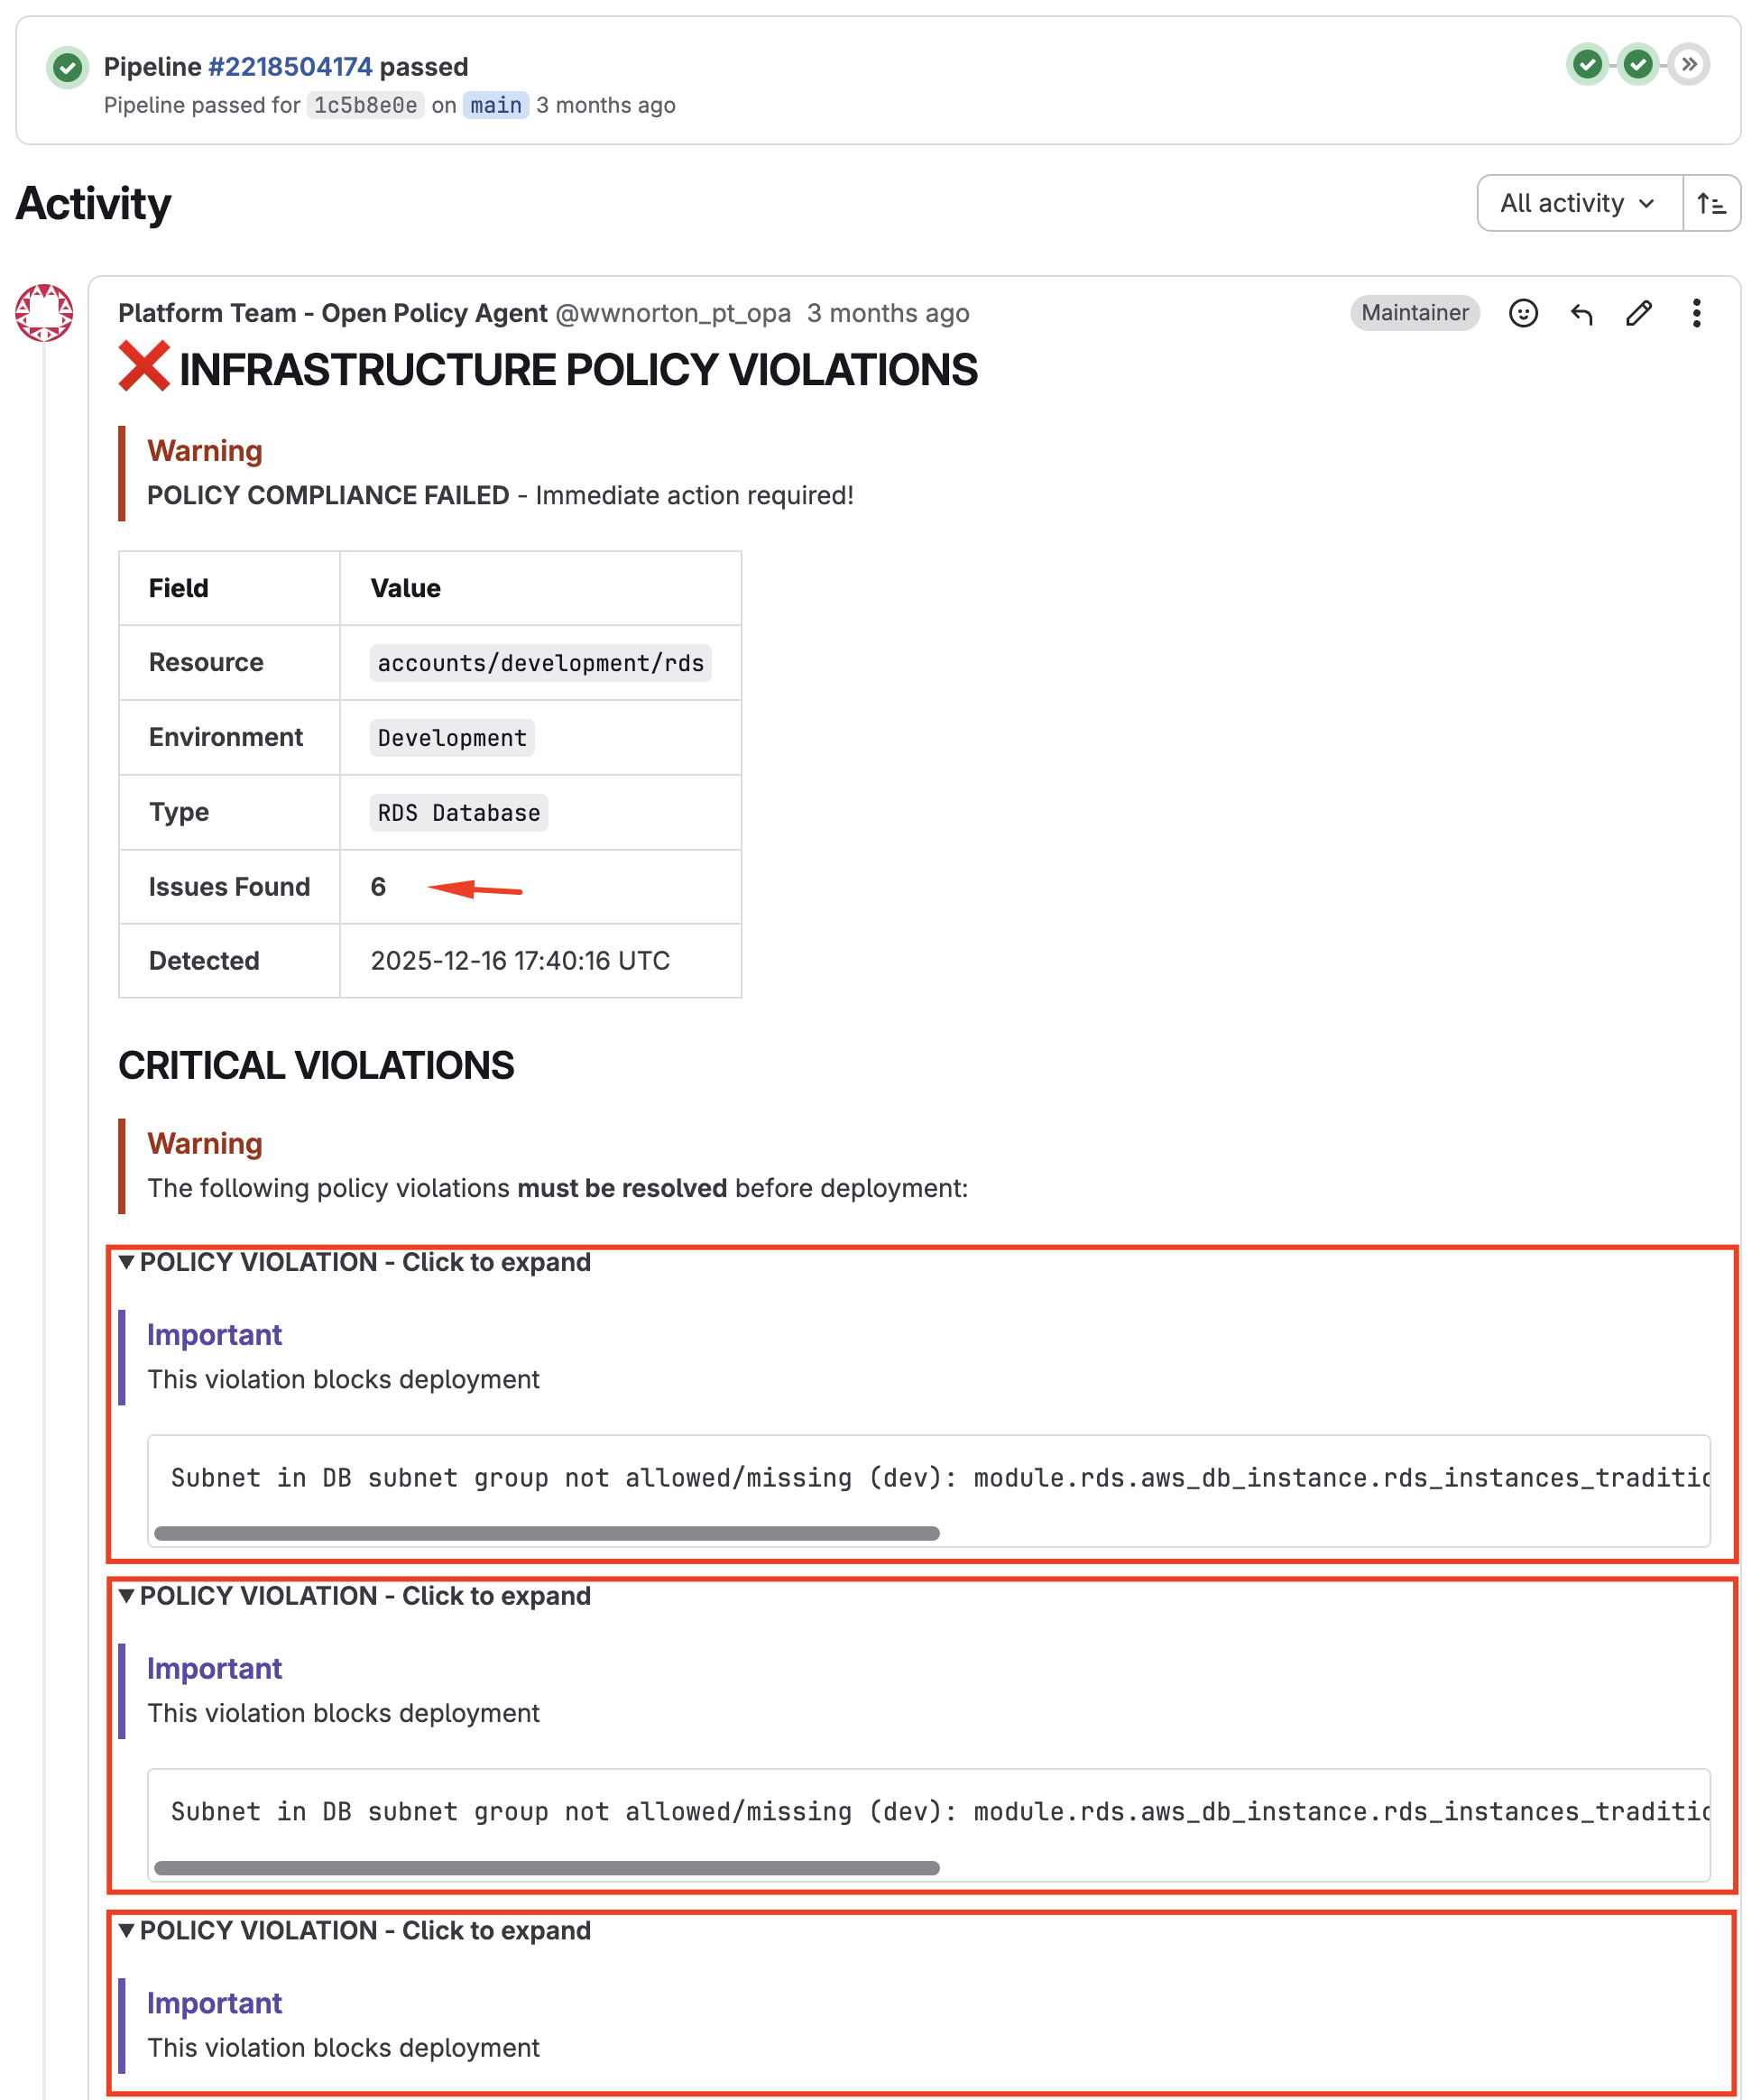
- If OPA finds violations, it will comment directly on the MR with the specific issues
- The Platform team reviews your MR (typically within 24 hours)
- Once approved and merged, Terraform applies the changes according to your timing configuration
What to expect on your MR
- OPA Failed
- OPA Passed
- Terraform Plan
When OPA finds a policy violation, the pipeline posts a comment listing every rule that was triggered. Fix the flagged values and push again — the pipeline re-runs automatically.
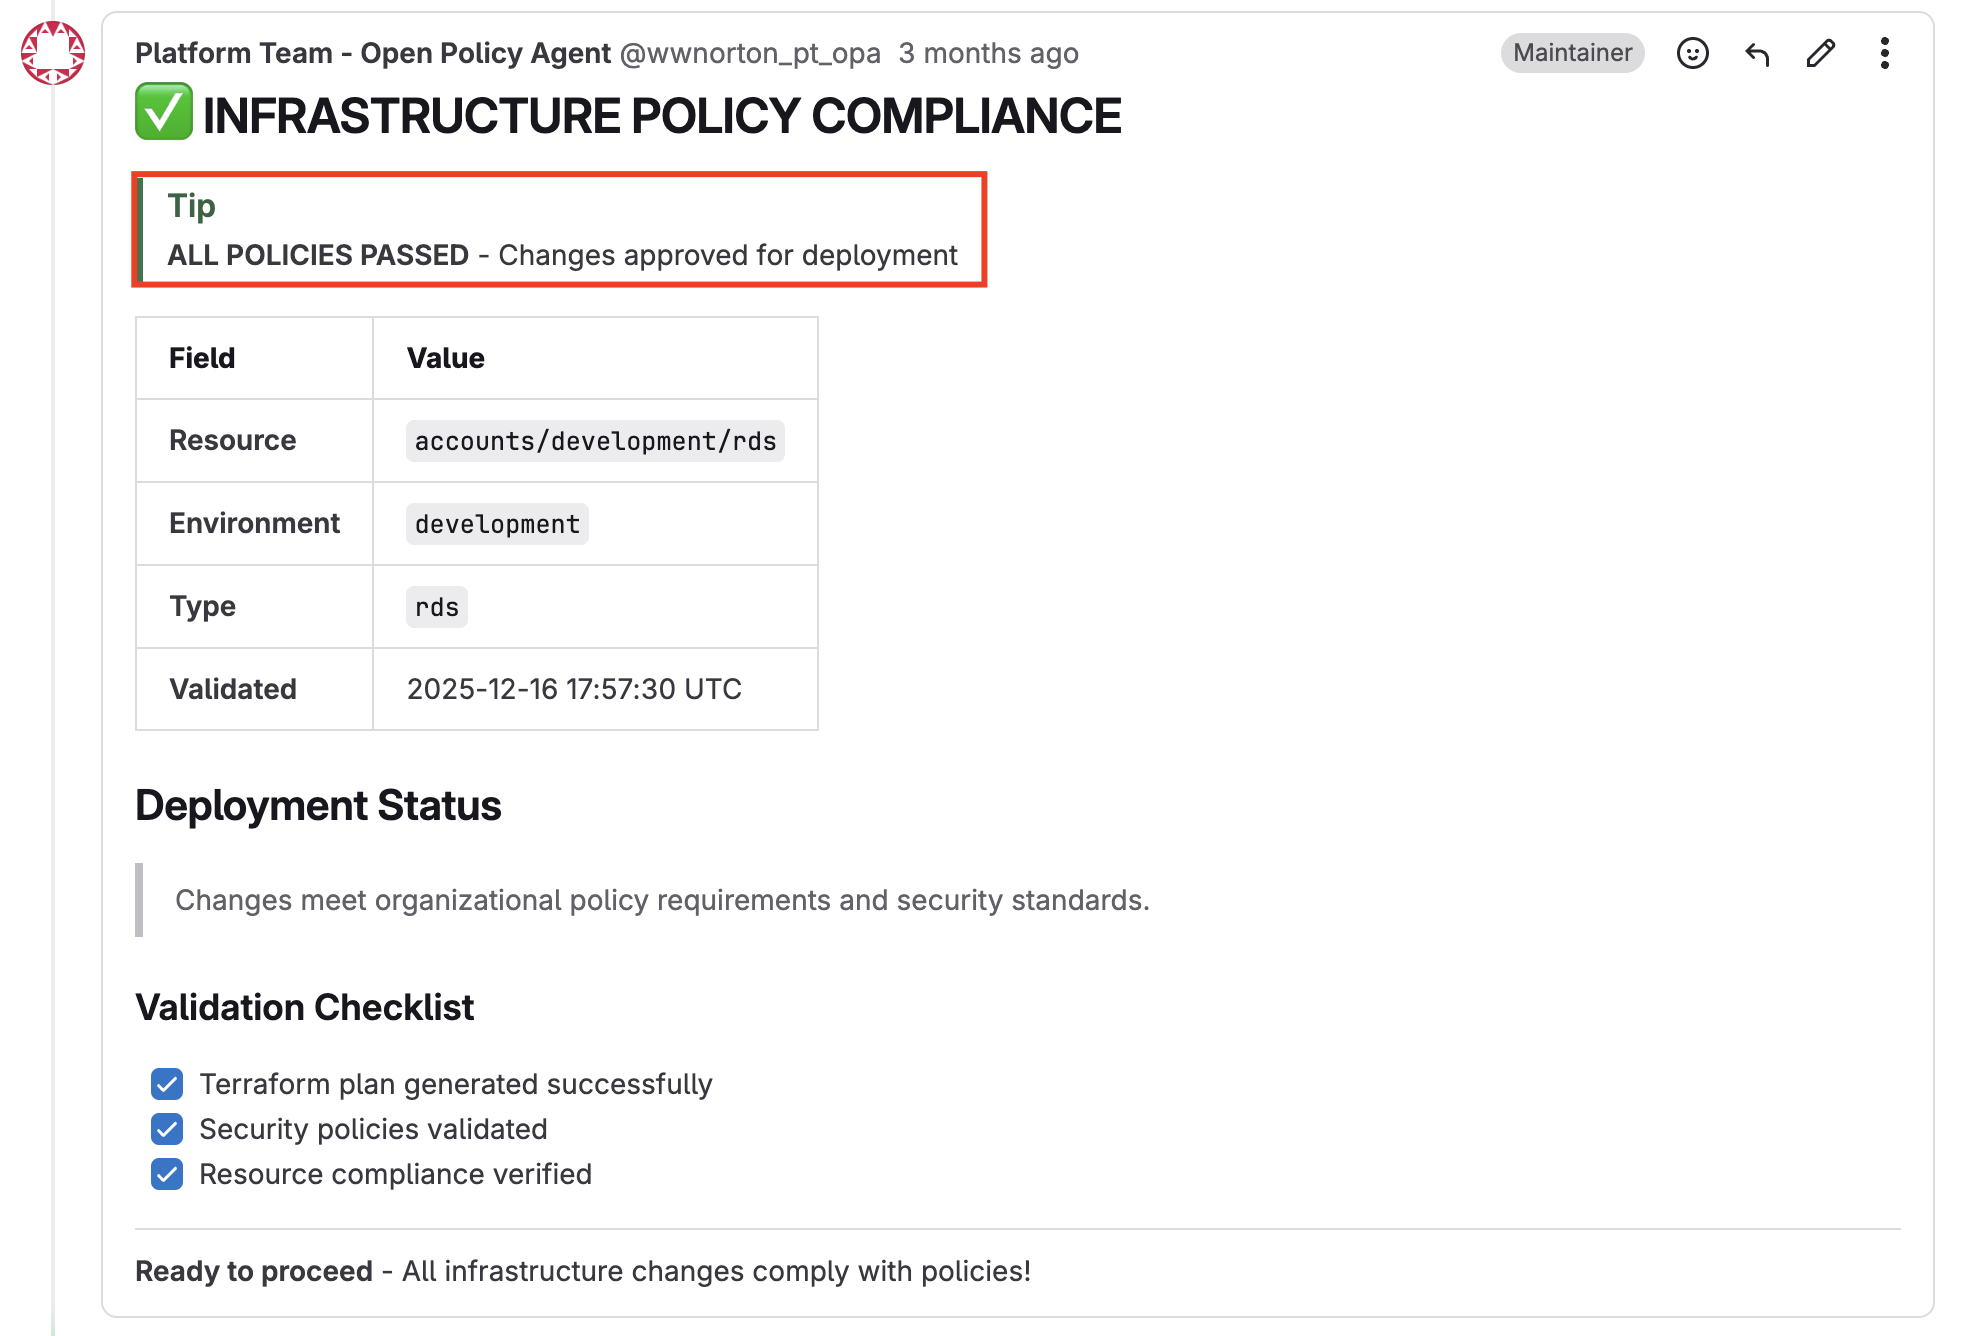
When all checks pass, OPA confirms with a success comment. Your MR is now ready for Platform team review.
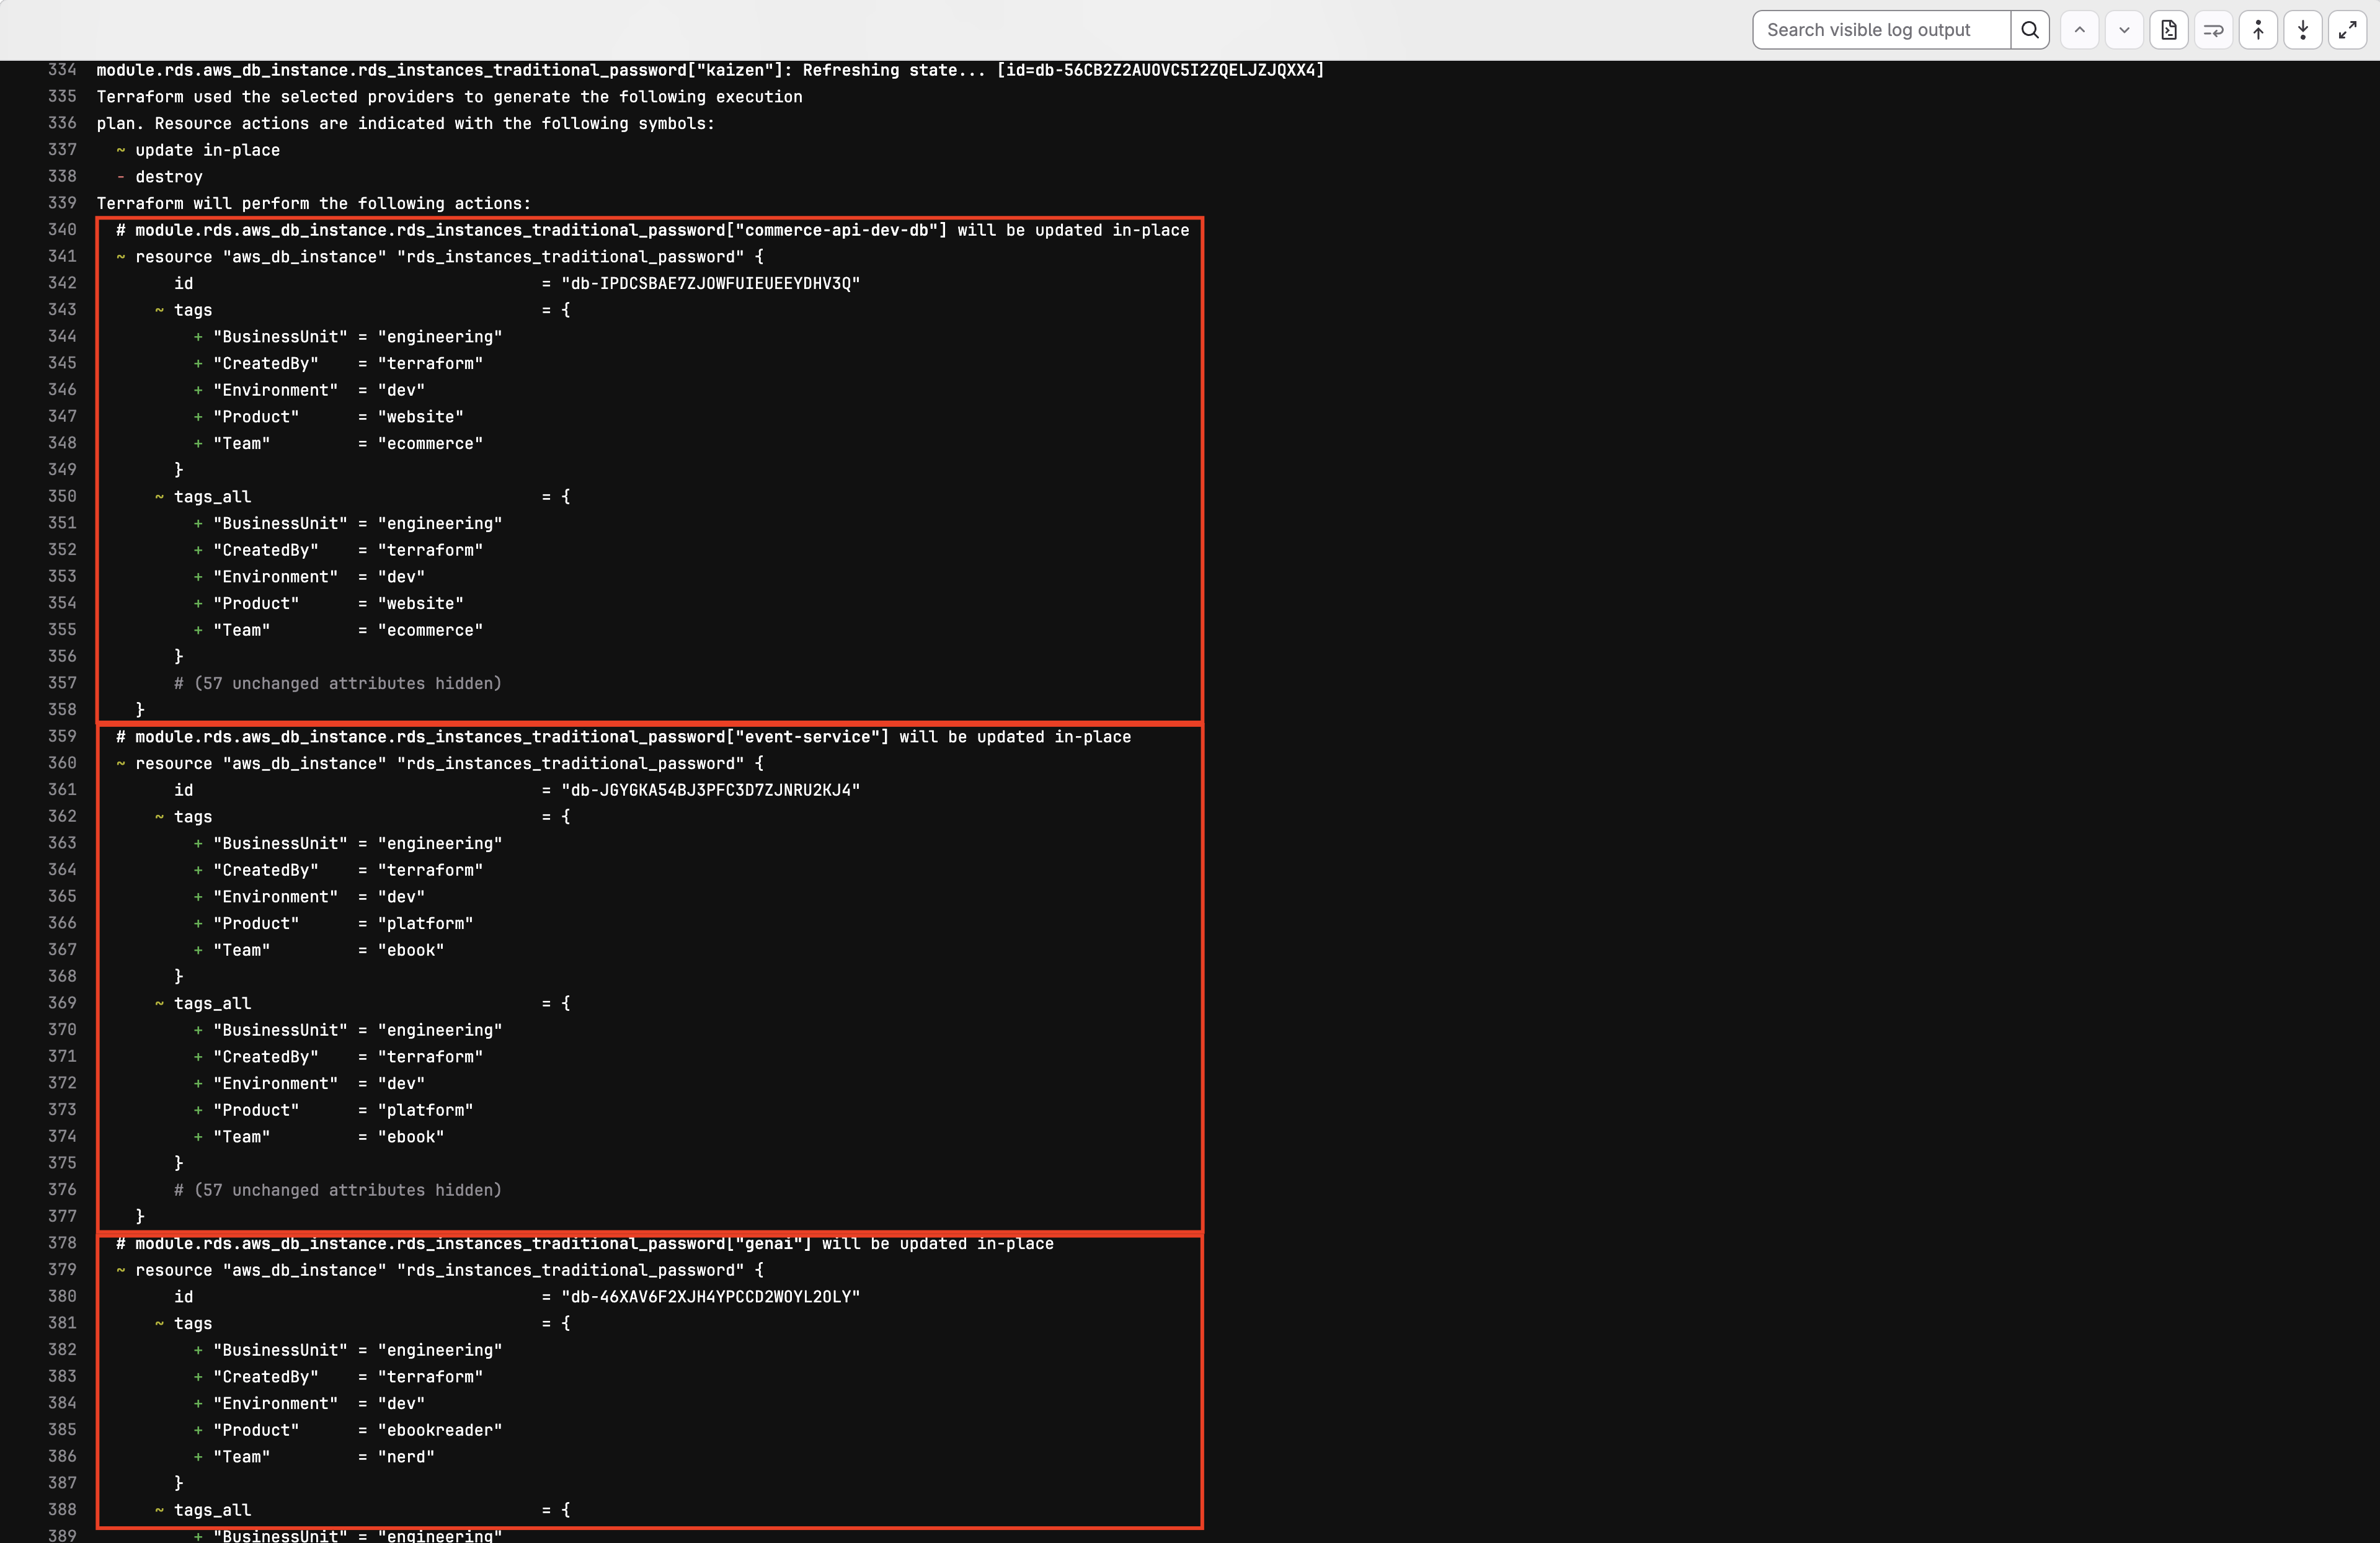
The pipeline also posts the Terraform plan output so you and the reviewer can see exactly what resources will be created, modified, or destroyed.
Understanding SAFE vs READ-MORE Properties
Every use case below is tagged with a risk level. Before you read them, here's what those tags actually mean:
- SAFE — The change does not destroy or recreate the database. No data loss. It may still cause a brief restart (e.g.,
instance_class), but your data and connection string survive. Most property changes fall here. - READ-MORE — The change may cause Terraform to destroy and recreate the database, or otherwise alter behavior in a way that requires planning. Read the linked explanation and verify the Terraform plan carefully before merging.
In short: SAFE ≠ zero interruption. SAFE means "no data destruction." A SAFE change can still restart the database briefly. For full details on which properties are SAFE vs READ-MORE and why, see Understanding RDS Infrastructure → SAFE vs READ-MORE and the property reference table below.
Common Use Cases
The following sections cover the most common modifications you'll make to existing databases, ordered from simplest to most complex.
Use Case 1: Adding or Updating Tags
Risk level: SAFE — No service interruption
Tags help with cost tracking, ownership, and incident response. To add or update tags on an existing database, find its entry in the tfvars file and modify the tags block:
my-database = {
  # ... existing configuration ...
  tags = {
    CreatedBy    = "terraform"
    Environment  = "dev"
    Product      = "myproduct"       # Your product name
    Team         = "myteam"          # Your team name
    BusinessUnit = "engineering"     # Your business unit
    CostCenter   = "CC-12345"       # Optional: for cost allocation
  }
}
Use Case 2: Changing Database Size
Risk level: SAFE — May cause a brief restart depending on the change
To scale your database up (or down), change the instance_class field:
my-database = {
  # Previously: instance_class = "db.t4g.micro"
  instance_class = "db.m5.large"
  # ... rest of configuration ...
}
Downtime Consideration: Changing instance_class typically requires a database restart. If you set apply_immediately = true, this happens as soon as the pipeline runs after merge. Otherwise, it happens during the next maintenance window. For production databases, coordinate with your application team and consider scheduling the change during low-traffic hours.
To increase storage, update allocated_storage:
my-database = {
  # Previously: allocated_storage = 20
  allocated_storage = 200
  # ... rest of configuration ...
}
Storage increases are usually online operations — they do not cause downtime. However, storage can only be increased, never decreased. AWS also limits storage modifications to once every 6 hours.
Use Case 3: Enabling Multi-AZ Failover
Risk level: SAFE — No service interruption
Multi-AZ creates a standby replica in a different Availability Zone. AWS automatically fails over to the standby if the primary becomes unavailable. To enable it:
my-database = {
  # Previously: multi_az = false
  multi_az = true
  # ... rest of configuration ...
}
What this does:
- Creates a synchronous standby replica in another AZ
- Automatic failover (typically 60-120 seconds) if the primary fails
- No changes to your application's connection string
- Approximately doubles the cost of the database instance
When to enable Multi-AZ: Recommended for any database that serves production traffic or where downtime is unacceptable. For development and POC databases, single-AZ is usually sufficient.
Use Case 4: Upgrading Database Engine Versions
Risk level: READ-MORE — Requires careful planning
Major version upgrades can be destructive. They may require downtime, can change database behavior, and may not be reversible. Always test in a lower environment first and coordinate with the Platform team for production upgrades.
Minor Version Upgrades
A minor version upgrade changes the patch number (e.g., X.Y.3 → X.Y.4). These are generally safe and backwards-compatible:
my-database = {
  engine_version = "X.Y"  # Update to the target minor version
  # ... rest of configuration ...
}
If auto_minor_version_upgrade = true (the default), AWS may apply minor upgrades automatically during maintenance windows. Setting the version explicitly ensures a specific version.
Major Version Upgrades — In-Place
A major version upgrade changes the leading number (e.g., 16.x → 17.x for PostgreSQL). Done in place on the existing instance, these require additional consideration:
- Test in development first — Apply the upgrade to a dev database and verify your application works correctly
- Check compatibility — Review the PostgreSQL or MySQL release notes for breaking changes
- Coordinate with Platform team — Major upgrades may need additional parameter group changes or maintenance coordination
- Plan for downtime — In-place major upgrades typically require several minutes of unavailability
The new version must be in the OPA allowlist. Check policies/data/rds/allowlist.json for currently allowed versions. If the version you need is not listed, contact the Platform team to request it be added before submitting your MR.
Major Version Upgrades — Blue/Green Deployment (recommended for prod)
AWS RDS Blue/Green Deployments let you upgrade with minimal downtime by running the new version alongside the old one and cutting over at a moment of your choosing. At a high level:
- RDS clones your primary (and replicas) into a green environment at the new version, kept in sync by replication.
- You validate the green environment — run queries, point a copy of your app at it, check performance.
- When ready, you trigger switchover. RDS renames the endpoints: the green instance takes over the blue instance's endpoint/DNS, the blue instance is renamed and retained. Typical cutover is ~1 minute of write unavailability.
- Your application's connection string does not change — because RDS preserves the endpoint across switchover, app secrets keep working. Reads to the old version continue until the rename step.
What to do today to use Blue/Green at Norton:
The self-service RDS module does not yet expose aws_rds_cluster_blue_green_deployment / aws_db_instance Blue/Green arguments directly, so enabling a Blue/Green deployment is currently a Platform-coordinated operation. Open a Teams request to @platform with:
- The database identifier
- Current → target engine version
- Target switchover window
- Any parameter group changes needed for the new version
Platform will stand up the green environment via the Console/separate Terraform, walk you through validation, and drive the switchover. Once we have repeated this a few times we'll evaluate wiring it into the module for full self-service. Until then, prefer Blue/Green over in-place for any production major version change.
Use Case 5: Adding a Read Replica
Risk level: READ-MORE — Read replicas add operational complexity; read the drawbacks in Understanding RDS → Read Replicas before enabling.
Read replicas are useful for offloading read traffic, running heavy analytics queries off-primary, or supporting cross-region disaster recovery. Add a read_replicas block inside an existing primary's entry in the tfvars:
my-primary-db = {
  # ... full primary configuration (unchanged) ...

  read_replicas = {
    my-primary-db-rr-1 = {
      identifier        = "my-primary-db-rr-1"
      # Optional overrides:
      # instance_class    = "db.m5.large"     # Different size from primary
      # availability_zone = "us-east-1b"      # Specific AZ placement
    }
  }
}
Naming convention: Replica identifiers typically follow {primary-identifier}-rr-{number} (e.g., sw5-prd-rr-c). The replica key in the map can be any unique string, but matching the identifier keeps things readable.
Before you submit this MR, read the drawbacks and operational complexity — replica lag, failover implications, upgrade ordering, and connection-string routing all matter.
Property Reference Table
The tfvars file includes annotations indicating which properties are safe to change without risk and which require additional reading. Here is the full reference (see Understanding SAFE vs READ-MORE above for what the labels mean):
| Property | Risk Level | Notes |
|---|---|---|
identifier | SAFE | |
engine | READ-MORE | Changing engine type is destructive (destroys and recreates) |
engine_version | SAFE (*) | Safe for minor versions; major versions need planning |
instance_class | SAFE | May cause brief restart |
allocated_storage | SAFE | Can only increase, not decrease |
db_name | READ-MORE | Changing on existing DB is destructive |
username | READ-MORE | Changing on existing DB is destructive |
password_secret_name | SAFE | Points to Secrets Manager path |
publicly_accessible | SAFE | |
multi_az | SAFE | |
storage_encrypted | READ-MORE | Cannot toggle on existing unencrypted DB without recreation |
backup_retention_period | SAFE | |
skip_final_snapshot | SAFE | |
port | SAFE | |
vpc_id | SAFE | Used when creating new security group |
subnet_ids | SAFE | Used when creating new subnet group |
subnet_group_name | READ-MORE | Changing may affect connectivity |
security_group_ids | SAFE | List of existing SG IDs to attach; must be in the same VPC |
allowed_cidr_blocks | SAFE | CIDRs added to the RDS SG inbound; required field |
copy_tags_to_snapshot | SAFE | |
deletion_protection | SAFE | Blocks accidental Terraform destroy; recommended true in prod |
performance_insights_enabled | SAFE | |
performance_insights_retention_period | SAFE | Days of Performance Insights history to retain (7 or 731) |
manage_master_user_password | READ-MORE | Switches password management approach |
master_user_secret_kms_key_id | SAFE | KMS key used to encrypt the AWS-managed master password secret |
max_allocated_storage | SAFE | |
monitoring_interval | SAFE | Set 0 to disable Enhanced Monitoring; otherwise 1/5/10/15/30/60 |
monitoring_role_arn | SAFE | Required whenever monitoring_interval > 0; use the shared rds-monitoring-role in the target account |
storage_type | SAFE | |
iops | SAFE (*) | Depends on storage type; see AWS docs |
storage_throughput | SAFE | Only applies to gp3; typical value 125 |
kms_key_id | READ-MORE | Changing encryption key is destructive |
parameter_group_name | READ-MORE | Changing may require a restart and must be compatible with the engine version |
option_group_name | READ-MORE | Engine-specific; changes may trigger a restart |
enabled_cloudwatch_logs_exports | SAFE | |
backup_window | SAFE | |
maintenance_window | SAFE | |
auto_minor_version_upgrade | SAFE | |
tags | SAFE | |
apply_immediately | SAFE |
For more details on why certain properties are marked READ-MORE, see Understanding RDS Infrastructure.
Troubleshooting
OPA Policy Violation on MR
Symptoms:
- Pipeline fails with OPA violation messages
- Comment appears on MR listing specific violations
Common causes:
- Engine version not in allowlist → Check allowed versions and instance classes
- Instance class not in allowlist → Check allowed versions and instance classes
storage_encrypted = false→ Must betrue(enforced by policy)- VPC or subnet group not in allowlist → Copy networking values from one of the presets in Step 3, or ask Platform team to add your VPC
Resolution: Fix the flagged values in your tfvars and push the updated commit. The pipeline will re-run automatically.
Secret Not Found Error
Symptoms:
- Terraform plan/apply fails with "secret not found" error
Common causes:
- Secret doesn't exist yet in AWS Secrets Manager
password_secret_namein tfvars doesn't match the actual secret path- Secret is in the wrong AWS account
Resolution: Verify the secret exists in AWS Secrets Manager and the name matches exactly what's in your tfvars. See Step 2.
Terraform Format Errors
Symptoms:
- Pipeline fails with formatting errors
Resolution: Fix the formatting issues — VS Code with the Terraform extension auto-formats on save — then push the updated commit and the pipeline will re-run automatically.
Quick Reference
New Database Checklist
Pre-Submission
- Secret created in AWS Secrets Manager with
{"password": "..."}format - Secret name follows convention:
{env}/{team}/rds/{db-identifier}and{team}matches an existing namespace - Configuration uses an allowed engine, version, and instance class
- Tags include:
CreatedBy,Environment,Product,Team,BusinessUnit - File is properly formatted (use VS Code Terraform extension for auto-format on save)
Submission
- Changes committed to a feature branch
- MR created with clear description of what and why
- Pipeline passes OPA checks and terraform plan looks correct
Post-Merge
- Terraform apply completed successfully (check pipeline)
- Database accessible from application (test connectivity)
Support
When to Contact Platform Team
- OPA violations for values you believe should be allowed
- Production database changes that need special coordination
- Major version upgrades, especially via Blue/Green deployment
- Read replica creation (see Configuring a Read Replica)
- Networking questions (VPC, subnet groups, security groups)
- Access requests for the Infrastructure repository
How to Get Help
- Check this guide and the troubleshooting section first
- Review existing database configurations in the tfvars file for reference
- Reach out in Microsoft Teams using the
@platformgroup tag. This tag works in any public Digital Product Group channel — you don't need to be in a Platform-owned channel to use it, but it will not resolve in private channels. Include in your message:- Your MR link
- The pipeline job URL (if there's an error)
- What you've already tried
Related Documentation
Internal (Norton)
- Understanding RDS Infrastructure — Architecture, OPA policies, and design rationale
- Managing Application Secrets — Detailed guide to AWS Secrets Manager
- Understanding AWS Secrets Manager — Concepts behind secrets management
- Infrastructure Repository — Source code for all RDS configurations
External (AWS & HashiCorp)
- AWS RDS User Guide — Official AWS documentation
- AWS RDS Blue/Green Deployments — Low-downtime major version upgrades
- Terraform aws_db_instance — Terraform resource reference