How-To: Managing Route53 with Terraform
Introduction
This guide provides step-by-step instructions for adding and modifying Route53 DNS records and hosted zones using Terraform in the Infrastructure repository. It assumes you are starting from zero experience with the infrastructure codebase.
The self-service Route53 workflow is designed for scenarios where you need to:
- Add an
A,CNAME,MX, orTXTrecord for a new application - Point a record at an AWS resource (load balancer, CloudFront, S3 website) using an alias
- Set up DNS verification records for an ACM certificate or a third-party vendor
- Roll traffic between two backends with weighted routing
- Add health-check-driven failover between primary and secondary endpoints
- Stand up a new hosted zone for a new domain
What This Workflow Does: You edit the relevant configuration files in a merge request — a JSON record file for record changes, terraform.tfvars for hosted zone or health check changes. The CI/CD pipeline runs terraform plan, the Platform team reviews and approves, you merge to main, and an operator presses the manual Apply button on the resulting pipeline.
Prerequisites
Required
- GitLab Access: Developer (or higher) permissions on the Infrastructure repository so you can create a branch and open a merge request. This is the only hard requirement — everything else in the workflow is done through GitLab. If you don't have access, contact the Platform team via the
@platformtag in any public Digital Product Group Teams channel. The@platformgroup tag only works in public Digital Product Group channels — private channels won't resolve it.
Recommended
You can complete the entire workflow from the GitLab UI, but most contributors find the tooling below makes the experience much smoother — especially for record-heavy zones.
- AWS Access (for verification): SSO access to the target AWS account via AWS Identity Center. Useful for confirming a record resolves correctly after merge. Without it, you can still verify with
digornslookupfrom your laptop. See Managing Application Secrets for Console access details. - Local clone + Git: If you prefer editing in an IDE over the GitLab web UI, clone the repo locally. Not required — the GitLab web editor can do everything described in this guide.
- macOS
- Windows
- Linux
Git ships with macOS (via the Xcode Command Line Tools). If you want a newer version, install Homebrew first — it doesn't come pre-installed:
/bin/bash -c "$(curl -fsSL https://raw.githubusercontent.com/Homebrew/install/HEAD/install.sh)"
brew install git
Install Git for Windows which includes Git Bash — a Unix-like terminal for running Git commands.
# Debian/Ubuntu
sudo apt install git

# RHEL/CentOS
sudo yum install git
- VS Code + HashiCorp Terraform extension: Highly recommended for syntax highlighting, auto-formatting, and inline validation. Install the HashiCorp Terraform extension (official — search
HashiCorp.terraform). Requires VS Code v1.86+ and Terraform v0.12+. On Windows it also supports Remote - WSL. - Basic understanding: Familiarity with Git workflows (branches, MRs), DNS record types (
A,CNAME,MX,TXT, alias), and Norton's AWS accounts — Development (hosts dev, QA, staging) and Production.
Setting Up Editor IntelliSense for Terraform
The HashiCorp Terraform extension can give you full IntelliSense — inline provider docs, attribute autocompletion, and instant validation of resource shapes — but only after a one-time terraform init so the AWS provider schema lands on disk where the language server can read it. This is documented officially under Refresh IntelliSense in the extension repository.
Do not run terraform plan or terraform apply locally. The remote state backend, AWS credentials, and KMS keys are configured inside the CI runners only. Local plan/apply will either fail outright or — worse — appear to succeed against incomplete state and produce a misleading diff. terraform init -backend=false is the only Terraform CLI command you should run locally, and only for editor IntelliSense; let the pipeline do everything else.
One-Time Setup
-
Install the HashiCorp Terraform VS Code extension — marketplace listing. Full feature reference: hashicorp/vscode-terraform on GitHub.
-
Install the Terraform CLI if you don't have it already. Follow the official Terraform installation guide for your platform — package managers (
brew,choco,apt) and direct downloads are all covered there. Confirm with:terraform -version -
Initialize the stack without a backend so providers download but no remote state is touched:
cd accounts/development/Route53terraform init -backend=falseThe
-backend=falseflag is the important part. It tells Terraform to skip the GitLab-hosted state backend entirely — no credentials are needed, no state is locked, and nothing is read or written remotely. Terraform downloads the AWS provider into.terraform/and that is the schema the VS Code extension reads from. -
Reload VS Code (or close and reopen the workspace). Open any
.tffile under the stack and IntelliSense should activate — hover overaws_route53_zonefor inline documentation, and typeaws_route53_record.to see attribute autocomplete. If completions don't appear, run Terraform: Refresh IntelliSense from the Command Palette as described in the official docs. -
Repeat for any other stack you actively edit.
init -backend=falseis per-directory. Run it once in eachaccounts/{env}/Route53/(ors3/,rds/, etc.) directory you work in. You only need to re-run it when the AWS provider version changes or when you wipe the.terraform/directory.
How to Add a New DNS Record
The most common task. The example below walks through adding a CNAME for a new application; the Common Use Cases section below covers other record types and routing policies in detail.
Step 1: Clone the Infrastructure Repository
If you haven't already, clone the repository locally:
git clone git@gitlab.com:wwnorton/ops/infrastructure.git
cd infrastructure
Create a new branch for your changes:
git checkout -b feat/add-my-app-cname
Step 2: Open the Right Records File
Records live in JSON files under each environment's Route53 directory:
- Development:
accounts/development/Route53/route53-records/ - Production:
accounts/production/Route53/route53-records/
Pick the file that matches the zone you are editing — for example, wwnorton-com.json for wwnorton.com, wwnorton-net.json for wwnorton.net, or one of the author-site zones in production. Public and private views of wwnorton.com live in separate files (wwnorton-com-public.json and wwnorton-com-private.json in production); make sure you are editing the right one.
Not sure which zone? A record for an application that should be reachable from the public internet goes in the public zone. A record that only needs to resolve from inside Norton's VPCs (e.g. service-to-service traffic) goes in the corresponding private zone. If both, add to both.
Step 3: Add the Record Entry
Each file holds an array of record objects. To add a CNAME pointing at the controlled subdomain for the production external ALB:
[
  // ... existing records ...

  {
    "name": "myapp",
    "type": "CNAME",
    "ttl": 300,
    "records": ["alb-external-prod.wwnorton.com"]
  }
]
That single entry creates myapp.wwnorton.com as a CNAME pointing at the controlled subdomain. The full menu of record patterns (alias, weighted, MX, TXT, etc.) is in Common Use Cases below.
Use controlled subdomains for ALB targets, not the raw ELB hostname. Records that point at alb-external-prod.wwnorton.com (or one of its siblings) inherit the maintenance-mode and failover machinery for free. Records that point straight at k8s-tfexternalprd-...elb.amazonaws.com do not, and have to be updated individually for any redirect. See Understanding Route53 → Controlled Subdomains for the full registry.
Step 4: Submit Your Changes
-
Commit your changes:
git add accounts/development/Route53/route53-records/wwnorton-com.jsongit commit -m "feat: Add myapp.wwnorton.com CNAME"git push origin feat/add-my-app-cname -
Open a Merge Request in GitLab targeting the
mainbranch. -
In your MR description, include:
- What record is being added, deleted, or modified, in which zone, and in which environment.
- The team and application this record serves.
- The target the record points at, and why (alias vs CNAME vs A, controlled subdomain vs raw target).
- Anything special — TTL choice, failover setup, allow_overwrite for a migration, etc.
Step 5: Review, Merge, and Apply
- The CI pipeline runs automatically on your MR:
- Format and validate — catches HCL and JSON syntax errors.
- Terraform plan — shows what will be created, deleted, or changed; posted as an MR comment.
- The Platform team reviews within 24 hours and may request changes.
- Once approved and merged to
main, a new pipeline runs on the merge commit. - Open the Apply stage on that pipeline and click the manual job for your stack (e.g.
accounts-development-Route53oraccounts-production-Route53). - Records appear in AWS once apply succeeds. DNS will propagate within the TTL of the record (typically 60–300 seconds).
What to expect on your MR
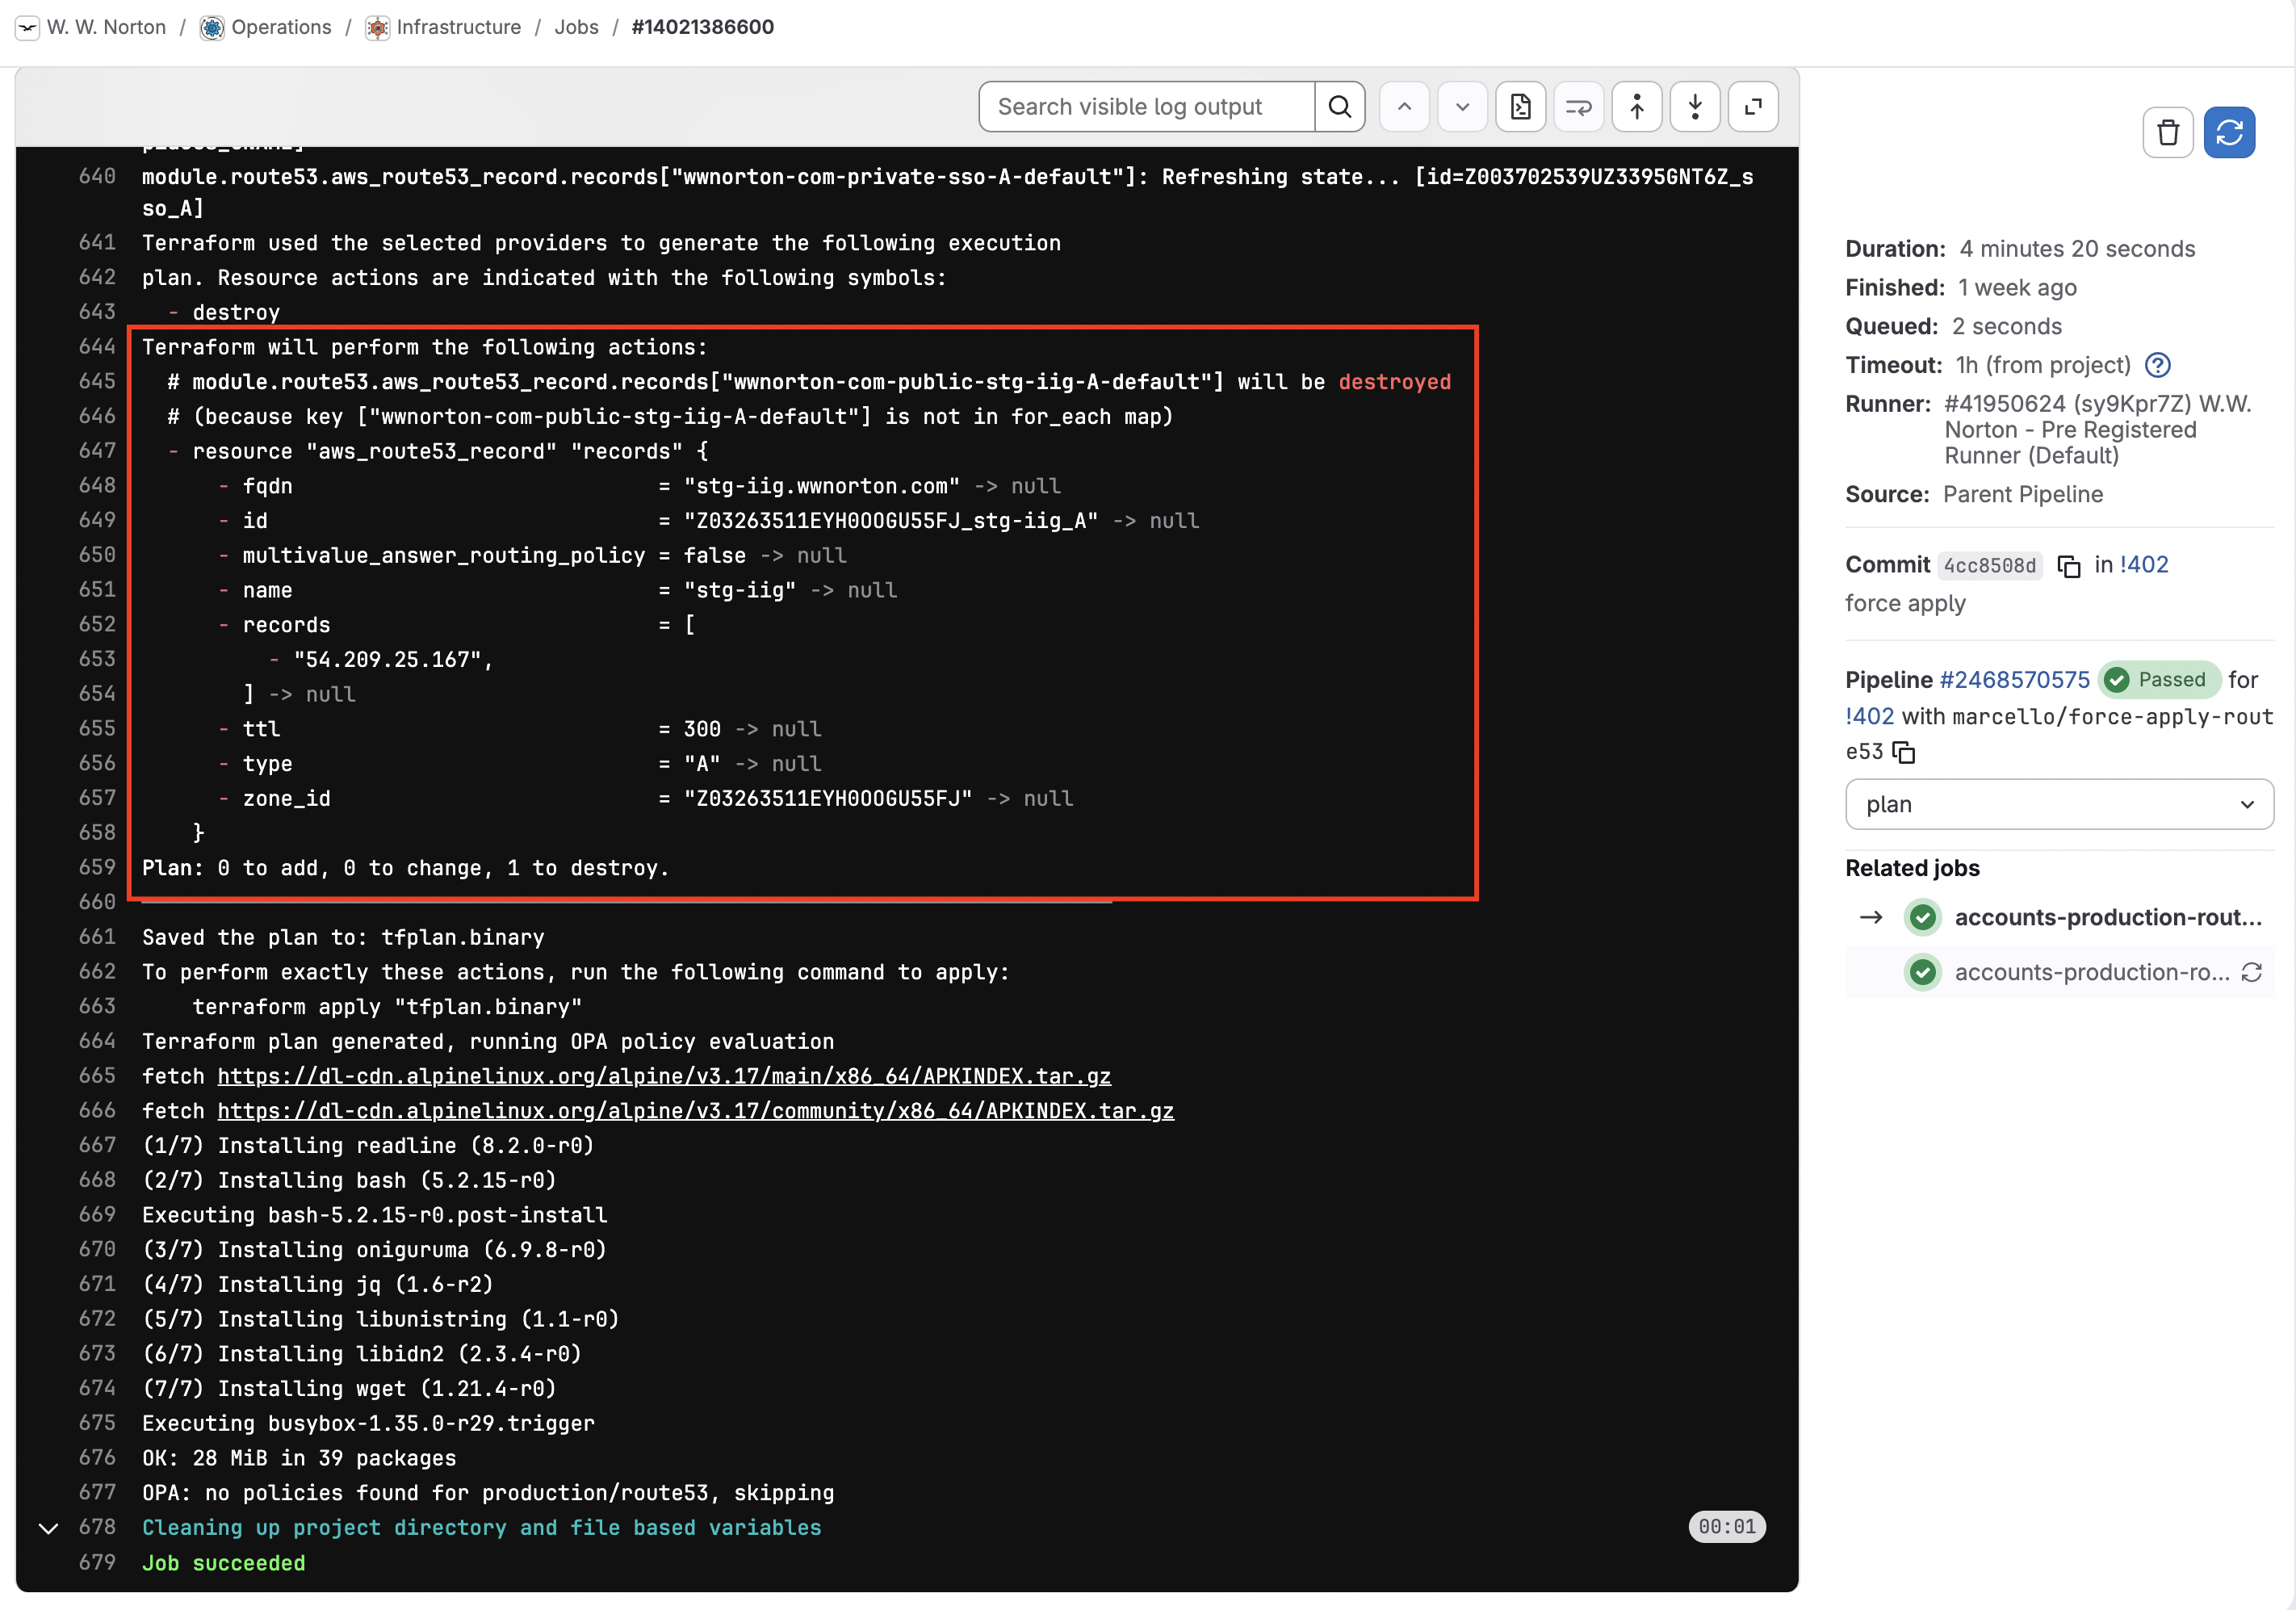
- Plan looks correct
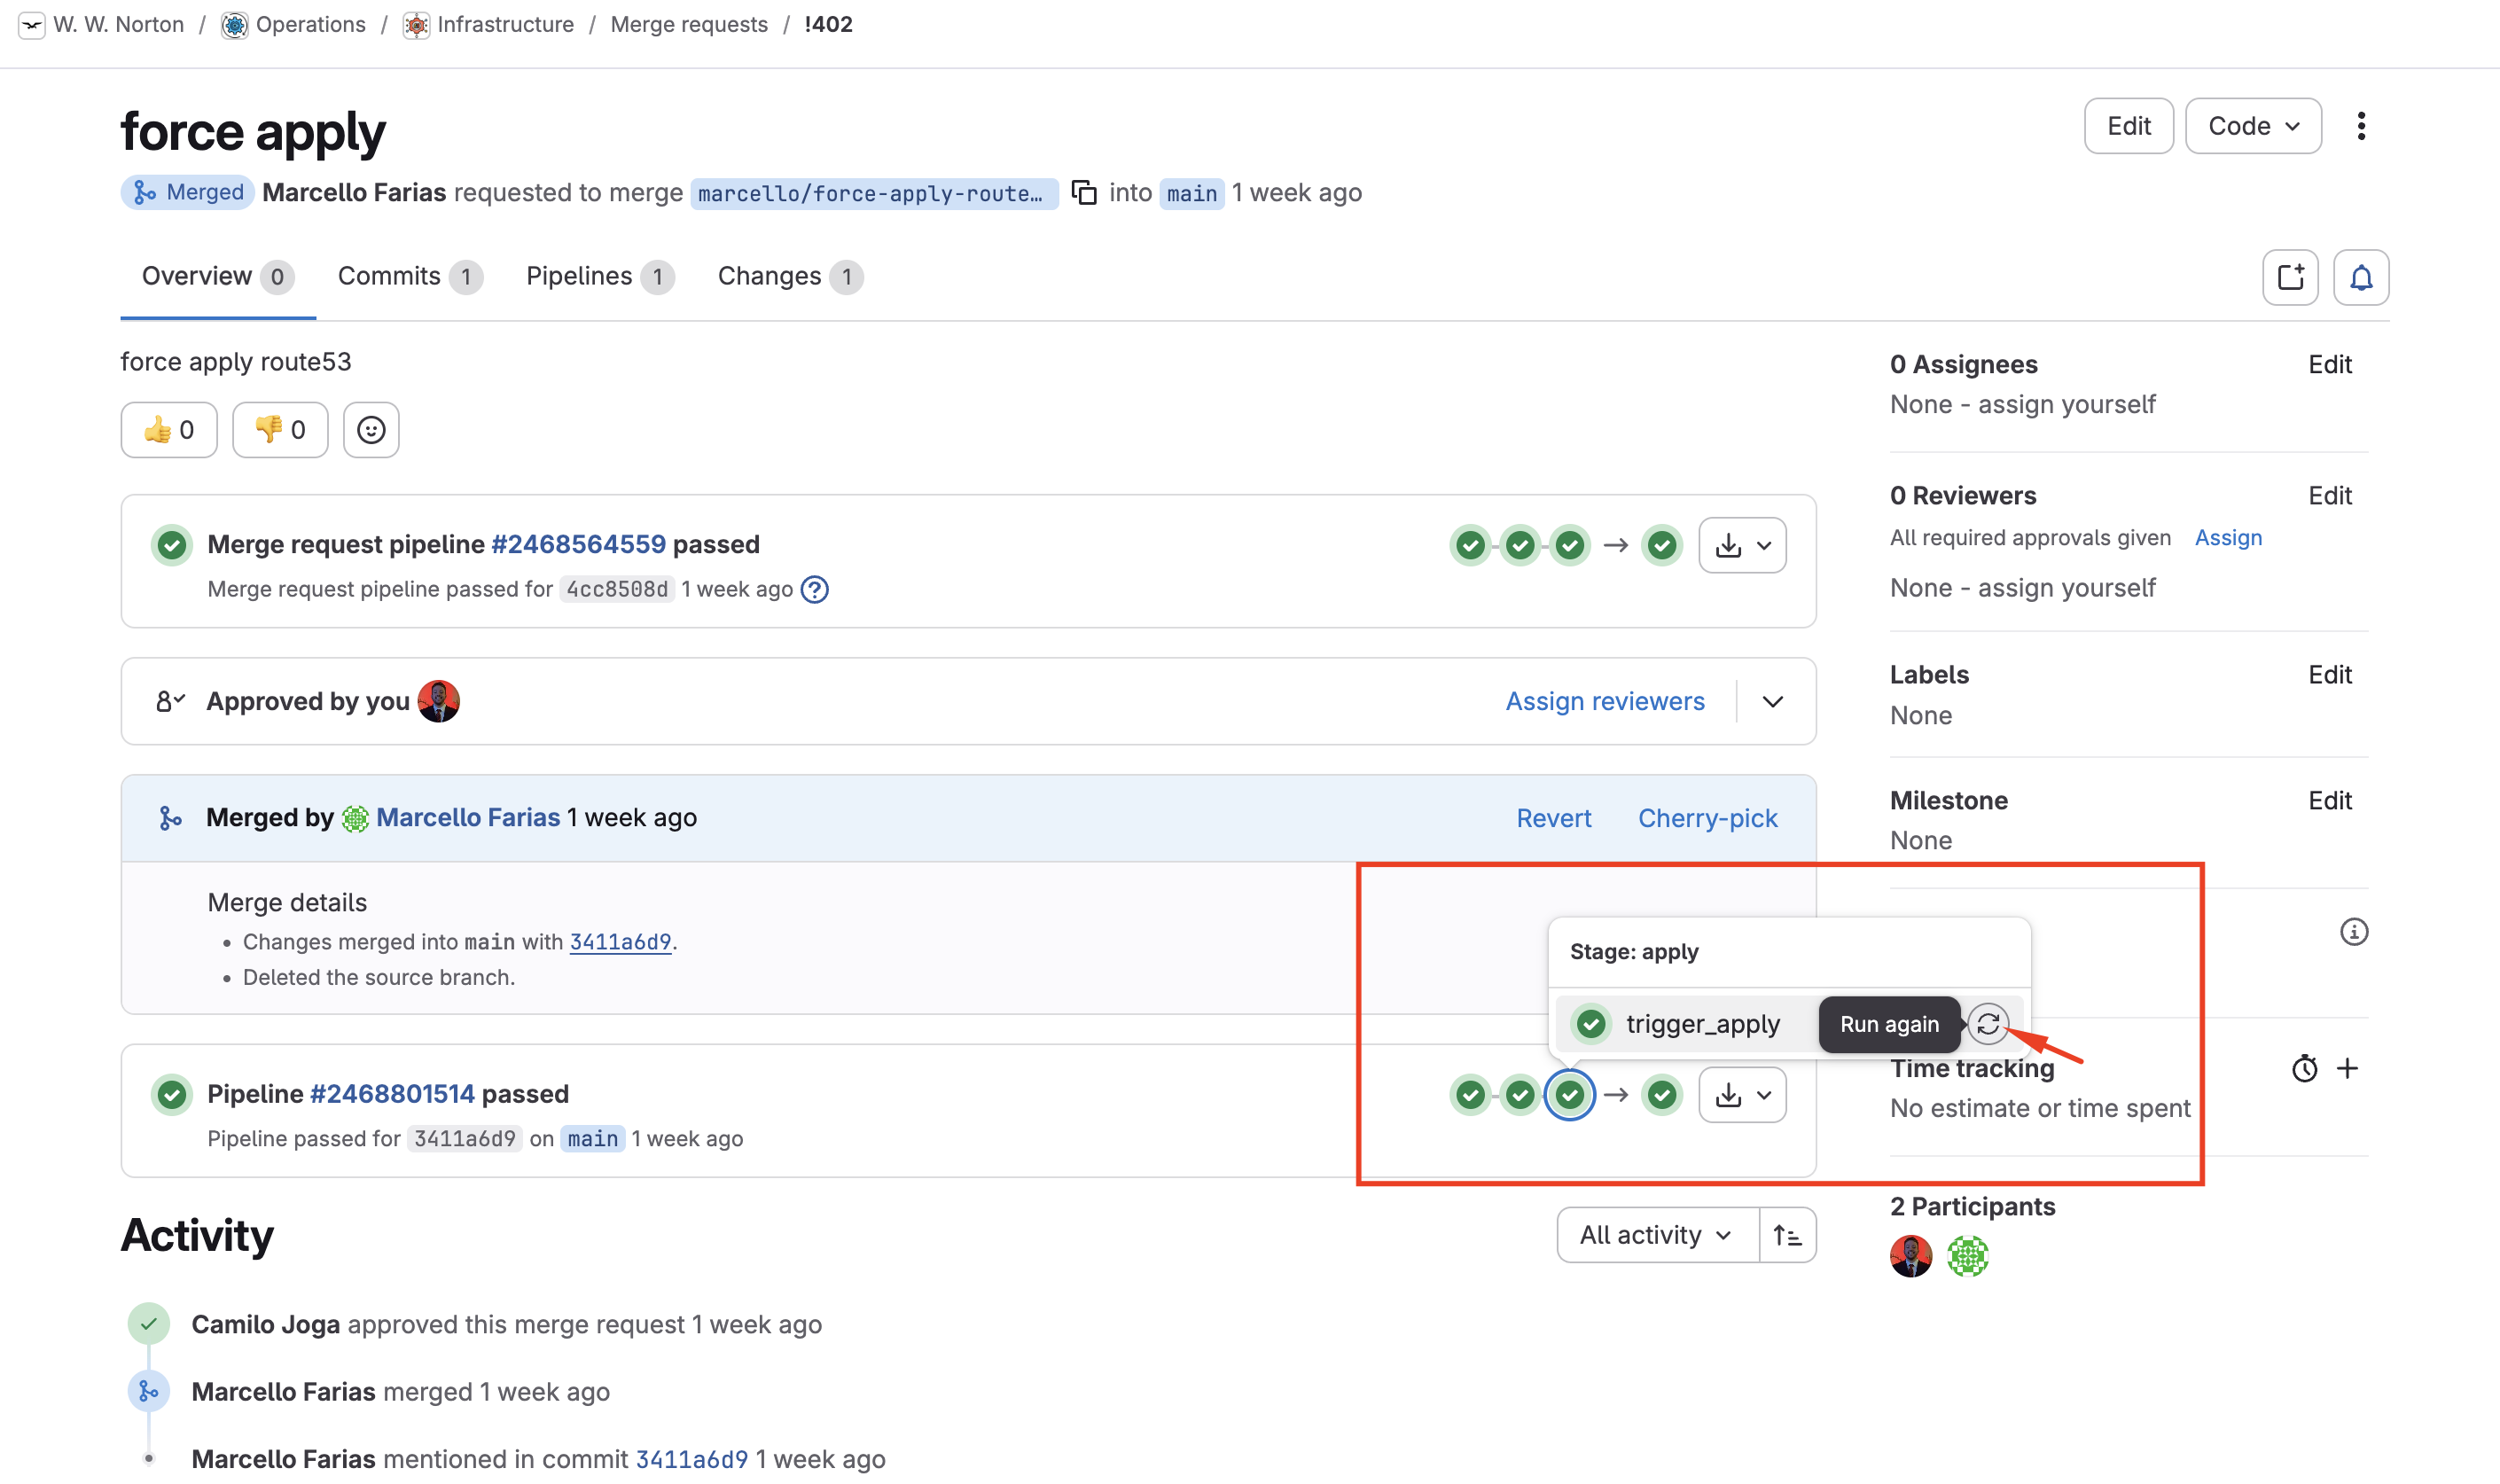
- Apply (manual)
The Terraform plan comment shows exactly the resources that will change — usually one or two aws_route53_record entries. Read it carefully; this is the last automated checkpoint before apply.
On main, the Apply stage is manual. Open it and press play on the right job for your environment. The job log streams the terraform apply output.
Common Use Cases
The patterns below cover the record shapes you are most likely to need. All examples are in JSON; the same shape works for inline records in terraform.tfvars if you prefer that style.
Use Case 1: Standard Records (A, CNAME, MX, TXT)
Risk level: SAFE for new records — READ-MORE if changing an existing record an application depends on.
- CNAME to controlled ALB
- A record (direct IP)
- MX record
- TXT (SPF / DKIM / verification)
The most common shape — a CNAME for an application pointing at a controlled subdomain rather than the raw ELB hostname:
{
  "name": "myapp",
  "type": "CNAME",
  "ttl": 300,
  "records": ["alb-external-prod.wwnorton.com"]
}
When to use: Every new application served by an EKS-backed ALB. The controlled subdomain is what makes maintenance mode and ALB swaps possible without touching the application record.
A direct A record. Use sparingly — most AWS targets should use an alias (see Use Case 2). Direct A records are appropriate for static IPs of legacy systems or external services:
{
  "name": "portal",
  "type": "A",
  "ttl": 300,
  "records": ["104.218.140.153"]
}
When to use: Pointing at a non-AWS host with a stable IP, or an internal service whose IP is owned by infrastructure outside this repo.
Email routing for the zone. Multiple records with different priorities are encoded as separate entries in the records list:
{
  "name": "@",
  "type": "MX",
  "ttl": 300,
  "records": [
    "1 ASPMX.L.GOOGLE.COM.",
    "5 alt1.aspmx.l.google.com.",
    "10 ALT4.ASPMX.L.GOOGLE.COM."
  ]
}
The @ name targets the apex of the zone (e.g. wwnorton.com itself). Trailing dots on the targets are required — they signal a fully qualified name.
When to use: Configuring email delivery for a domain.
TXT records cover SPF, DMARC, DKIM, ACM and vendor verification, and BIMI. Long values often need quoted concatenation — write them as separate strings inside the record value:
{
  "name": "@",
  "type": "TXT",
  "ttl": 300,
  "records": [
    "v=spf1 include:_spf.google.com -all",
    "google-site-verification=abc123..."
  ]
}
ACM certificate validation uses CNAMEs, not TXT — see Use Case 3.
When to use: SPF, DMARC, DKIM, vendor domain verification, and any other text-based proof-of-ownership records.
Use Case 2: Alias Records (Apex of a Domain, ALB, CloudFront, S3)
Risk level: SAFE for new records — READ-MORE if rerouting traffic on an existing apex.
Alias records are the right choice when the target is an AWS resource and you want one of:
- The apex of the zone (
@), where CNAMEs are illegal - Free DNS queries (alias queries are not billed)
- Health-aware routing without an explicit health check
{
  "name": "@",
  "type": "A",
  "alias": {
    "name": "k8s-tfexternalprd-d2265e5869-324837681.us-east-1.elb.amazonaws.com",
    "zone_id": "Z35SXDOTRQ7X7K",
    "evaluate_target_health": false
  }
}
The zone_id is the hosted zone of the AWS resource, not the Route53 zone you are adding the record into. AWS publishes the canonical zone_id for each service and region:
| Target type | Where to find the zone_id |
|---|---|
| ALB / NLB | EC2 console → Load Balancers → the LB's "Hosted zone" field, or aws elbv2 describe-load-balancers |
| CloudFront | Always Z2FDTNDATAQYW2 (a single global value) |
| S3 static website | Documented per region; for us-east-1 it's Z3AQBSTGFYJSTF |
| API Gateway (regional) | The output of aws apigateway get-domain-name for the custom domain |
Plug in the right zone_id. A wrong zone_id does not produce a syntax error — it produces a record that resolves to nothing, and the failure mode is "the site is down." Double-check the value against AWS documentation or aws ... describe-* output before merging.
Use Case 3: ACM Certificate Validation Records
Risk level: SAFE — these records are inert until ACM consumes them, and they expire silently after the certificate is issued.
When ACM issues a TLS certificate for a domain in your zone, it asks for a CNAME proving you own the domain. The CNAME is given to you in the ACM Console (Certificate → Domains → "Create record in Route53" or copy the values manually). Add it to the right zone file:
{
  "name": "_b124124e4a4ddd4bbf125d09236f571e",
  "type": "CNAME",
  "ttl": 300,
  "records": [
    "_a128e69edb4f4daa628d1f4ed21192de.nbnhgqgzdr.acm-validations.aws."
  ]
}
The leading underscore on the name is intentional. ACM polls the record on a 1-minute interval; once it sees the validation, the certificate moves to Issued within minutes. After issuance, you can leave the record in place — ACM uses it again on every renewal.
Each subject alternative name (SAN) needs its own validation CNAME. A certificate covering app.wwnorton.com, *.app.wwnorton.com, and app.wwnorton.net will need three separate validation records, possibly across two zone files.
Use Case 4: Weighted Routing (Gradual Rollouts)
Risk level: READ-MORE — incorrect weights can route real traffic to an unready backend.
Two records with the same name and type, distinguished by set_identifier, with weights summing to whatever number you like (Route53 uses the ratio, not a fixed total):
[
  {
    "name": "myapp",
    "type": "CNAME",
    "ttl": 60,
    "records": ["alb-external-prod.wwnorton.com"],
    "set_identifier": "current",
    "weighted_routing_policy": { "weight": 90 }
  },
  {
    "name": "myapp",
    "type": "CNAME",
    "ttl": 60,
    "records": ["alb-iig-prod.wwnorton.com"],
    "set_identifier": "candidate",
    "weighted_routing_policy": { "weight": 10 }
  }
]
Pattern: Drop the candidate weight to 0 to roll back instantly. Bump the candidate weight up over a series of small MRs. Keep TTL low (60s) during the rollout so client-side DNS caches don't lock anyone onto a single answer for long.
Use Case 5: Failover Routing with a Health Check
Risk level: READ-MORE — failover only works if the health check is well-tuned. A check that flaps will flap your DNS.
Failover routing needs (1) a health check declared in terraform.tfvars and (2) two records — primary and secondary — sharing a name and type but distinguished by set_identifier and the failover role:
# accounts/{env}/Route53/terraform.tfvars
health_checks = {
  "myapp-primary" = {
    type              = "HTTPS"
    fqdn              = "myapp.wwnorton.com"
    resource_path     = "/healthz"
    failure_threshold = 3
    request_interval  = 30
  }
}
[
  {
    "name": "myapp",
    "type": "A",
    "set_identifier": "primary",
    "alias": {
      "name": "alb-external-prod.wwnorton.com",
      "zone_id": "Z35SXDOTRQ7X7K",
      "evaluate_target_health": true
    },
    "failover_routing_policy": { "type": "PRIMARY" },
    "health_check_id": "REPLACE_WITH_HEALTH_CHECK_ID"
  },
  {
    "name": "myapp",
    "type": "A",
    "set_identifier": "secondary",
    "alias": {
      "name": "alb-dr-prod.wwnorton.com",
      "zone_id": "Z35SXDOTRQ7X7K",
      "evaluate_target_health": true
    },
    "failover_routing_policy": { "type": "SECONDARY" }
  }
]
Wiring the health check ID into the JSON is the trickiest part of this pattern. The IDs are AWS-generated and are not known until the check exists. Two options:
- Two-MR rollout — first MR adds the health check (with a placeholder record), wait for apply, copy the ID from the pipeline output, second MR replaces the placeholder with the real ID.
- Inline records in tfvars — declare the records inline in
terraform.tfvarsinstead of in JSON, and reference the health check viaaws_route53_health_check.health_checks["myapp-primary"].iddirectly. This avoids the two-MR dance but loses the JSON readability for that specific record set.
For your first failover setup, the two-MR approach is the right call. Switch to inline only when you are comfortable with the module.
Use Case 6: Adding a New Hosted Zone
Risk level: READ-MORE — a new zone has to have its NS records propagated at the registrar before it answers anything publicly.
Adding a new domain (e.g. for a new author site) requires editing terraform.tfvars rather than just a record JSON. Add the zone and create an empty (or near-empty) records file:
# accounts/production/Route53/terraform.tfvars
hosted_zones = {
  # ... existing zones ...

  "newauthor-com" = {
    name         = "newauthor.com"
    comment      = "Hosted zone for the New Author site"
    records_file = "route53-records/newauthor-com.json"
    tags = {
      Environment = "production"
      ManagedBy   = "Terraform"
      Type        = "public"
    }
  }
}
// accounts/production/Route53/route53-records/newauthor-com.json
[
  {
    "name": "@",
    "type": "A",
    "alias": {
      "name": "d1234abcd.cloudfront.net",
      "zone_id": "Z2FDTNDATAQYW2",
      "evaluate_target_health": false
    }
  },
  {
    "name": "www",
    "type": "CNAME",
    "ttl": 300,
    "records": ["d1234abcd.cloudfront.net"]
  }
]
After apply, grab the four name servers from the pipeline's apply output (or from the AWS Console) and update the registrar's NS records to point at them. The zone is live as soon as the registrar's NS propagates — usually within a few minutes, occasionally up to 48 hours for the most aggressive caches.
Private zones don't need registrar updates. They are reachable only from associated VPCs, so AWS routes queries internally without involving the global DNS hierarchy.
Use Case 7: Maintenance Mode
Risk level: READ-MORE — the change ripples to every application that resolves through the affected controlled subdomain.
Maintenance mode redirects every application behind a controlled subdomain to the static maintenance page in a single record edit. The full procedure — including the prepare-in-advance / merge-at-the-window pattern, the file list to edit, and the revert workflow — lives in docs/aws/route53/controlled-subdomains.md in the Infrastructure repository.
The short version:
- Prepare the MR ahead of the maintenance window — change the
alb-external-prod(and any other applicable) controlled subdomain CNAME target tomaintenance.wwnorton.comin all three files: production public, production private, and development. - Get the MR reviewed and approved before the window starts.
- At maintenance time, merge and run the manual Apply jobs.
- Roll back via either a revert MR (prepared during step 1) or by re-applying the original CNAME values in a follow-up MR.
Background and rationale for the controlled-subdomain pattern: Understanding Route53 → Controlled Subdomains.
Understanding SAFE vs READ-MORE Properties
Each kind of change carries a different level of risk on an existing record. This reference helps you understand the impact before merging.
| Change | Risk Level | Notes |
|---|---|---|
| Add a new record (any type) | SAFE | No existing resolution is affected |
Change a ttl | SAFE | Affects future caching; in-flight cached answers stay until expiry |
Change records value on an A/CNAME pointing at a controlled subdomain | SAFE | Controlled subdomains absorb most target swaps |
Change records value on a record pointing at a raw ELB | READ-MORE | Until propagation completes, requests may hit either old or new target |
Change a name or type | READ-MORE | Forces destroy + recreate; brief outage for the old name |
Change an alias.zone_id or alias.name | READ-MORE | Same as above; verify the new zone_id is correct for the target type |
Add a set_identifier to an existing simple record | READ-MORE | Forces destroy + recreate; pair with weighted/latency policy thoughtfully |
Set allow_overwrite = true | READ-MORE | Lets Terraform take over a record that exists in AWS but isn't yet in state — only use during a one-off migration MR, then remove |
Add a health_check_id to a record | SAFE | Health check has to exist first |
| Delete a record | READ-MORE | Affected name stops resolving until any client cache expires |
| Delete a hosted zone | BLOCKED | prevent_destroy rejects the plan; edit the lifecycle block first if intentional |
For deeper context on prevent_destroy, the controlled-subdomain pattern, and the pipeline flow, see Understanding Route53 Infrastructure.
Troubleshooting
Error: zone is required for record or Error: invalid alias zone_id
Symptoms:
- Pipeline plan or apply fails with a Terraform error referencing a missing or invalid alias
zone_id.
Common causes:
- Pasted the Route53 zone ID instead of the AWS resource's hosted zone ID.
- Used a CloudFront
zone_idfor an ALB target (or vice versa).
Resolution: Look up the right zone_id for the target type — see the table in Use Case 2. For ALBs, run aws elbv2 describe-load-balancers --names ... and use the CanonicalHostedZoneId field. For CloudFront, the correct value is always Z2FDTNDATAQYW2.
Error: record already exists During Apply
Symptoms:
- Apply fails with a "Tried to create resource record set, but it already exists" error.
Common cause: A record with the same name and type was created out-of-band in the AWS Console (or by a previous, broken Terraform run) and is not in the current Terraform state.
Resolution: Two options:
- Recommended — delete the orphan record in the Console first, then re-run apply. The plan output will show the record being created cleanly.
- One-off migration only — set
allow_overwrite = trueon the record entry, run apply once to take ownership, and then removeallow_overwritein the next MR. Leavingallow_overwrite = truelong-term hides drift, so always remove it after the migration.
Record Doesn't Resolve After Apply
Symptoms:
dig myapp.wwnorton.comreturns NXDOMAIN or an old answer well past the TTL.
Common causes:
- The record was added to the wrong zone (public vs private).
- The TTL on the record is correct but the recursive resolver you are testing from cached the old answer (or a
NODATAnegative answer) before the record existed. - For a brand-new public hosted zone, the registrar's NS records haven't been updated yet.
Resolution:
- Verify the record exists in the right zone via the AWS Console (Route53 → Hosted zones → the zone → search for the name).
- Test resolution against the authoritative name servers directly:
dig @ns-XXXX.awsdns-XX.com myapp.wwnorton.com. Get the NS list from the zone'soutput.name_serversor the Console. If the authoritative answer is correct, wait for caches to expire. - For new public zones, confirm the registrar's NS list matches the zone's
name_servers.
Error: failure threshold or Health Check Reference Errors
Symptoms:
- Plan fails referencing an unknown
health_check_id, or apply fails because the health check doesn't exist yet.
Common cause: Trying to add the record and the health check in the same MR, with the record referencing a hardcoded ID that doesn't yet exist in AWS.
Resolution: Use the two-MR rollout described in Use Case 5. Apply the health check first, copy the resulting ID from the apply output, then merge the second MR with the real ID wired in.
Quick Reference
New Route53 Record Checklist
Pre-Submission
- Picked the right zone file — public vs private, prod vs dev
- Pointing at a controlled subdomain (not a raw ELB) where applicable
- Used an alias record for AWS targets at the apex of a zone
- Confirmed the alias
zone_idmatches the target's service and region - Set a TTL appropriate for the change cadence (60s for hot records, 300s+ for stable ones)
Submission
- Changes committed to a feature branch
- MR created with clear description of what record, in which zone, why, and what it points at
- Pipeline plan comment shows exactly the record changes you expected — no more, no less
Post-Merge
- Manual Apply step run on the merge-commit pipeline
- Resolved against the authoritative name servers (
dig @ns-XXXX...) once apply completes - If a new public zone: registrar NS records updated to match the zone's
name_servers
Support
Known Gaps
- No OPA policies for Route53 yet: Other resources (S3, RDS, ElastiCache, MemoryDB, MQ) have OPA policy bundles enforcing organization standards on the plan. Route53 does not, so review and
prevent_destroyare doing more of the work today. See Understanding Route53 → OPA Policy Guardrails for the rationale and the likely first checks. - No tag enforcement on records: Records cannot be tagged (an AWS limitation). Tags exist on hosted zones and health checks only.
When to Contact Platform Team
- Adding a new public hosted zone (registrar coordination needed)
- Anything involving DNSSEC (not currently configured)
- Migrating an existing record from a non-Terraform-managed source —
allow_overwriteuse cases - Health check or failover setups that need cross-account or cross-region coordination
- Maintenance-mode windows for production
- Access requests for the Infrastructure repository
How to Get Help
- Check this guide and the troubleshooting section first.
- Review existing records in the same zone file for reference — most patterns are well-represented.
- Reach out in Microsoft Teams using the
@platformgroup tag. This tag works in any public Digital Product Group channel — you don't need to be in a Platform-owned channel to use it, but it will not resolve in private channels. Include in your message:- Your MR link
- The pipeline job URL (if there's an error)
- What you've already tried —
digoutput is especially helpful
Related Documentation
Internal (Norton)
- Understanding Route53 Infrastructure — Architecture, design decisions, and pipeline rationale
- Controlled Subdomains for Load Balancers — Subdomain registry and maintenance-mode procedure
- Managing S3 Buckets with Terraform — S3 self-service workflow (same pipeline shape)
- Managing RDS Databases with Terraform — RDS self-service workflow
- Infrastructure Repository — Source code for all Route53 configurations
External (AWS & HashiCorp)
- Amazon Route 53 Developer Guide — Official AWS documentation
- Choosing a routing policy — Detailed comparison of routing policies
- Terraform aws_route53_record — Resource reference
- Terraform aws_route53_zone — Resource reference
Appendix
Hosted Zone Configuration Reference
Declared in accounts/{environment}/Route53/terraform.tfvars under hosted_zones.
| Attribute | Type | Default | What It Does |
|---|---|---|---|
name | string | required | Domain name of the zone (e.g. wwnorton.com) |
comment | string | none | Human-readable description shown in the Console |
force_destroy | bool | false | Allows zone destruction even if records exist — prevent_destroy blocks this regardless |
delegation_set_id | string | none | Reuse a pre-declared delegation set for stable NS records |
vpc_associations | list(object) | [] | List of { vpc_id, vpc_region } — declares the zone as private and attaches it to those VPCs |
records_file | string | none | Relative path to a JSON file holding the zone's records |
records | list(object) | [] | Inline records declared directly in tfvars |
tags | map(string) | {} | Tags applied to the zone resource |
Record Configuration Reference
Each record (whether in a JSON file or inline in tfvars) supports:
| Attribute | Type | Default | What It Does |
|---|---|---|---|
name | string | required | The record name; @ or "" resolves to the zone apex |
type | string | required | DNS record type — A, AAAA, CNAME, MX, TXT, SRV, NS, PTR, etc. |
ttl | number | 300 | TTL in seconds (ignored when alias is set) |
records | list(string) | [] | Record values; ignored when alias is set |
alias | object | none | { name, zone_id, evaluate_target_health } — alias to an AWS resource |
weighted_routing_policy | object | none | { weight } — requires set_identifier |
latency_routing_policy | object | none | { region } — requires set_identifier |
geolocation_routing_policy | object | none | { continent, country, subdivision } — requires set_identifier |
failover_routing_policy | object | none | { type } — PRIMARY or SECONDARY; requires set_identifier |
multivalue_answer_routing_policy | bool | false | Enable multivalue answer behavior |
health_check_id | string | none | Health check key from health_checks map; resolved at apply time |
set_identifier | string | none | Required for weighted, latency, geolocation, and failover routing |
allow_overwrite | bool | false | Allow Terraform to take over a record that exists out-of-band — migration only |
Health Check Configuration Reference
Declared in terraform.tfvars under health_checks. Map keys become the lookup names; values configure the check.
| Attribute | Type | Default | What It Does |
|---|---|---|---|
type | string | required | HTTP, HTTPS, HTTP_STR_MATCH, HTTPS_STR_MATCH, TCP, CALCULATED, or CLOUDWATCH_METRIC |
resource_path | string | "/" | Path checked for HTTP/HTTPS types |
failure_threshold | number | 3 | Consecutive failures before marking unhealthy |
request_interval | number | 30 | Seconds between checks (10 or 30) |
port | number | AWS default | Port to check |
fqdn | string | none | Hostname to check (HTTP/HTTPS) |
search_string | string | none | Required substring in response (string-match types) |
ip_address | string | none | IP to check directly (instead of resolving fqdn) |
cloudwatch_alarm_name | string | none | Alarm to follow (CLOUDWATCH_METRIC type) |
cloudwatch_alarm_region | string | none | Alarm's region |
insufficient_data_health_status | string | "Failure" | Status when alarm has no data |
enable_sni | bool | true | SNI on HTTPS checks |
measure_latency | bool | false | Publish latency CloudWatch metrics |
invert_healthcheck | bool | false | Treat success as failure (rare) |
tags | map(string) | {} | Tags on the check resource |