How-To: Managing S3 Buckets with Terraform
Introduction
This guide provides step-by-step instructions for creating and modifying AWS S3 buckets using Terraform in the Infrastructure repository. It covers everything from initial setup to submitting changes, assuming you are starting from zero experience with the infrastructure codebase.
The self-service S3 workflow is designed for scenarios where you need to:
- Create a new S3 bucket for your application's data, uploads, or exports
- Modify an existing bucket's configuration (versioning, lifecycle rules, etc.)
- Enable Glacier archiving for cost optimization on infrequently accessed data
- Set up a bucket for ELB access logs to debug traffic and latency issues
What This Workflow Does: You edit a Terraform variables file (terraform.tfvars) in a merge request. The CI/CD pipeline validates your changes with OPA policies, the Platform team reviews and approves, and Terraform applies the changes to AWS automatically upon merge. You do not need to run any Terraform commands yourself — the pipeline handles everything.
Prerequisites
Required
- GitLab Access: Developer (or higher) permissions on the Infrastructure repository so you can create a branch and open a merge request. This is the only hard requirement — everything else in the workflow is done through GitLab. If you don't have access, contact the Platform team via the
@platformtag in any public Digital Product Group Teams channel. The@platformgroup tag only works in public Digital Product Group channels — private channels won't resolve it.
Recommended
You can complete the entire workflow from the GitLab UI, but most contributors find the tooling below makes the experience much smoother.
- AWS Access (for verification): SSO access to the target AWS account via AWS Identity Center. Useful to confirm your bucket was created after merge. Without it, you can still validate via Grafana dashboards or by asking the Platform team. See Managing Application Secrets for Console access details.
- Local clone + Git: If you prefer editing in an IDE over the GitLab web UI, clone the repo locally. Not required — the GitLab web editor can do everything described in this guide.
- macOS
- Windows
- Linux
Git ships with macOS (via the Xcode Command Line Tools). If you want a newer version, install Homebrew first — it doesn't come pre-installed:
/bin/bash -c "$(curl -fsSL https://raw.githubusercontent.com/Homebrew/install/HEAD/install.sh)"
brew install git
Install Git for Windows which includes Git Bash — a Unix-like terminal for running Git commands.
# Debian/Ubuntu
sudo apt install git

# RHEL/CentOS
sudo yum install git
- VS Code + HashiCorp Terraform extension: Nice-to-have for syntax highlighting, auto-formatting, and inline validation. Install the HashiCorp Terraform extension (official — search
HashiCorp.terraform). Requires VS Code v1.86+ and Terraform v0.12+. On Windows it also supports Remote - WSL. - Basic understanding: Familiarity with Git workflows (branches, MRs) and Norton's AWS accounts — Development (hosts dev, QA, staging) and Production.
Setting Up Editor IntelliSense for Terraform
The HashiCorp Terraform extension gives you full IntelliSense — inline provider docs, attribute autocompletion, and instant validation of resource shapes — but only after a one-time terraform init so the AWS provider schema lands on disk where the language server can read it. This is documented officially under Refresh IntelliSense in the extension repository.
Do not run terraform plan or terraform apply locally. The remote state backend, AWS credentials, and KMS keys are configured inside the CI runners only. Local plan/apply will either fail outright or — worse — appear to succeed against incomplete state and produce a misleading diff. terraform init -backend=false is the only Terraform CLI command you should run locally, and only for editor IntelliSense; let the pipeline do everything else.
One-Time Setup
-
Install the HashiCorp Terraform VS Code extension — marketplace listing. Full feature reference: hashicorp/vscode-terraform on GitHub.
-
Install the Terraform CLI if you don't have it already. Follow the official Terraform installation guide for your platform — package managers (
brew,choco,apt) and direct downloads are all covered there. Confirm with:terraform -version -
Initialize the stack without a backend so providers download but no remote state is touched:
cd accounts/development/s3terraform init -backend=falseThe
-backend=falseflag is the important part. It tells Terraform to skip the GitLab-hosted state backend entirely — no credentials are needed, no state is locked, and nothing is read or written remotely. Terraform downloads the AWS provider into.terraform/and that is the schema the VS Code extension reads from. -
Reload VS Code (or close and reopen the workspace). Open any
.tffile under the stack and IntelliSense should activate — hover overaws_s3_bucketfor inline documentation, and typeaws_s3_bucket.to see attribute autocomplete. If completions don't appear, run Terraform: Refresh IntelliSense from the Command Palette as described in the official docs. -
Repeat for any other stack you actively edit.
init -backend=falseis per-directory. Run it once in eachaccounts/{env}/s3/(orrds/,Route53/, etc.) directory you work in. You only need to re-run it when the AWS provider version changes or when you wipe the.terraform/directory.
How to Create a New S3 Bucket
Step 1: Clone the Infrastructure Repository
If you haven't already, clone the repository locally:
git clone git@gitlab.com:wwnorton/ops/infrastructure.git
cd infrastructure
Create a new branch for your changes:
git checkout -b feat/add-my-new-bucket
Step 2: Open the S3 Configuration File
Navigate to the Terraform variables file for your target environment:
- Development:
accounts/development/s3/terraform.tfvars - Production:
accounts/production/s3/terraform.tfvars
The file contains a map called s3_buckets where each key is a logical name for a bucket, and the value is an object with its configuration. Review the existing bucket entries in the file for reference — they show the patterns used across Norton.
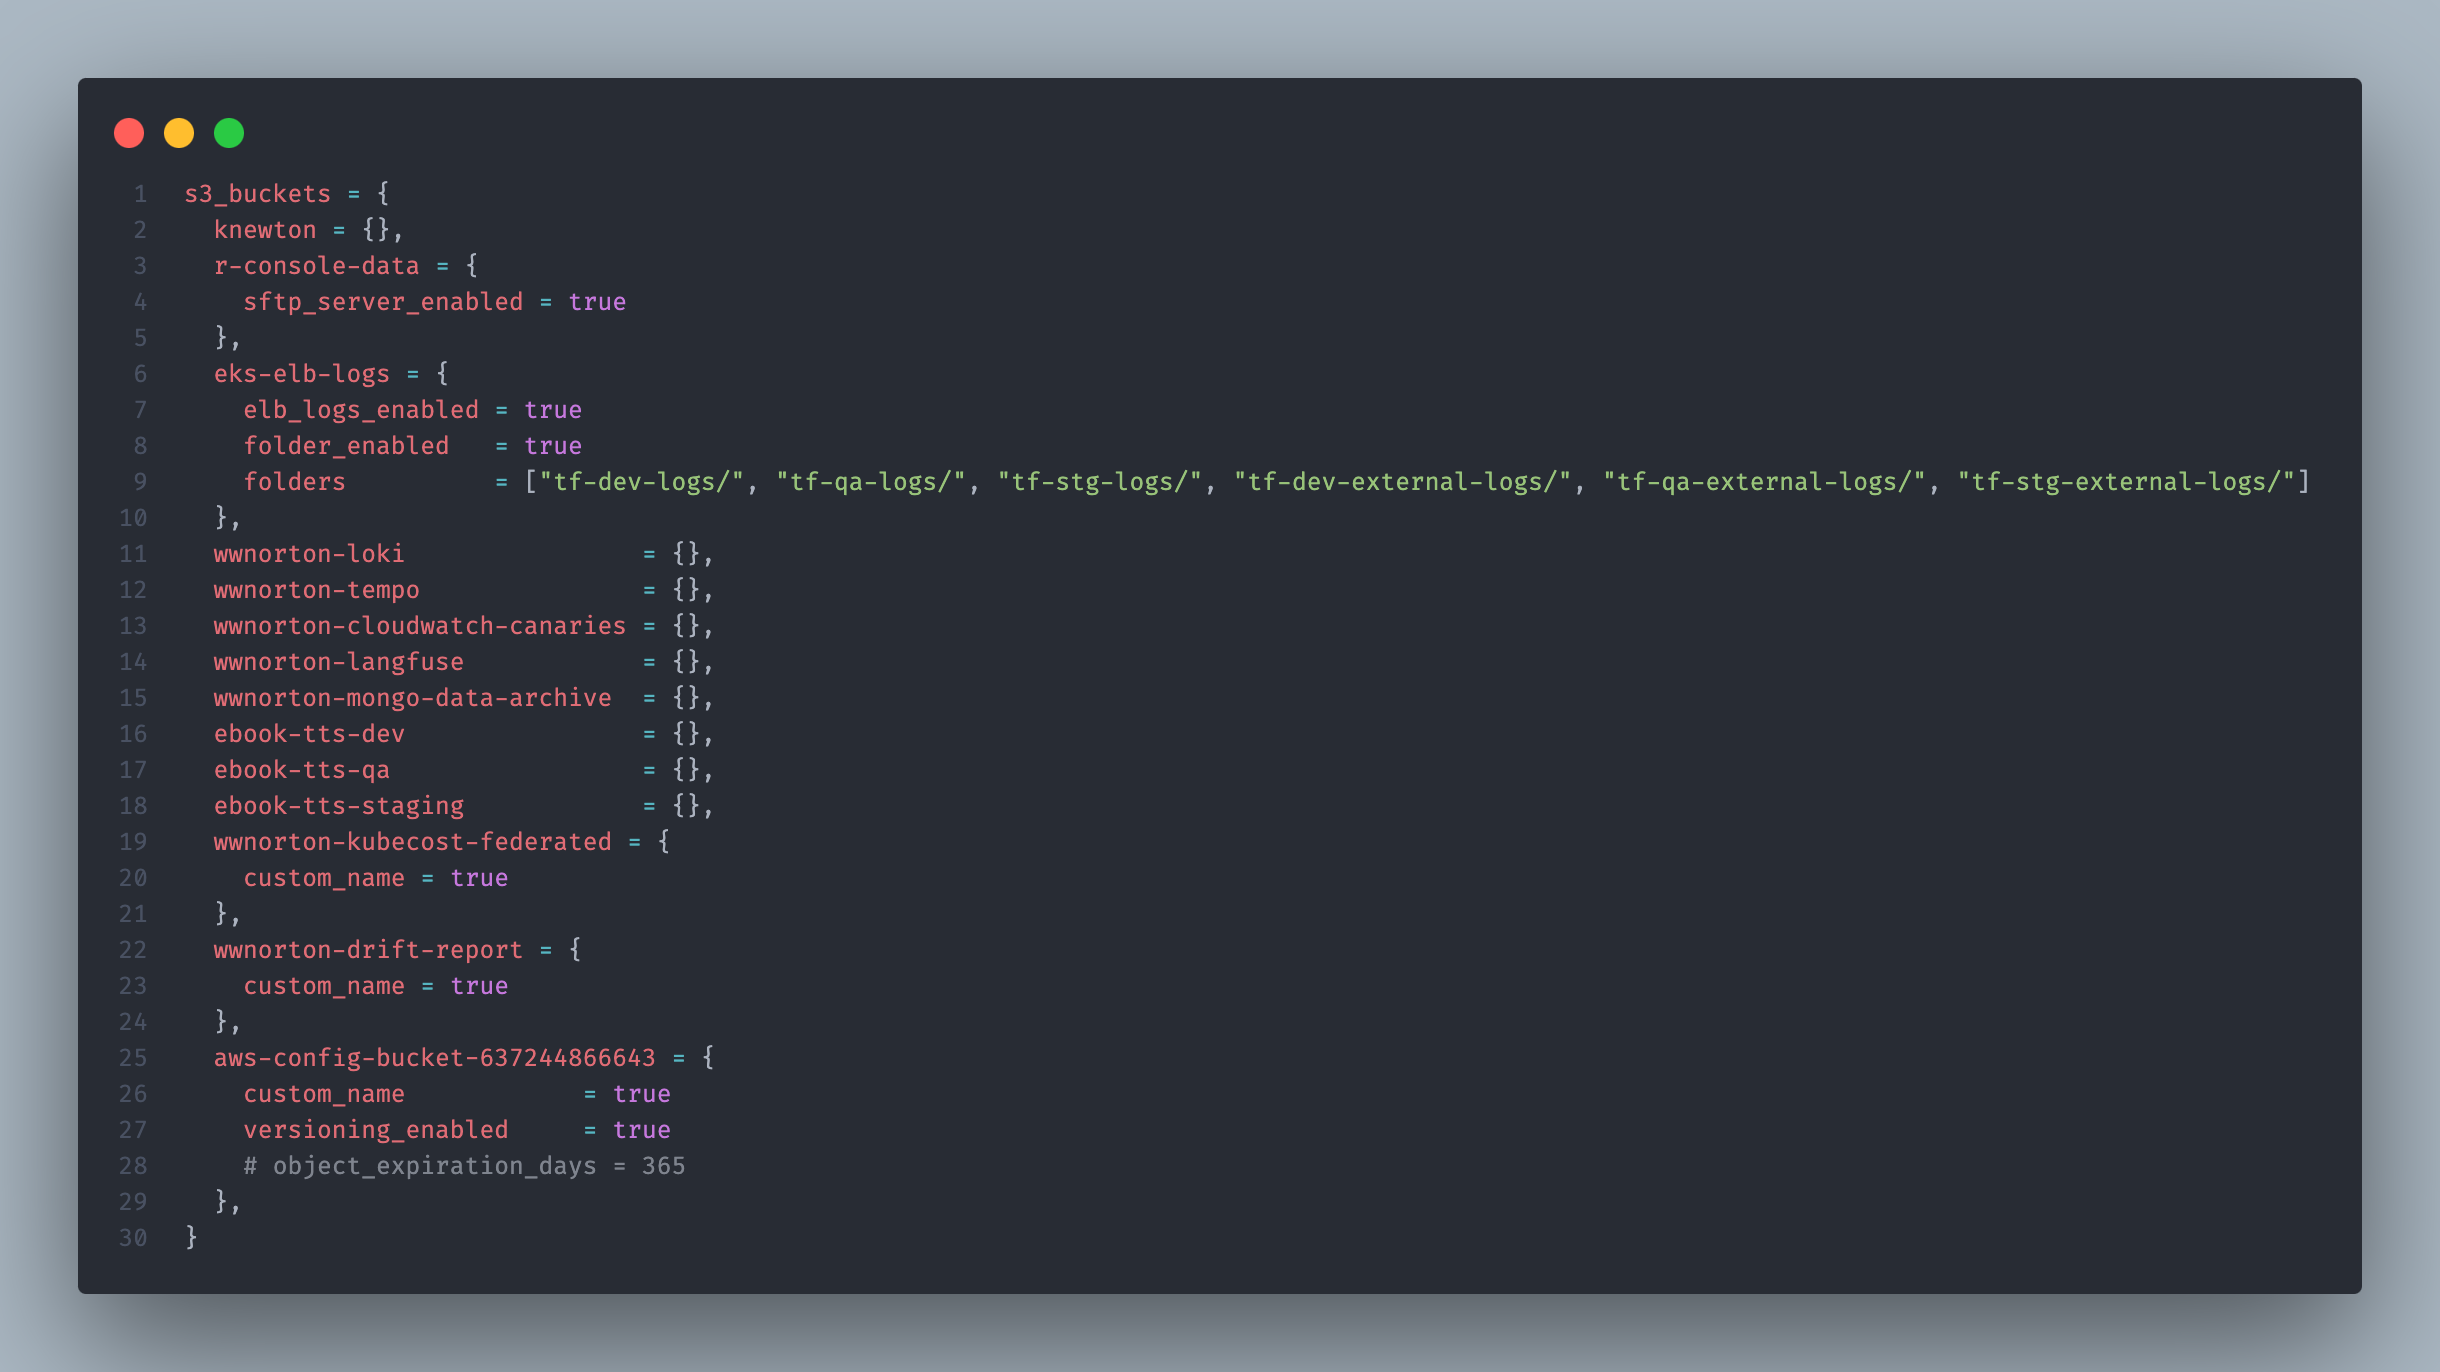
Platform team recommends cloning this repo locally and making changes in VS Code with the Terraform extension installed so you can do some local checks and linting before committing and creating a merge request.
Step 3: Add Your Bucket Configuration
Inside the s3_buckets = { ... } block in the tfvars file, add a new entry. Unlike RDS, S3 buckets can be created with minimal configuration — the simplest possible bucket requires only a key with an empty object:
s3_buckets = {
  # ... existing buckets ...

  my-app-data = {}
}
This single line creates a fully functional bucket named my-app-data-{environment} (e.g., my-app-data-dev) with:
- KMS encryption enabled by default (using the shared account-level KMS key)
- No versioning — object history is not tracked
- No lifecycle rules — objects remain in S3 Standard indefinitely
- Private access — no public read, no public write
- No folders — the bucket is empty
For the full rationale on why these defaults were chosen and how the module applies them, see Understanding S3 Infrastructure → Encryption and → Bucket Naming.
Bucket naming: By default, the bucket name is {key}-{environment}. If you need an exact name without the environment suffix (e.g., for a bucket shared across environments), set custom_name = true. Keep in mind that S3 bucket names are globally unique across all of AWS — if another account already owns that name, your Terraform apply will fail.
Full Example with Optional Features
For buckets that need more than the defaults, add the attributes you need. Here is a complete example showing the most common options:
my-app-data = {
  versioning_enabled      = true           # Keep object version history
  glacier_enabled         = true           # Transition old objects to Glacier
  glacier_transition_days = 90             # After 90 days
  deep_archive_days       = 365            # Then to Deep Archive after 365 days
  folder_enabled          = true           # Pre-create folder structure
  folders                 = ["uploads/", "exports/"]
}
For the full list of every attribute you can set, see the Configuration Attribute Reference appendix at the bottom of this document.
OPA Policy Enforcement: The CI pipeline runs OPA (Open Policy Agent) checks against your changes. The policies enforce encryption on all new buckets and validate Glacier/Deep Archive transition day ranges. The allowed ranges change over time — always check the current values at policies/data/s3/allowlist.json before submitting your MR. See Understanding S3 Infrastructure for full details on all policy guardrails.
Step 4: Validate Your Changes via the Pipeline
All validation — formatting, syntax, OPA policy checks, and terraform plan — runs automatically when you open a merge request. If you are using VS Code with the Terraform extension, syntax errors will be highlighted in the editor automatically, which can help catch issues before pushing.
Step 5: Submit Your Changes
-
Commit your changes:
git add accounts/development/s3/terraform.tfvarsgit commit -m "feat: Add my-app-data S3 bucket"git push origin feat/add-my-new-bucket -
Open a Merge Request in GitLab targeting the
mainbranch -
In your MR description, include a clear description of:
- What bucket is being created (or modified)
- What environment it targets
- The team and application this bucket serves
- Whether Glacier, public access, or ELB logs are being enabled, and why
- Expected impact and reasoning
Step 6: Review and Deployment
- The CI pipeline runs automatically on your MR:
- OPA policy check — validates your configuration against the allowlists
- Terraform plan — shows what will be created or changed
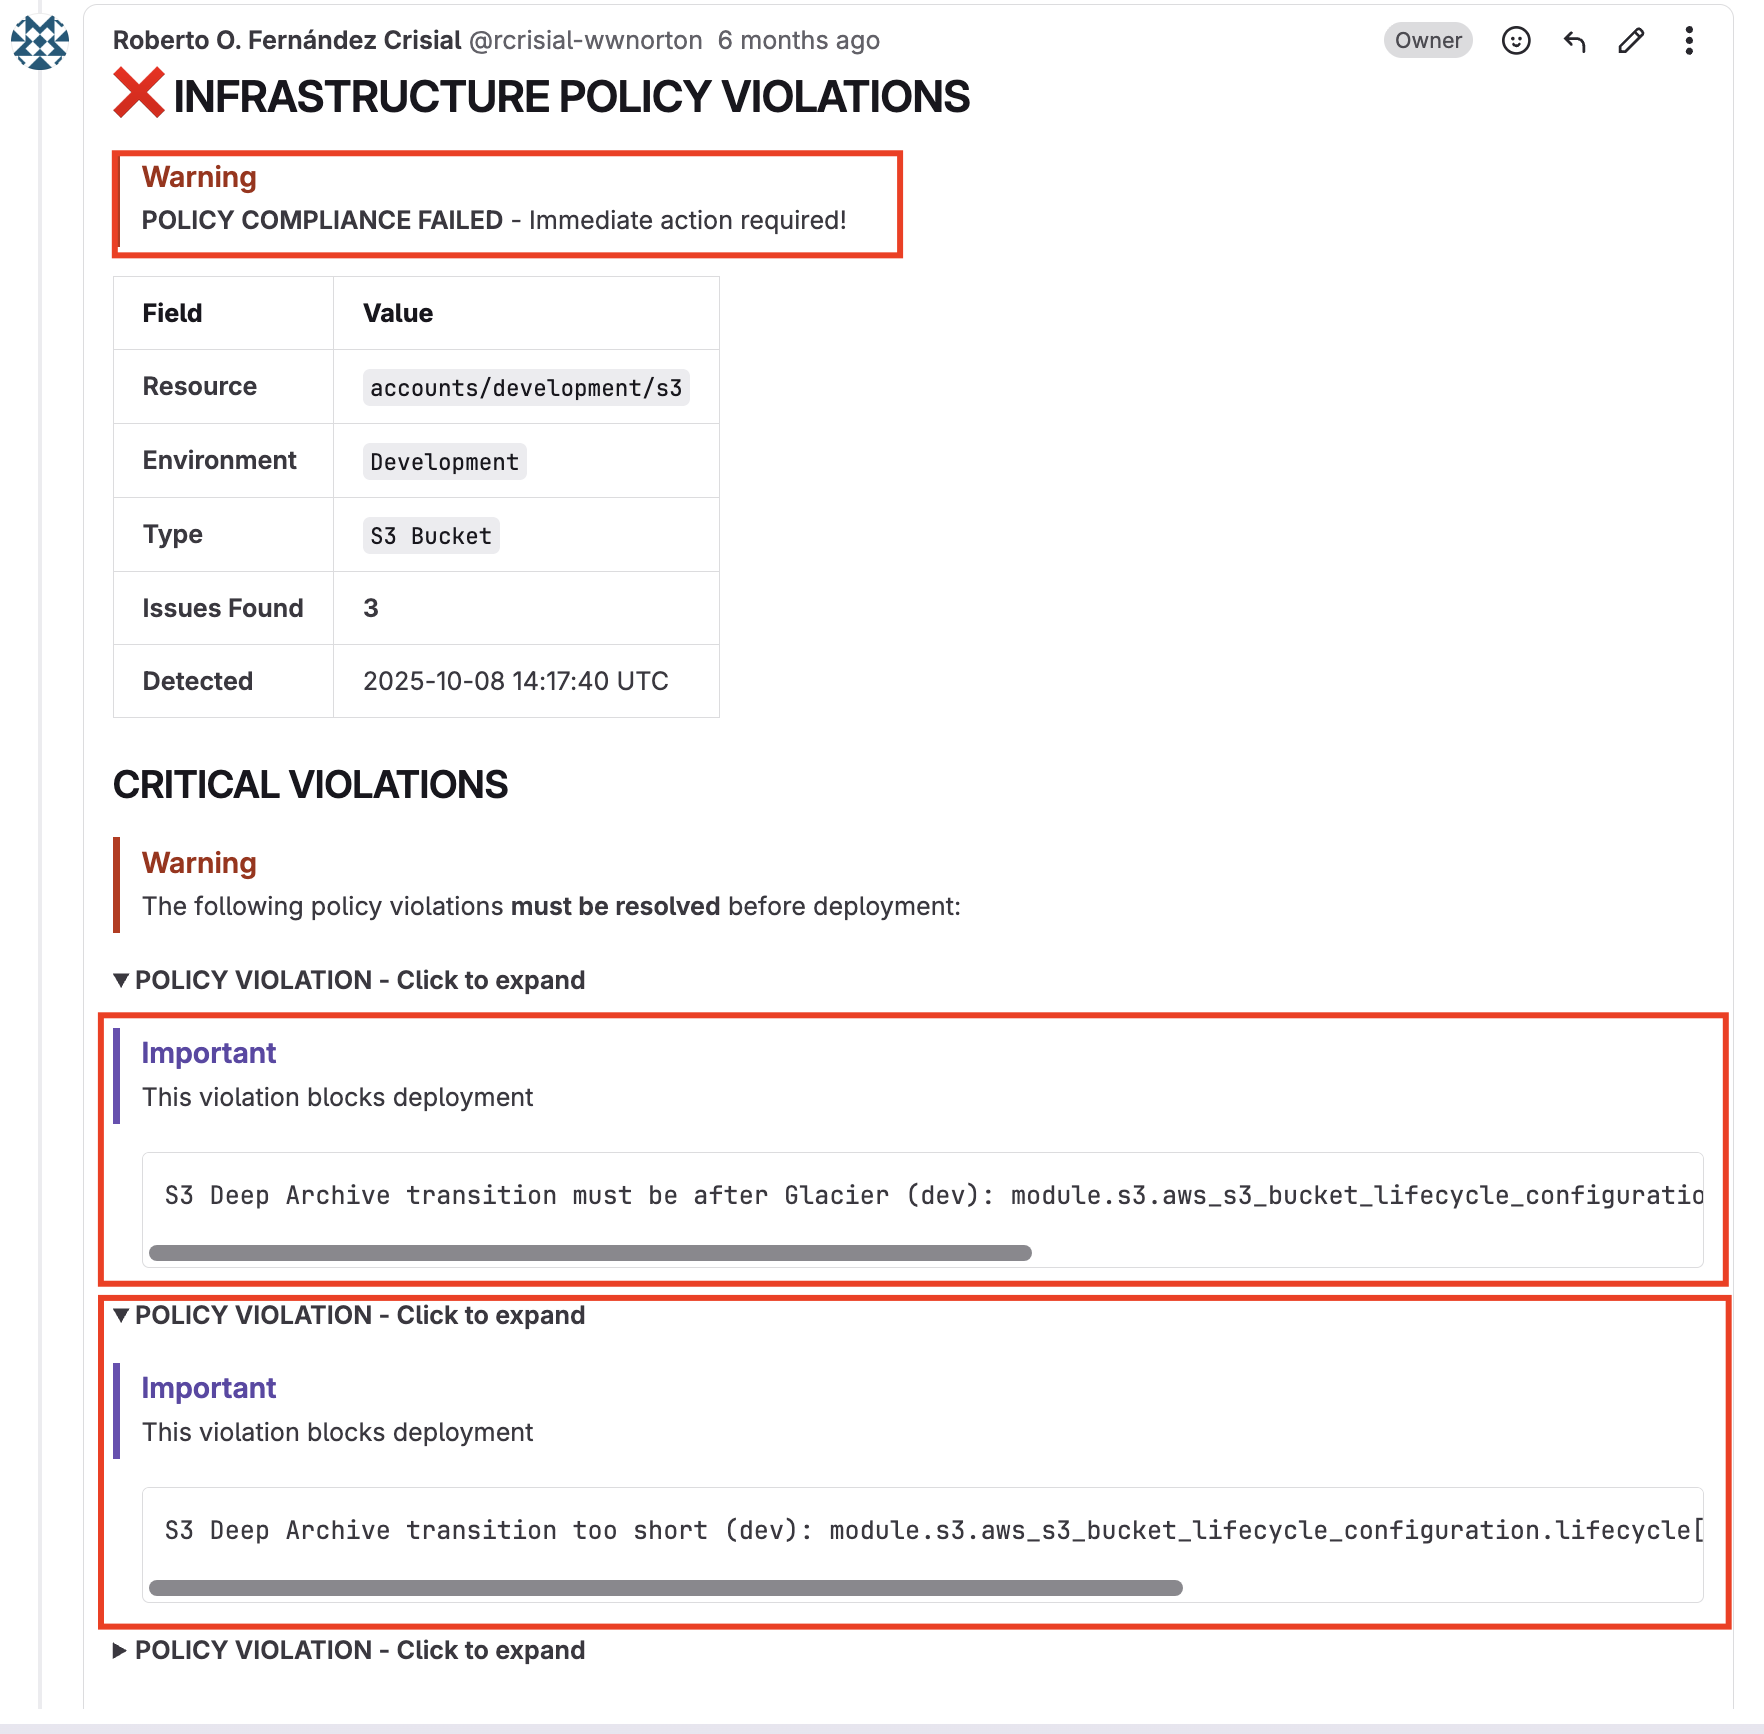
- If OPA finds violations, it will comment directly on the MR with the specific issues
- The Platform team will begin reviewing your MR within 24 hours
- They may request clarifications or modifications
- Once approved and merged, Terraform applies the changes according to the pipeline
What to expect on your MR
- OPA Failed
- OPA Passed
- Terraform Plan
When OPA finds a policy violation, the pipeline posts a comment listing every rule that was triggered. Fix the flagged values and push again — the pipeline re-runs automatically.
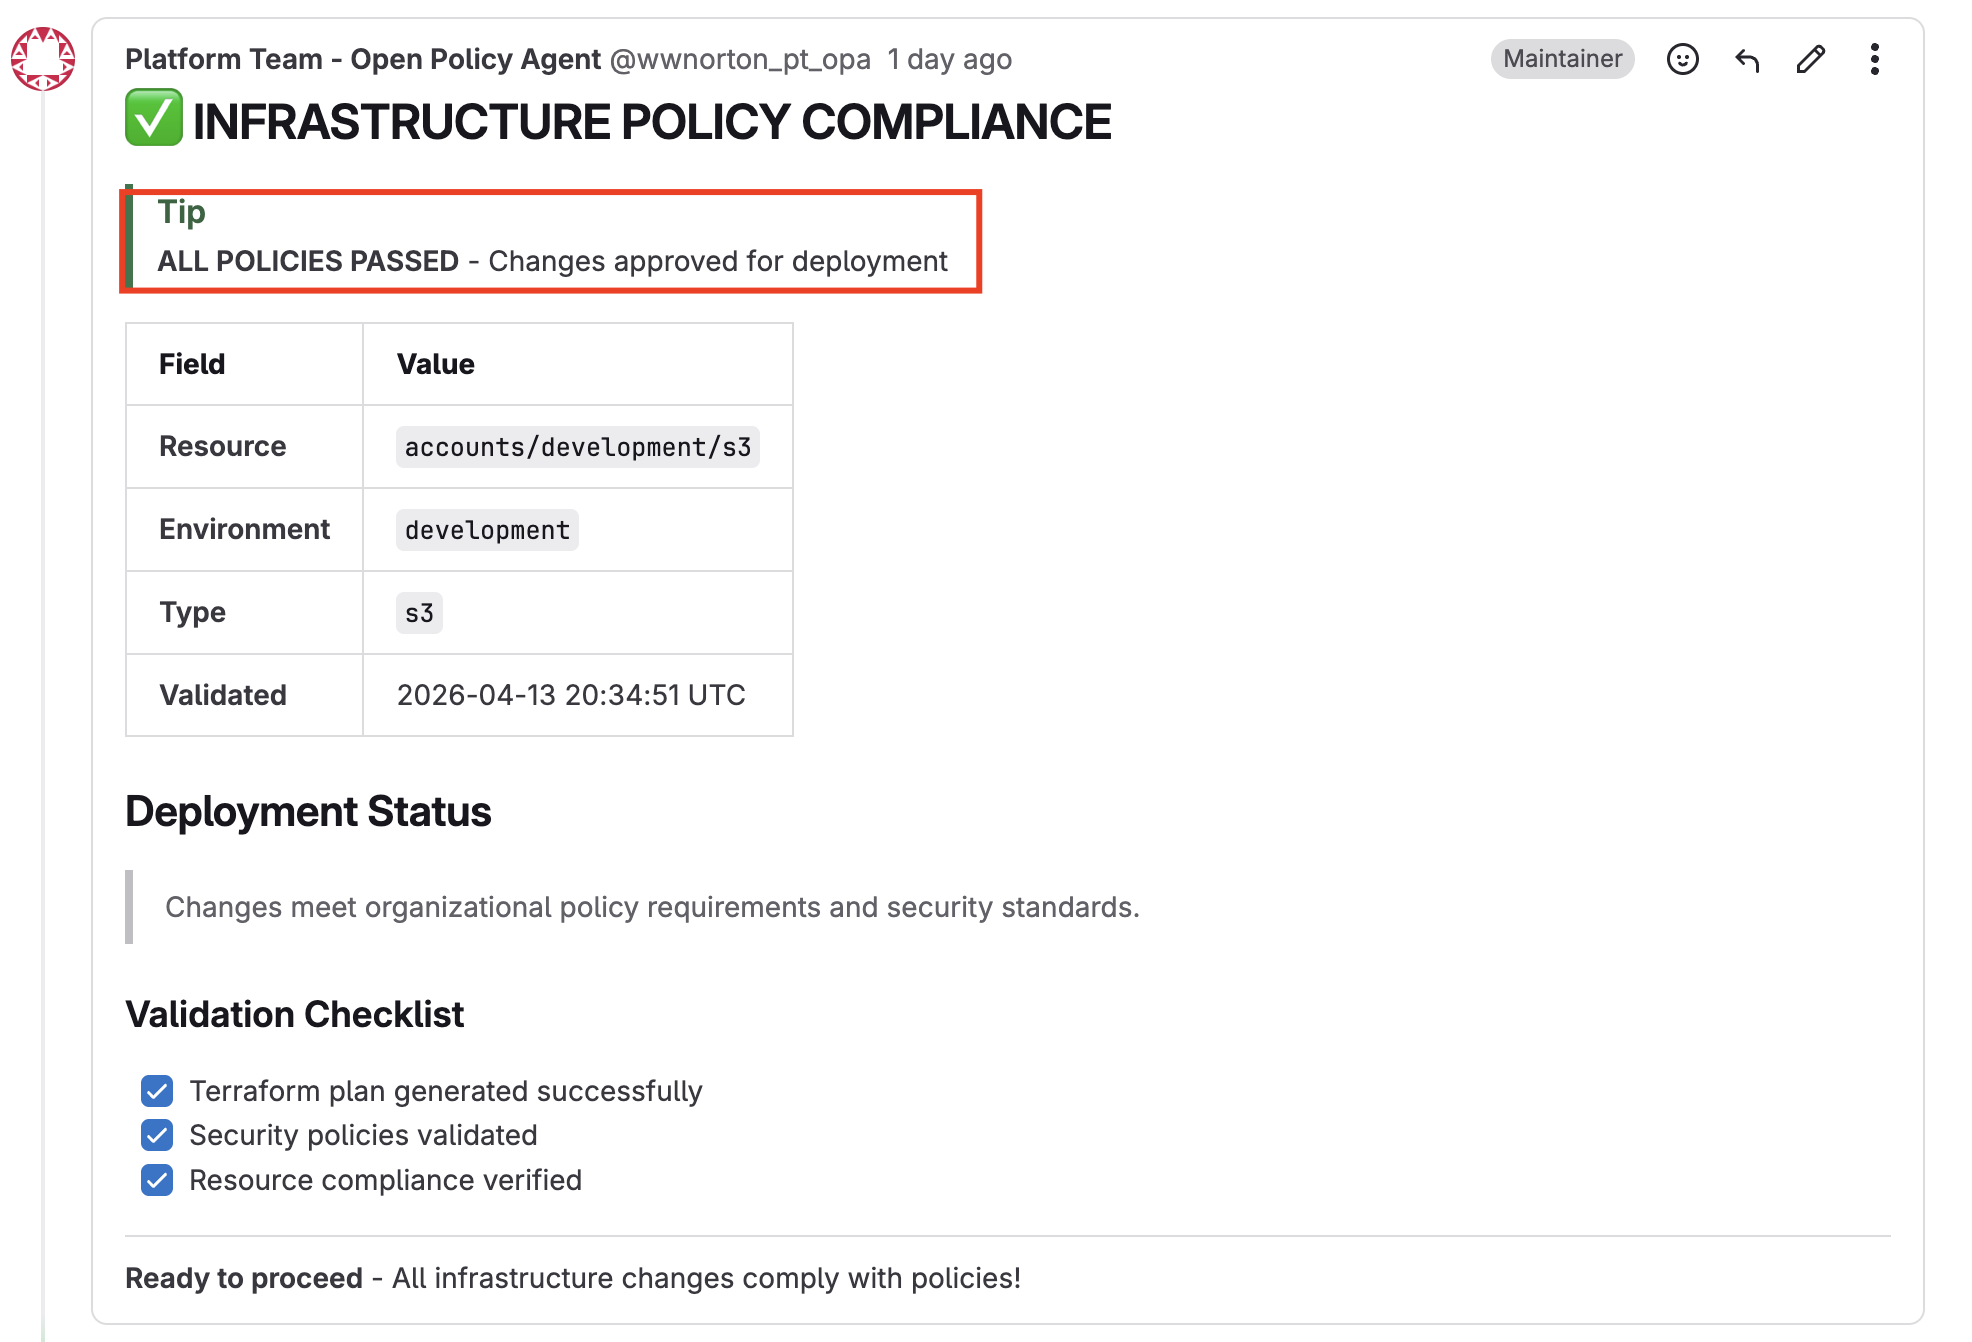
When all checks pass, OPA confirms with a success comment. Your MR is now ready for Platform team review.
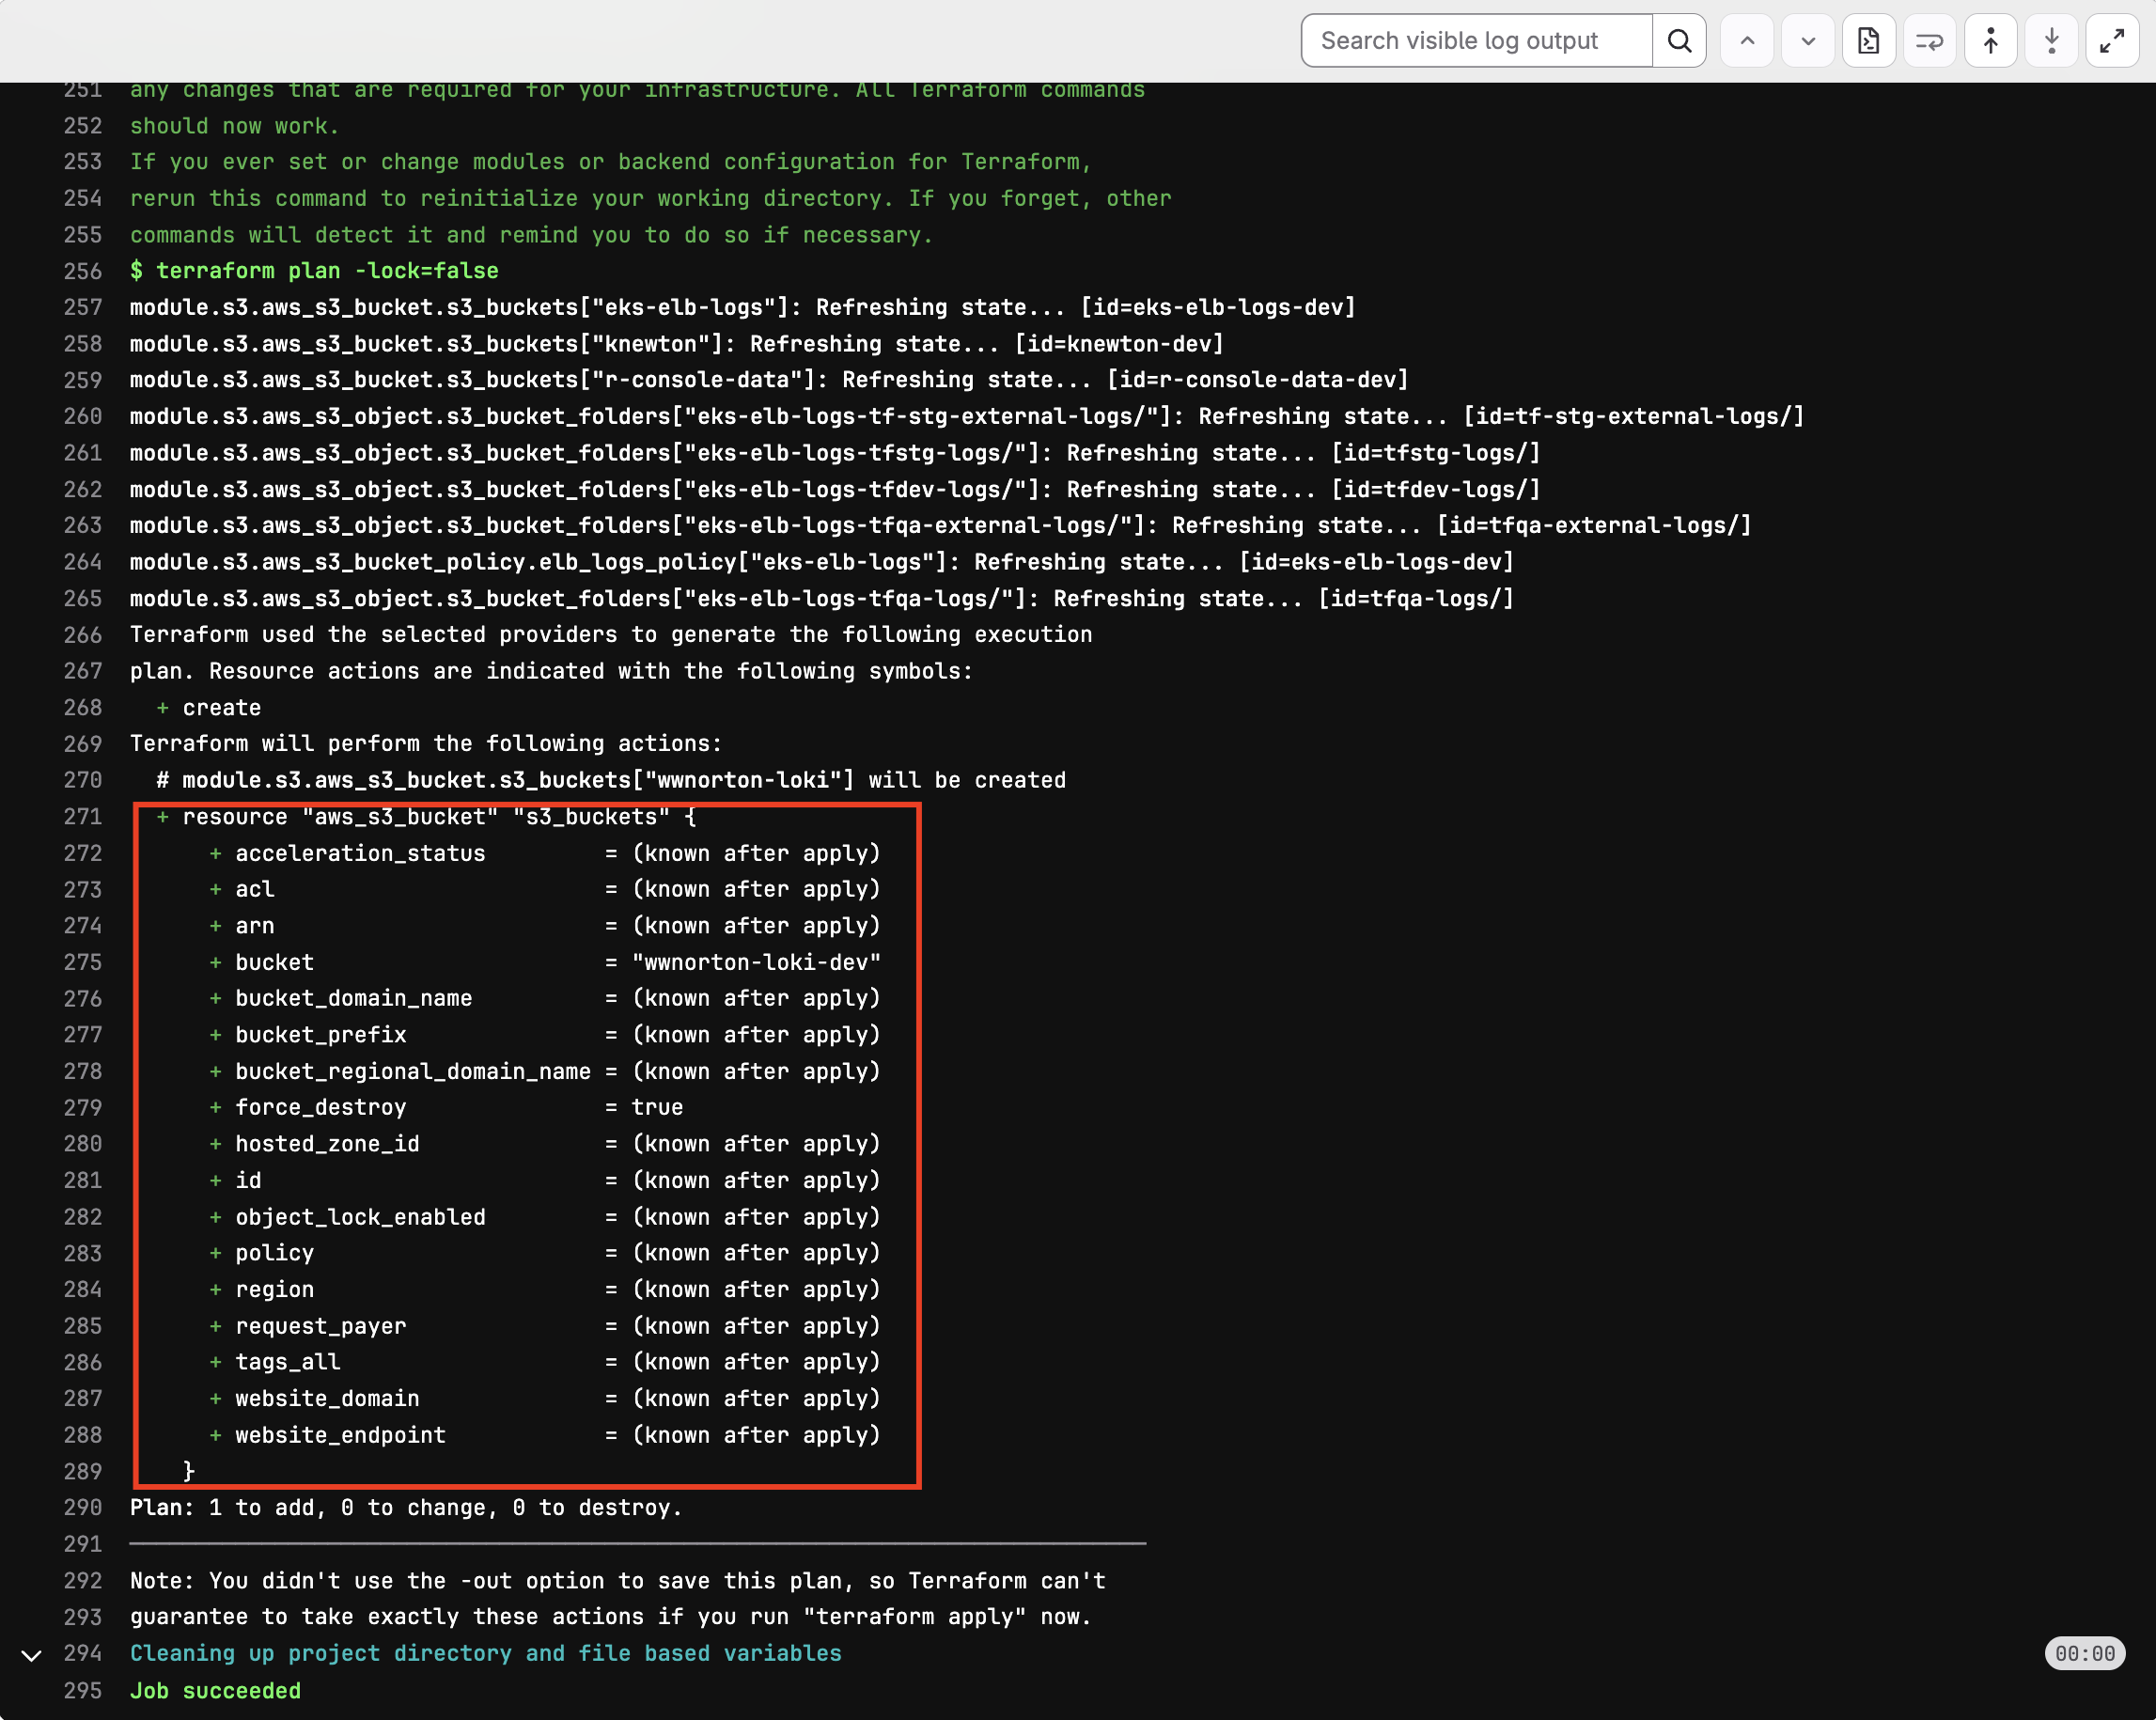
The pipeline also posts the Terraform plan output so you and the reviewer can see exactly what resources will be created, modified, or destroyed.
Common Use Cases
The following sections cover the most common modifications you'll make, ordered from simplest to most complex.
Use Case 1: Creating a New Bucket
Risk level: SAFE — No impact to existing resources
The most common task. Follow the steps in How to Create a New S3 Bucket above. Here are the most common patterns — select the one that matches your use case:
- Basic Bucket
- With Versioning
- With Folders
- Custom Name
A simple bucket with default KMS encryption and no extra features. This is the right choice for most application data storage:
my-app-data = {}
Result: Creates my-app-data-dev (or my-app-data-prod) with KMS encryption enabled, private access, and no lifecycle rules.
When to use: General application data, temporary files, internal exports, or any storage that doesn't need versioning, archiving, or public access.
Keeps version history of all objects — useful for data you might need to recover or audit:
my-app-data = {
  versioning_enabled = true
}
Result: Every object change creates a new version. Deleted objects get a "delete marker" and can be restored.
When to use: Configuration files, user-uploaded content that must be recoverable, compliance-sensitive data, or any storage where accidental deletion would be costly.
Cost note: Versioning stores all object versions, which increases storage costs over time. Consider pairing versioning with Glacier lifecycle rules to transition old versions to cheaper storage.
Pre-creates a folder structure in the bucket so your application has an organized starting point:
my-app-data = {
  folder_enabled = true
  folders        = ["uploads/", "processed/", "exports/"]
}
Result: Creates empty placeholder objects that appear as folders in the AWS Console and S3 clients.
When to use: Applications that expect a specific directory structure, or when you want to organize data by category from the start.
Uses the key as the exact bucket name, without appending the environment suffix:
wwnorton-my-shared-bucket = {
  custom_name = true
}
Result: Creates a bucket named exactly wwnorton-my-shared-bucket (not wwnorton-my-shared-bucket-dev).
When to use: Buckets shared across environments, buckets that external services reference by exact name, or when you need a specific bucket name for compatibility reasons.
S3 bucket names are globally unique across all of AWS. Choose a distinctive name that includes your organization prefix (e.g., wwnorton-) to avoid collisions. The default naming with environment suffix is safer for most use cases.
Use Case 2: Enabling Glacier Archiving
Risk level: READ-MORE — May affect application access patterns
Glacier is a low-cost storage class for data that is rarely accessed. Enabling it adds a lifecycle rule that automatically transitions objects from S3 Standard to Glacier after a configured number of days. You can optionally add a second transition to Deep Archive for even cheaper long-term storage.
my-archive-bucket = {
  glacier_enabled         = true
  glacier_transition_days = 90    # Move to Glacier after 90 days
  deep_archive_days       = 365   # Optional: move to Deep Archive after 365 days
}
Consequences to service workflows: Once objects transition to Glacier, they are no longer immediately accessible. Any application that tries to read a Glacier-archived object directly will receive an InvalidObjectState error. Here's what you need to understand:
- Glacier retrieval takes 1 minute to 12 hours depending on the retrieval tier (Expedited, Standard, or Bulk)
- Deep Archive retrieval takes up to 12 hours — designed for data accessed less than once per year
- The lifecycle rule applies to all objects in the bucket (entire bucket, no prefix filter)
- Transitions are one-way — once an object is in Glacier, it stays there until explicitly restored
Before enabling Glacier, verify that your application either:
- Does not access objects older than the transition threshold, or
- Has logic to handle Glacier retrieval requests (via the
RestoreObjectAPI), or - Uses a separate bucket for frequently accessed data
OPA enforced ranges (check allowlist.json for current values):
glacier_transition_daysmust be within the min/max range defined per environmentdeep_archive_daysmust be greater thanglacier_transition_daysdeep_archive_daysmust meet the minimum threshold defined per environment
Use Case 3: Enabling ELB Access Logs for Debugging
Risk level: SAFE — No impact to existing objects or application behavior
ELB (Elastic Load Balancer) access logs are invaluable for debugging traffic issues, analyzing latency patterns, and security auditing. When enabled, your load balancer writes detailed request logs to the S3 bucket. This is a two-step process: first create the bucket, then configure the load balancer to use it.
Step 1: Create the Bucket
Add a bucket with elb_logs_enabled = true to your tfvars:
my-elb-logs = {
  elb_logs_enabled = true
  folder_enabled   = true
  folders          = ["tf-dev-logs/", "tf-dev-external-logs/"]
}
What the module does automatically:
- Creates the bucket with default KMS encryption
- Attaches a bucket policy granting
s3:PutObjectto the AWS ELB service account (127311923021for us-east-1) - Log files will appear under
AWSLogs/{account-id}/in the bucket - Pre-creates the folder structure you specified (if
folder_enabled = true)
Submit this change via MR and wait for it to be merged and applied.
Step 2: Request Load Balancer Logging (After Merge)
After the bucket is created, the ALB/NLB itself needs to be reconfigured to send access logs to it. Teams do not currently self-manage load balancers — all ALBs/NLBs are owned and operated by the Platform team. Open a follow-up ticket or Teams request to Platform once your bucket MR is merged, including:
- The bucket name (e.g.,
my-elb-logs-dev) - Which ALB/NLB should start writing logs to it (name or ARN)
- Whether this is a permanent configuration or time-boxed (e.g., only for a specific debugging window)
Platform will enable access logging on the load balancer — either via the AWS Console (EC2 → Load Balancers → Attributes → Access logs) or via the infrastructure code that owns the LB. Once enabled, logs appear under AWSLogs/{account-id}/ in your bucket.
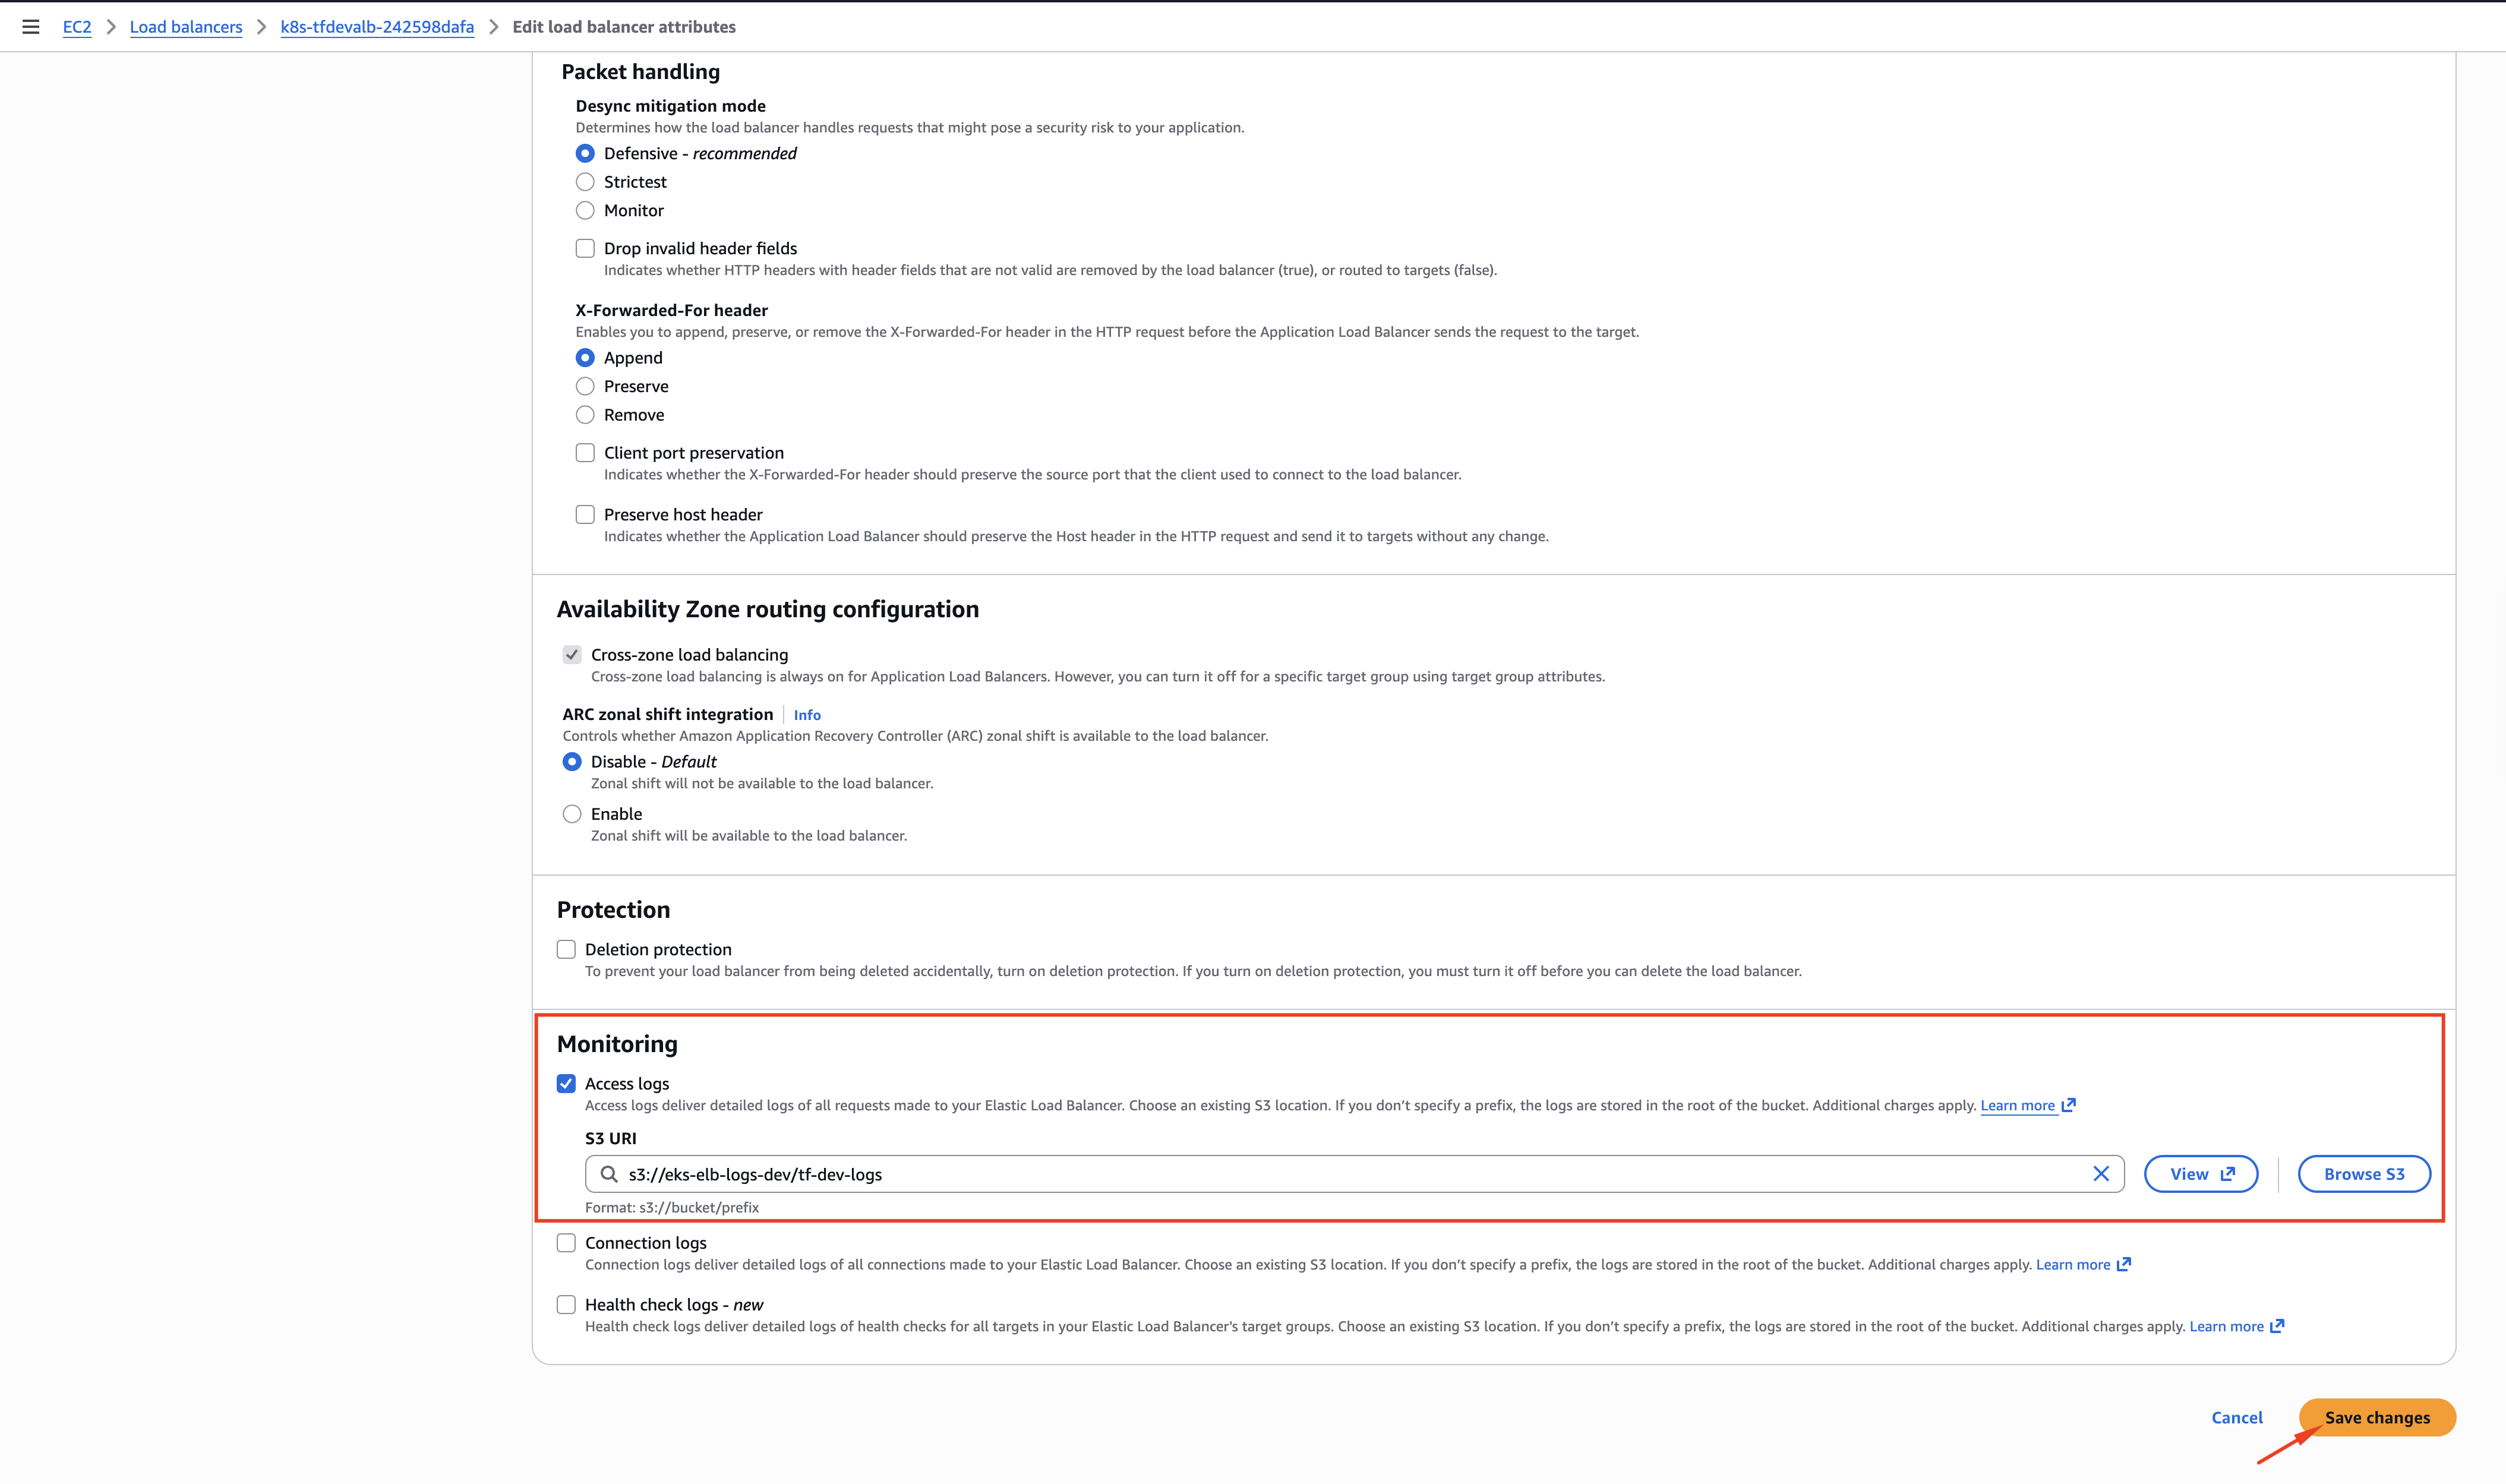
Why not self-serve? Load balancers are shared across many teams and applications, so misconfiguration has a large blast radius. Platform owns them today to keep that risk contained. If self-service LB configuration becomes a common request, it's something we can evaluate for the roadmap.
Pre-create folders: Use folder_enabled with folders to create the directory structure your team expects. This makes it easier to browse logs in the AWS Console and set up log aggregation tools like Loki or Athena.
What's in each log entry:
- Request timestamp, client IP, and port
- Target IP and processing times (request, target, response)
- HTTP status codes (from ELB and from the target application)
- Bytes sent and received
- Full request URL and user agent string
- SSL/TLS cipher and protocol details
Use Case 4: Granting Application Access via a Bucket Policy
Risk level: READ-MORE — bucket policies grant real permissions; an over-broad policy is a security incident.
The most common reason to attach a custom bucket policy is to let an application — typically a Lambda function, an EKS pod, or another AWS service — read or write objects without sharing IAM credentials. The S3 module supports this via a file-based policy: drop a JSON file at aws/s3/policies/{bucket-key}-policy.json and the module attaches it automatically the next time the bucket is applied.
The pattern is the same regardless of who is calling: declare the principal (the IAM role of the calling application), the actions (the S3 verbs the application needs), and the resources (the bucket and/or its objects). The differences are in the principal and a small detail or two per platform.
Step 1: Create the policy JSON file
Path: aws/s3/policies/{bucket-key}-policy.json — the filename must match the key in the s3_buckets map exactly. The module looks for that file at apply time and attaches it if it exists.
- Lambda execution role
- EKS pod identity
- AWS service principal
For a Lambda function. The Lambda's execution role ARN goes in Principal.AWS. Use the role ARN, not the function ARN — IAM authenticates the request as the role:
{
  "Version": "2012-10-17",
  "Statement": [
    {
      "Sid": "AllowMyLambdaReadWrite",
      "Effect": "Allow",
      "Principal": {
        "AWS": "arn:aws:iam::637244866643:role/my-lambda-execution-role"
      },
      "Action": [
        "s3:GetObject",
        "s3:PutObject",
        "s3:DeleteObject",
        "s3:ListBucket"
      ],
      "Resource": [
        "arn:aws:s3:::my-app-data-dev",
        "arn:aws:s3:::my-app-data-dev/*"
      ]
    }
  ]
}
Why two resource entries? s3:ListBucket operates on the bucket itself (arn:...:my-app-data-dev), while s3:GetObject and friends operate on individual objects (arn:...:my-app-data-dev/*). Combining them in one statement keeps the policy compact.
For an EKS workload using EKS Pod Identity (or IRSA — IAM Roles for Service Accounts). The pod authenticates as the IAM role attached to its service account:
{
  "Version": "2012-10-17",
  "Statement": [
    {
      "Sid": "AllowEbookNerdServicePodAccess",
      "Effect": "Allow",
      "Principal": {
        "AWS": "arn:aws:iam::637244866643:role/eks-pod-identity-dev-ebook-nerd-service"
      },
      "Action": [
        "s3:ListBucket",
        "s3:GetObject",
        "s3:PutObject",
        "s3:DeleteObject"
      ],
      "Resource": [
        "arn:aws:s3:::ebook-tts-dev-dev",
        "arn:aws:s3:::ebook-tts-dev-dev/*"
      ]
    }
  ]
}
The role name follows Norton's convention (eks-pod-identity-{env}-{service-name}); confirm the exact name with the team that owns the pod identity association. This is the same pattern used by ebook-tts-dev-policy.json — the canonical example in the repo.
For an AWS service (not a specific role) — e.g. CloudFront origin access, AWS Config, or AWS Backup. Use a Service principal and lock down aws:SourceAccount (and aws:SourceArn when possible) to prevent the confused deputy problem:
{
  "Version": "2012-10-17",
  "Statement": [
    {
      "Sid": "AllowCloudFrontReadAccess",
      "Effect": "Allow",
      "Principal": {
        "Service": "cloudfront.amazonaws.com"
      },
      "Action": "s3:GetObject",
      "Resource": "arn:aws:s3:::my-public-assets-prod/*",
      "Condition": {
        "StringEquals": {
          "AWS:SourceArn": "arn:aws:cloudfront::100478842646:distribution/E1234567890ABC"
        }
      }
    }
  ]
}
Step 2: Reference the bucket in your application
Bucket policies grant permission on the bucket — the application still needs IAM permissions on its own role to call the S3 API. In the AWS resource-based-vs-identity-based model, both sides must allow the action. For Lambda, attach a small inline policy or managed policy to the function's execution role permitting the same s3:* actions on the same bucket ARN. For EKS pod identity / IRSA, the same applies to the role bound to the service account.
Norton's standard is: keep bucket-side permissions in the bucket policy file (in this repo) and identity-side permissions in whatever owns the role (the application's own infrastructure module, the EKS team's pod identity association, etc.).
Step 3: Submit your changes
Add the policy file and update the bucket's tfvars entry — even an empty change to the bucket entry is fine; the module needs to re-evaluate the bucket on the next apply for the policy to attach. Reference the file in your MR description so reviewers can find it quickly:
git add aws/s3/policies/my-app-data-policy.json
git add accounts/development/s3/terraform.tfvars
git commit -m "feat: Add bucket policy granting my-app Lambda access to my-app-data-dev"
Two common mistakes worth flagging up front:
- Filename has to match the bucket key exactly. The module looks for
{bucket-key}-policy.json. A bucket keyedmy-app-datarequiresmy-app-data-policy.json— notmy_app_data-policy.jsonand notmy-app-data.json. - Custom policies replace ELB log policies. If your bucket has both
elb_logs_enabled = trueand a custom policy file, the custom policy wins. To keep ELB log delivery working, copy the ELB log statement (see Understanding S3 → Policy precedence) into your custom policy.
Why a bucket policy and not just an IAM role policy?
For most serverless and EKS workloads, an identity-based policy on the role would be enough — and is often the right default. Reasons to add a bucket policy on top:
- Cross-account access. Bucket policies are the only way to grant access to a principal in a different AWS account.
- Service principals. AWS services like CloudFront origin access, AWS Backup, and AWS Config require a bucket policy with their service principal — there is no role to attach an identity policy to.
- Defense in depth. A bucket policy that explicitly enumerates allowed principals makes the bucket's access surface auditable from the bucket side, regardless of how many roles in how many accounts have S3 permissions.
- Public buckets. Public read access is implemented as a bucket policy with a
*principal — there is no other place to express it.
When in doubt and the workload is single-account, lead with the role policy and add a bucket policy only when one of the cases above applies.
Understanding SAFE vs READ-MORE Properties
Each configurable property carries a different level of risk when changed on an existing bucket. This reference helps you understand the impact of changes before making them.
| Property | Risk Level | Notes |
|---|---|---|
versioning_enabled | SAFE | Can be enabled on existing buckets without disruption |
glacier_enabled | READ-MORE | Transitioning existing objects may affect application access patterns |
glacier_transition_days | SAFE | Changing only affects future transitions, not already-transitioned objects |
deep_archive_days | READ-MORE | Deep Archive retrieval takes up to 12 hours — verify your workflows can handle this |
elb_logs_enabled | SAFE | Attaches a bucket policy; does not affect existing objects |
object_expiration_days | READ-MORE | Permanently deletes objects once the age threshold is reached |
folder_enabled / folders | SAFE | Creates empty placeholder objects only |
sse_algorithm / kms_key_id | READ-MORE | Changing encryption on existing buckets may require re-encryption of objects |
custom_name | READ-MORE | Changing on an existing bucket forces recreation (data loss if not migrated first) |
website_enabled | SAFE | Enables static website hosting configuration |
public_read | READ-MORE | Blocked by default — requires Platform coordination for an exception |
public_read = true is blocked by default. MRs that set this flag are rejected unless your team has coordinated an exception with the Platform team ahead of time. If your use case requires public read access (e.g., static website assets), reach out to Platform before opening the MR so we can agree on the right approach. See Understanding S3 → Public Read Policy for details.
For deeper context on why certain properties are marked READ-MORE, see Understanding S3 Infrastructure.
Troubleshooting
OPA Policy Violation on MR
Symptoms:
- Pipeline fails with OPA violation messages
- Comment appears on MR listing specific violations
Common causes:
- Glacier transition days outside the allowed range for the target environment
- Deep Archive days less than or equal to Glacier transition days
- Missing encryption configuration (shouldn't happen with the module, but may occur with manual edits)
Resolution: Fix the flagged values in your tfvars and push the updated commit. The pipeline will re-run automatically.
Bucket Name Already Exists
Symptoms:
- Terraform apply fails with "BucketAlreadyExists" or "BucketAlreadyOwnedByYou" error
Common causes:
- S3 bucket names are globally unique across all of AWS — another account may already own that name
- You may already have a bucket with that name in the same account
Resolution: Choose a different bucket key. Using the default naming ({key}-{environment}) helps avoid conflicts by including the environment suffix. Prefix with wwnorton- for custom-named buckets.
Objects Not Accessible After Glacier Transition
Symptoms:
- Application gets errors reading objects that previously worked fine
403 ForbiddenorInvalidObjectStateerrors from S3
Common causes:
- Objects were automatically transitioned to Glacier or Deep Archive by the lifecycle rule
Resolution: Use the S3 RestoreObject API to restore objects before reading them, or adjust glacier_transition_days to a longer period if objects are still actively accessed within the current threshold.
Check whether a missing object is archived vs deleted
If an object doesn't appear in the S3 Standard listing and your application is getting NoSuchKey- or InvalidObjectState-style errors, confirm whether it was archived (recoverable) or deleted (not recoverable) before assuming data loss:
- AWS Console: Open the bucket → enable Show versions in the object list. A Glacier/Deep Archive object is still present but shows the
GlacierorGlacier Deep Archivestorage class in the Storage class column. A deleted object shows a delete marker as the latest version. - CLI — check storage class:
aws s3api head-object --bucket my-bucket-dev --key path/to/object.txt— theStorageClassfield will showGLACIERorDEEP_ARCHIVEfor archived objects, or the call will fail with404for genuinely deleted (non-versioned) objects. - CLI — list with storage class:
aws s3api list-objects-v2 --bucket my-bucket-dev --prefix path/ --query 'Contents[].[Key,StorageClass]' --output table. - If archived — use the
RestoreObjectAPI to trigger a temporary restore copy. If versioning is on and there's a delete marker, removing the marker is enough to bring the object back. - If deleted and versioning was off — the object is gone. Recovery would require a backup outside S3 (if one exists).
Terraform Format Errors
Symptoms:
- Pipeline fails with formatting errors
Resolution: Fix the formatting issues — VS Code with the Terraform extension auto-formats on save — then push the updated commit and the pipeline will re-run automatically.
Quick Reference
New S3 Bucket Checklist
Pre-Submission
- Chose a unique, descriptive bucket key
- Decided on naming: default (
key-env) orcustom_name - Set versioning if needed for data recovery or audit
- Set Glacier if needed for cost optimization (verified transition day ranges)
- NO
public_read = trueunless a Platform exception has already been coordinated - Reviewed existing buckets in tfvars for reference
- File is properly formatted (use VS Code Terraform extension for auto-format on save)
Submission
- Changes committed to a feature branch
- MR created with clear description of what, why, and impact
- Pipeline passes OPA checks and terraform plan looks correct
Post-Merge
- Terraform apply completed successfully (check pipeline)
- Bucket visible in AWS Console with correct name and encryption
- Application configured to use the bucket (if applicable)
- Platform notified to enable ELB logging on the load balancer (if
elb_logs_enabled)
Support
Known Gaps
- Bucket-level tags: Tag support is a known gap on the Platform roadmap. The current S3 module does not expose a
tagsattribute per bucket. Consistent tagging across infrastructure (RDS, S3, and others) is a priority for the Platform team so cost allocation, ownership, and incident response all work the same way. If you need tags on a self-service bucket before the module is updated, contact Platform and we'll apply them out-of-band.
When to Contact Platform Team
- OPA violations for settings you believe should be allowed
- Need to add bucket-level tag support to the S3 module
- Custom bucket policies (requires a JSON policy file added to the module)
- SFTP integration questions
- Production bucket changes that need special coordination
- Access requests for the Infrastructure repository
How to Get Help
- Check this guide and the troubleshooting section first
- Review existing bucket configurations in the tfvars file for reference
- Reach out in Microsoft Teams using the
@platformgroup tag. This tag works in any public Digital Product Group channel — you don't need to be in a Platform-owned channel to use it, but it will not resolve in private channels. Include in your message:- Your MR link
- The pipeline job URL (if there's an error)
- What you've already tried
Related Documentation
Internal (Norton)
- Understanding S3 Infrastructure — Architecture, OPA policies, and design rationale
- Managing Application Secrets — Detailed guide to AWS Secrets Manager
- Infrastructure Repository — Source code for all S3 configurations
External (AWS & HashiCorp)
- AWS S3 User Guide — Official AWS documentation
- Terraform aws_s3_bucket — Terraform resource reference
- AWS S3 Storage Classes — Glacier, Deep Archive, and other storage tiers
Appendix
Configuration Attribute Reference
Every attribute is optional. If omitted, the default value applies.
| Attribute | Type | Default | What It Does |
|---|---|---|---|
custom_name | bool | false | Use key as-is for bucket name (no environment suffix) |
versioning_enabled | bool | false | Enable S3 versioning — keeps all object versions for recovery |
sse_algorithm | string | "aws:kms" | Override encryption algorithm (aws:kms or AES256) |
kms_key_id | string | (shared key) | Override KMS key ARN for this specific bucket |
glacier_enabled | bool | false | Add lifecycle rule to transition objects to Glacier storage |
glacier_transition_days | number | 90 | Days after creation before objects transition to Glacier |
deep_archive_days | number | — | Days after creation before objects transition to Deep Archive (must be greater than glacier_transition_days) |
object_expiration_days | number | — | Days after creation before objects are permanently deleted by the lifecycle rule |
elb_logs_enabled | bool | false | Attach policy allowing ELB to deliver access logs to this bucket |
folder_enabled | bool | false | Create placeholder folder objects in the bucket |
folders | list(string) | [] | Folder paths to create (e.g., ["uploads/", "logs/"]) |
website_enabled | bool | false | Enable S3 static website hosting (serves index.html) |
public_read | bool | false | Allow public read access — blocked by default; coordinate with Platform for an exception before opening an MR (see Understanding S3 → Public Read Policy) |
sftp_server_enabled | bool | false | Flag for SFTP integration (reference only, no direct module effect) |
See also Understanding SAFE vs READ-MORE Properties for the risk level of modifying each attribute on an existing bucket.